
What can you learn from the starling cat? What can you learn from a cat? Instant solution to math problems
It’s quite easy to create a New Year’s mood, because everything is in the little things. Try making wonderful cards using New Year do it yourself, it’s very fun and simple, such an original gift will be appreciated by friends and family. We invite you to familiarize yourself with several master classes on creating postcards and turn the proposed ideas into reality.
Master classes
Mini-album-card “Herringbone”

What is needed:
- Pastel paper;
- Corrugated cardboard with an image;
- Double-sided tape;
- Spray paint;
- Cutter;
- Rhinestones;
- Decorative lace (golden);
- Pigment cushion;
- Glue “Moment” and for attaching rhinestones (transparent);
- Ruler;
- Layout mat;
- Creasing tools;
- Pencil.

Origami Christmas tree for postcard
Today, postcards in the scrapbooking style have become very popular, finished product looks bright and very beautiful. We recommend that you familiarize yourself with the scrapbooking master class for beginners.Required materials: 5 squares of colored paper measuring 10 cm; 9 cm; 7.5 cm; 6.5 cm; 5.5 cm.
How to do:

- So, you need to take the largest square and fold it so that you get a triangle.
- Unfold the square and make the exact same triangle by folding opposite sides of the cardboard.
- Place the unfolded sheet of cardboard in front of you.
- Fold the sheet along the folds to form a three-dimensional triangle.
- Now one of the sides of the figure will need to be bent inward, as shown in the photo.
- In the same way, fold the cardboard on the second side - this is the first module of our Christmas tree.
- We add the remaining modules using the same scheme; accordingly, their sizes should be different - from larger to smaller.
- You need to glue a small piece of tape to the top of the first module. We place the most large module inside the smaller one and do the same with the rest.
Christmas tree made of decorative tape for a postcard
Creating wonderful cards for the New Year 2019 with your own hands is very entertaining, so involve the kids in this process. Preparing for the holiday will be more fun with children.
To work, you will need a minimum of material - decorative tape, as well as strips of colored paper.

Manufacturing Features:
- Stick a piece of tape (preferably plain) vertically onto the cardboard blank; the top of the strip should be slightly narrower than the bottom - this is the trunk of the future Christmas tree.
- After this, you will need to cut the tape into strips of various sizes. The ends of the strips should be cut obliquely, imitating spruce branches.
- Glue the strips in a pyramid pattern (from largest to smallest).
Manufacturing instructions:

- Take green colored paper, cut out a circle, cut into two halves.
- Fold the edge of the paper as shown in the photo.
- Now make the next bend in the opposite direction, thus folding the edge again and creating a Christmas tree. The paper craft looks original.
- Glue the “branches” to the base using a glue stick and you can start decorating New Year’s cards with your own hands.
3D New Year card
Making voluminous New Year's cards with your own hands is not at all difficult; see this in the example of the proposed master class.You need to prepare:
- Double-sided tape;
- Multi-colored cardboard;
- Glue;
- Scissors;
- Figured hole punch.


Postcard “Christmas balls”
You can make an unusual New Year's card with your own hands in just a few minutes, prepare for 2019 great gift loved onesYou need to prepare:
- Colored paper of two colors;
- Scissors;
- Stationery glue;
- A pen for writing.

- Before you start making a New Year's card with your own hands, as in the photo, you will need to prepare everything necessary materials and tools.
- Fold the paper blue in half for the base, a background made in this way will contrast perfectly with the light blue “balls”.
- Cut out circles from light-colored paper.
- Fold each one in half.
- Now you need to attach these circles to each other, thus forming three-dimensional balls.
- Glue them on the outside of our card.
- Using a pen, draw the threads that “hold” the balls. Now your DIY New Year's card is completely ready, you just need to sign it.
Quilling holiday card
You can even create beautiful children's cards using quilling, try it, you will like it.You will need to prepare:
- Colored cardboard;
- Colored stripes;
- Glue;
- Toothpicks;
- Scissors;
- Corrugated light paper.

- Take quilling (green strips), make cuts at equal distances using nail scissors.
- Wind the prepared ribbons onto a toothpick, so you get several skeins, as in the photo.
- Now you need to fix the bottom of the skein with glue and straighten the fringe, you will get voluminous balls.
- Next, we proceed to the final stage of making a New Year's card with our own hands. You should glue the balls on a sheet of cardboard in the form of a pyramid, you will get a Christmas tree. Now you can “decorate” it as you wish.
Bright "Christmas tree"
You will need:- Various paper color range and textures;
- Double-sided tape;
- PVA glue;
- Decorative hole punch;
- Rope.

- You will need to fold a piece of colored paper in half, glue on a triangle of green paper and a small rectangle of brown paper to create a Christmas tree.
- Cut out circles of various sizes, then use a hole punch to make snowflakes.
- Glue all the figures onto the Christmas tree, decorate it with beads, and then decorate the lower part with openwork paper ribbon. You can also come up with your own own design postcards.
- Wrap the string around the card, then tie a bow. You can glue it at the bottom white paper for text.
Volumetric Christmas tree with beads
Required tools and materials:- Colored paper with ornaments for scrapbooking;
- White postcard without design;
- Scissors;
- Stationery glue;
- Double-sided tape;
- Ruler;
- Decorative pins with carnations.

- It is necessary to cut out 12 rectangles from paper, their length should be 10 cm. The width of the smallest one is 9 cm, all the rest are 6 mm wider.
- Wrap each of the rectangles around a pencil to create tubes.
- Now you need to glue them together, the longest one will be at the base, and the shortest one should be located at the top.
- Glue the Christmas tree to the card and decorate with carnations and pins. That's it. Everything is ready.
Children's card with fingers
Children get acquainted with this method of creating postcards in kindergarten, try doing this at home.

These photos demonstrate how you can keep the kids busy and prepare for the New Year; for this you need to prepare paints and paper or cardboard.

Postcards with “potato print”
If you don’t know how to have fun celebrating the 2019 Year of the Pig, then get creative with your kids. This master class demonstrates original creation holiday card.You will need:
- Raw potatoes;
- Paints.

How to do:
- Cut the potatoes in half, dip them in paint, and make a print on the cardboard.
- Now all that remains is to complete the details of the drawing, you will get a cute penguin or snowman.

You can make the following design from felt:


Ideas for inspiration


Quilling:


Video about creating a postcard in scrapbooking style:
Origami crafts for cards:


1. DIY New Year cards (“Christmas tree”)
The New Year tree is an indispensable attribute of the holiday. Therefore, postcards with her image will be especially appropriate. Plus, these cards can be very easy to make.
The New Year's tree applique can be made from plain or multi-colored strips of paper. Even you can make this New Year's craft with your own hands. small child.
Strips of paper can be replaced with colored tape or braid. They also make very beautiful New Year's cards.
A more complicated option - New Year's card "Christmas tree" from paper straws.
It’s very easy to make a New Year’s tree applique using store-bought stickers. Even a two-year-old can do this craft for the New Year with his own hands.
Simple and effective - homemade New Year's cards "Christmas tree" from ordinary buttons.
You can also embroider a Christmas tree with threads. Only in this case, the New Year's card should be made of high-density paper or cardboard. The holes must first be carefully made with an awl. The simplest option Christmas tree see photo below.
A more complex version of a New Year's card with a Christmas tree made of threads. To make this DIY New Year's craft, you will also need sequins.
By the way, you can embroider not only a Christmas tree with threads, but also something else, New Year’s. For example, this cute deer.
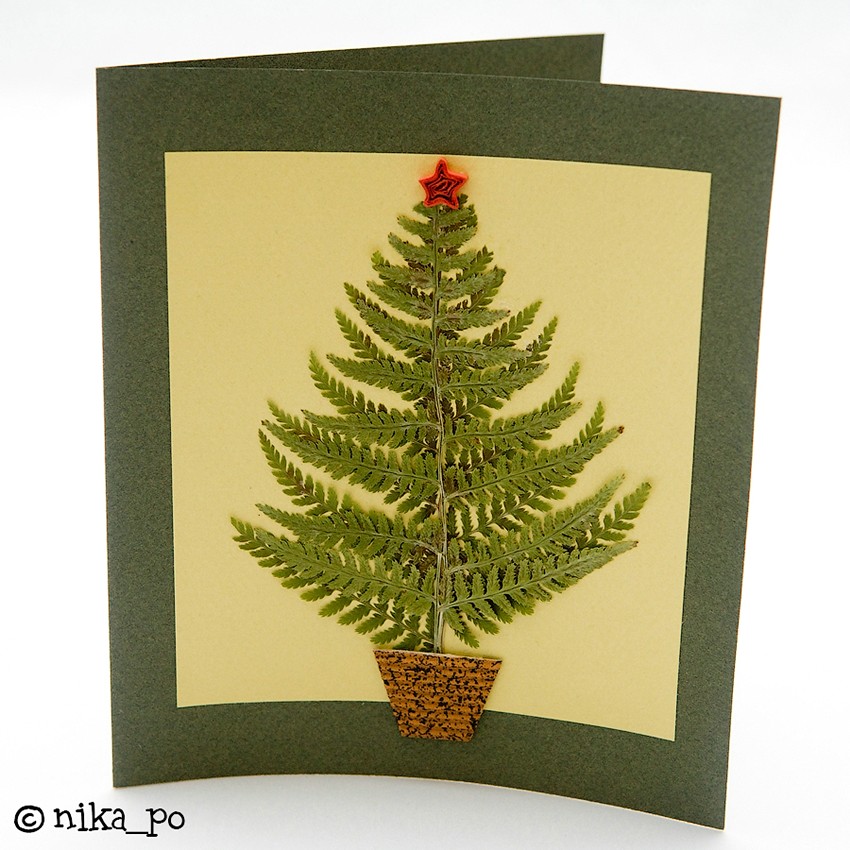
You can make an original DIY New Year's card from a fern leaf or any other plant similar to it. For example, cypress branches. Just take it top part leaf and glue it to the card. This will be a Christmas tree. All you have to do is decorate it with sequins or confetti made using a hole punch from colored paper. Instead of confetti, you can glue multi-colored pieces of plasticine to the Christmas tree. Even a child can do this part of the work of making a homemade New Year’s card.

I don't know what this weed is called. It grows along the roadsides like a carpet. Very common in middle lane Russia. Snow is depicted with semolina and a little sparkle is added.

The Christmas tree is made of fern, 2-3 branches are glued on top of each other.
There is also a fern here. But I cut off the sharp ends and collected the twig from individual leaves.

2. Do-it-yourself voluminous New Year’s cards “Herringbone”
We offer you several ways to make voluminous Christmas tree cards with your own hands.
Option 1.
You can find instructions for making these cute three-dimensional Christmas trees.
In order to make such a voluminous card for the New Year, you need to print and cut out Christmas tree blanks
The technique for making three-dimensional Christmas trees is similar to the method for making New Year's balls. But you don't have to glue them all together; instead, glue the Christmas trees onto the card.
Option 2.
Very beautiful New Year's craft with your own hands, accessible in complexity to a preschooler - a voluminous New Year's card "Christmas tree". The Christmas tree is made of rectangular strips of paper folded like an accordion.
Here are two more voluminous cards with a New Year tree made from a triangular-shaped sheet of paper folded like an accordion. Simple and tasteful!
Option 3.
Another voluminous New Year's card. Again, this New Year's craft for children is attractive not only in appearance, but also in its ease of manufacture.
To make such a New Year's card with your own hands, print out the templates on two sheets of cardboard or thick paper and use the detailed instructions from the photographs below. It is better if the sheets of cardboard are of different colors.
Finally, decorate the Christmas tree to your liking. The voluminous New Year's card is ready!
Option 4.
Origami Christmas tree. We invite you to make a three-dimensional New Year's card decorated with a Christmas tree made of paper made using the origami technique. To make the card look more elegant and festive, choose more beautiful paper for your New Year tree. Good for this DIY New Year's craft special paper for scrapbooking. By the way, making such an origami Christmas tree is much easier than it seems at first glance.
Option 5.
There is an easier way to make a Christmas tree using the origami technique. Detailed instructions in the photo below.
Option 6.
You can make a voluminous New Year's card with your own hands from corrugated paper.
Option 7.
The elements of the New Year's card in the photo below are made using the quilling technique.
3. DIY New Year cards (" Christmas balls")
Do-it-yourself New Year's cards with images of New Year's balls look good. The New Year's applique "Christmas balls" can be made from bright paper and decorated with ribbons.
Beautiful New Year's balls are made from colored strips of paper. Cut an unnecessary glossy magazine (advertising brochure) into thin strips and stick them on a white sheet of paper. After this, cut out circles from the resulting striped paper different sizes. Decorate your New Year's card with them.
New Year's balls can be made not only from paper, but also from buttons.
Original three-dimensional New Year cards with the image of Christmas balls
To make such a New Year's card with your own hands, print the following template.
Draw a circle on each square using a compass or an object with a round bottom of a suitable size. Cut out all the circles, then use with the following instructions for making New Year's balls. Just don't completely glue the balloon together; instead, stick it onto the card.
One more thing christmas decoration- a garland of flags will look impressive on a New Year's card. Flags can be made from paper or fabric and then glued or sewn onto the card.
Even very young children can make their own New Year's card with the image of a multi-colored garland of fingerprints.
And from a handprint you can make a New Year's card with Santa Claus.
1. On any surface that does not absorb paint (for example, a regular sheet pan), make a rectangular frame (the size of your card) from tape or tape.
2. Apply paint to the surface in an even layer. Use a cotton swab to draw a picture on a New Year's theme.
3. Attach a piece of paper. Your DIY New Year's card is ready!
4. Do-it-yourself voluminous New Year’s card “Snowman”
Separately, I would like to talk about this original, voluminous postcard for the New Year. Making such a paper snowman is very simple. Even a preschooler can cope with the task. Must be cut out of thick paper white three circles of different sizes. It is advisable to shade the edges of the circles so that they stand out better against each other. This can be done using crushed pencil lead or eye shadow. Also cut out a scarf, pens, carrot nose, eyes and buttons from colored paper. Glue all the parts of the snowman sequentially onto the blank of your New Year's card.
Here is the original card made by a scrapbooking artist.
And here are the versions of this voluminous New Year's card made by children.
5. DIY voluminous New Year cards
On the page cp.c-ij.com/en/contents/3058/list_15_1.h tml On the CREATIVE PARK website from CANON you can download ready-made paper models of three-dimensional New Year's cards. All you need to do is print them out, cut them out and glue them according to the instructions.
You can also find on this site large number templates for making ordinary New Year's cards with your own hands.
Another way to make voluminous New Year cards
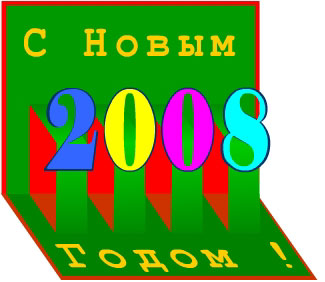
Craft "New Year's card 2008"
We invite you to make an original and at the same time very easy-to-make New Year's card with your child. She can serve the best gift to my beloved grandmother for the holiday.
You will need:
Dense colored paper or colored cardboard
- glue
- scissors
- a simple pencil, a ruler
- optional: colored markers, glitter for decoration
Instructions:
1. Take two sheets of thick colored paper or cardboard different colors, for example, red and green. One sheet will be the outside of the card, the other will be the inside. The inner sheet should be slightly smaller than the outer one.
2. Fold both sheets in half.
3. On the inner sheet, make 8 shallow cuts parallel to each other as shown in the figure.
4. Bend some of the resulting flaps inside the sheet (see picture).
5. Glue a second sheet of paper on the outside.
6. Cut out the numbers 2, 0, 0, 8 from colored paper. Before gluing them to the inner flaps, make sure that they are inside the card when it is closed. The craft is ready! You can decorate it with glitter and color it with colored markers if you wish.
6. New Year's crafts for children. New Year's applique
Postcards decorated with New Year's appliqué made from grains of rice turn out to be very delicate.
7. DIY New Year cards. New Year cards with snowflakes
Another DIY New Year's card idea is a card decorated with a snowflake cut out of paper.
If you have paper lace doilies at home, you can cut out snowflakes from them.
8. New Year's paper crafts. New Year cards made using the Iris folding technique
The Country of Masters website offers to make original New Year's cards using the Iris folding technique. The name of this technique - iris folding - can be translated as "rainbow folding". The design is filled with thin paper strips, which, overlapping each other at a certain angle, create an interesting twisting spiral effect.
The name of this technique, iris folding, can be translated as “rainbow folding.” The design is filled with thin paper strips, which, overlapping each other at a certain angle, create an interesting twisting spiral effect. To make a Christmas tree you will need a sheet of colored cardboard or thick paper, thin colored paper three different colors (it can be plain or variegated), an iris template based on a triangle, which you can build yourself or print a ready-made one. For gluing, use a glue stick.
First, get acquainted with the technique of constructing an iris template. For this work, the template is built on the basis of a triangle with a base of 14 cm and a height of 16 cm. The step is 1 cm. These dimensions can be changed at your discretion.
- Cut strips of paper three colors. The width of the strip should be twice the pitch, plus an allowance of 2-4 mm. For our step, the width of the strip is 22-24 mm. The very first stripes should be a little wider, because they cover the outer contours of the Christmas tree. It is difficult to immediately calculate how many stripes are needed. It is better to cut them while doing the work.
- Fold each strip in half lengthwise.
- Cut out five strips for the trunk of different shades measuring 35x20 mm. Fold them in half.
- Draw the silhouette of a Christmas tree on cardboard. Carefully cut it out using a utility knife or scissors. Draw or print an iris template.
- Place the cardboard on the template with the wrong side out. The cut silhouette may be slightly larger than the template. Secure the template, for example, with paper clips. All work will be done from the inside out.
- Do the barrel first. Apply a little glue to the area of cardboard around the slot on the right side. Glue the first strip. The fold line on the strip should be located along the line on the template. To glue the second strip, you can coat the top, bottom and previous strip of cardboard with glue. To prevent the strips from opening, they can be slightly glued in some places. Sometimes this technique does not use glue, but small pieces of tape that secure the strips along the edges.
- Fill the entire trunk with stripes.
- Take the longest and widest strip. First, just put it to work. The fold line should be located along the first line of the iris template. If the strip is too long, cut it. Glue the strip by smearing a little glue on the cardboard along the edges of the slot.
- Glue a strip of a different color so that it matches the outermost right line template.
- Glue the third strip below along the bottom border of the template.
- Prepare the next strip of the first color. First attach, measure the desired length, cut, then glue. Apply glue not to the strip, but to the gluing areas! Use a little glue, just so that the strip “sticks.”
- Glue the second strip of the second color, aligning it with the next line of the template.
- Glue a second strip of the third color along the next line. Continue gluing in the same order. Strictly clockwise, strictly alternating the selected colors. Each time the stripes will become shorter and shorter. In the end, small scraps cut off at the very beginning will be used. When there is a small empty triangle left at the end, cover it with a piece of paper in one of three colors.
Now you can turn the work over and admire the result. You can glue garlands and decorate the Christmas tree as you wish. We completed these and other Christmas trees at the master class on December 13, 2007 in about one hour. HAPPY NEW YEAR!
Summary: DIY New Year's cards. How to make original cards for the New Year with your child. New Year's crafts. Homemade New Year cards, postcard ideas. Volumetric cards for New Year's holidays. New Year's paper crafts with children. New Year's application.
1. DIY New Year cards (“Christmas tree”)
The New Year tree is an indispensable attribute of the holiday. Therefore, postcards with her image will be especially appropriate. Plus, these cards can be very easy to make.
The New Year's tree applique can be made from plain or multi-colored strips of paper. Even a small child can make this New Year's craft with his own hands.


Strips of paper can be replaced with colored tape or braid. They also make very beautiful New Year's cards.


A more complicated option is a New Year's card "Christmas tree" made from paper tubes. This original three-dimensional New Year's card "Christmas tree" is made of paper tubes. The Christmas tree is decorated with multi-colored buttons. Its trunk is made of a twig. To make this New Year card, it is advisable to use special scrapbooking paper or corrugated cardboard.


It’s very easy to make a New Year’s tree applique using store-bought stickers. Even a two-year-old can do this craft for the New Year with his own hands.


Simple and effective - homemade New Year's cards "Christmas tree" from ordinary buttons.


You can also embroider a Christmas tree with threads. Only in this case, the New Year's card should be made of high-density paper or cardboard. The holes must first be carefully made with an awl. For the simplest version of a Christmas tree, see the photo below.

For a more complex version of a New Year's card with a Christmas tree made of threads, see here >>>> To make this New Year's craft with your own hands, you will also need sequins or beads.


By the way, you can embroider not only a Christmas tree with threads, but also something else, New Year’s. For example, this cute deer.

You can make an original DIY New Year's card from a fern leaf or any other plant similar to it. For example, cypress branches. Just take the top of the leaf and glue it onto the card. This will be a Christmas tree. All you have to do is decorate it with sequins or confetti made using a hole punch from colored paper. Instead of confetti, you can glue multi-colored pieces of plasticine to the Christmas tree. Even a child can do this part of the work of making a homemade New Year’s card.

You can make a New Year's card either from a whole leaf of fern, or just from its upper part.


The technique for making three-dimensional Christmas trees is similar to the method for making New Year's balls. See the link >>>> But you don’t need to glue them completely, instead glue the Christmas trees onto the card.
Option 3.
Do-it-yourself voluminous New Year's card. To make such a voluminous card with a Christmas tree for the New Year, you will need three square sheets of green paper: large, medium and small. Also, in order to make a Christmas tree trunk, you will need a rectangular sheet of brown paper.

Fold each square piece of paper in half first (horizontally and vertically) to mark the center lines. Then fold them two more times diagonally. After this, fold each sheet into a pyramid (see photos 3 and 4). Glue a Christmas tree from the resulting pyramids by inserting them into each other. How to make a trunk for a Christmas tree is shown in photos (8, 9 and 10). Finally, glue the Christmas tree to your New Year's card.

Option 4.
Do-it-yourself voluminous postcard for the New Year. Making this voluminous paper card is much easier than it might seem at first glance. First you will need to cut out 5 halves of circles of different sizes from green paper: large, smaller, even smaller, etc. Fold each half of the circle in half, then in half again, and in half again. Unfold each piece and form accordion folds (see photo).

Now insert one piece into another and glue them together along the three central folds.
For the trunk, cut out of paper brown rectangle and also fold it like an accordion.
Glue your paper Christmas tree onto the card base. The easiest way to make snowflakes is from white paper using a hole punch or drawing with a cotton swab.
Option 5.
A very beautiful DIY New Year's craft, accessible in complexity to a preschooler - a voluminous New Year's card "Christmas tree". The Christmas tree is made of rectangular strips of paper folded like an accordion. But there is one nuance here. If you look closely at the photo, you will see that the tiers of the Christmas tree are made of strips of paper of different widths: the ones at the bottom are the widest, the closer to the top the narrower. In addition, the depth of the fold of the accordion is also different. The bottom strips of paper are folded into an accordion with a large "step". The higher you go to the top, the shallower the bend depth.


Here are two more voluminous cards with a New Year tree made from a triangular-shaped sheet of paper folded like an accordion. Simple and tasteful!


Option 6.
Another voluminous New Year's card. Again, this New Year's craft for children is attractive not only in appearance, but also in its ease of manufacture.

To make such a New Year's card with your own hands, print out the templates (template-1 and template-2) on two sheets of cardboard or thick paper and use the detailed instructions from the photographs below. It is better if the sheets of cardboard are of different colors.


 Finally, decorate the Christmas tree to your liking. The voluminous New Year's card is ready!
Option 7.
Origami Christmas tree. We invite you to make a three-dimensional New Year's card decorated with a Christmas tree made of paper made using the origami technique. To make the card look more elegant and festive, choose more beautiful paper for your New Year tree. Special paper for scrapbooking is well suited for this DIY New Year's craft. By the way, making such an origami Christmas tree is much easier than it seems at first glance. For one origami Christmas tree you will need 4-5 square sheets of paper of different sizes.

Option 8.
There is an easier way to make a Christmas tree using the origami technique. Detailed instructions in the photo below.


Option 9.
You can make a voluminous New Year's card with your own hands from corrugated paper.

Option 10.
The elements of the New Year's card in the photo below are made using the quilling technique.

3. DIY New Year cards (“New Year’s balls”)
Do-it-yourself New Year's cards with images of New Year's balls look good. The New Year's applique "Christmas balls" can be made from bright paper and decorated with ribbons.

Beautiful New Year's balls are made from colored strips of paper. Cut an unnecessary glossy magazine (advertising brochure) into thin strips and stick them on a white sheet of paper. After this, cut out circles of different sizes from the resulting striped paper. Decorate your New Year's card with them.

New Year's balls can be made not only from paper, but also from buttons.

Instead of buttons, you can use purchased decorative rhinestones.

The website www.hgtv.com offers to make original three-dimensional New Year cards with images of Christmas tree balls.

To make such a New Year's card with your own hands, print the following template. See link >>>> Draw a circle on each square using a compass or an object with a round bottom of a suitable size. Cut out all the circles, then use the following instructions to make Christmas balls. See link >>>> But you don't need to completely glue the balloon, stick it onto the card instead.

Another New Year's decoration - a garland of flags - will look impressive on a New Year's card. Flags can be made from paper or fabric and then glued or sewn onto the card.

Even very young children can make their own New Year's card with the image of a multi-colored garland of fingerprints.

And from a handprint you can make a New Year's card with Santa Claus or funny snowmen.


1. On any surface that does not absorb paint (for example, a regular sheet pan), make a rectangular frame (the size of your card) from tape or tape.

2. Apply paint to the surface in an even layer. Use a cotton swab to draw a picture on a New Year's theme.

3. Attach a piece of paper. Your DIY New Year's card is ready!


4. Do-it-yourself voluminous New Year’s card “Snowman”
Separately, I would like to talk about this original, voluminous postcard for the New Year. Making such a paper snowman is very simple. Even a preschooler can cope with the task. You need to cut out three circles of different sizes from thick white paper. It is advisable to shade the edges of the circles so that they stand out better against each other. This can be done using crushed pencil lead or eye shadow. Also cut out a scarf, pens, carrot nose, eyes and buttons from colored paper. Glue all the parts of the snowman sequentially onto the blank of your New Year's card.
Here is the original card made by a scrapbooking artist.

And here are the versions of this voluminous New Year's card made by children.


5. DIY voluminous New Year cards
Another method of making voluminous New Year cards can be found on our website at the link >>>>
6. New Year's crafts for children. New Year's applique
Postcards decorated with New Year's appliqué made from grains of rice turn out to be very delicate.


7. DIY New Year cards. New Year cards with snowflakes
Another DIY New Year's card idea is a card decorated with a snowflake cut out of paper. For information on how to cut very beautiful, unusual snowflakes from paper, see our special section “DIY New Year’s snowflakes”.

If you have paper lace doilies at home, you can cut out snowflakes from them.

8. New Year's paper crafts. New Year cards made using the Iris folding technique
The Country of Masters website offers to make original New Year's cards using the Iris folding technique. The name of this technique - iris folding - can be translated as "rainbow folding". The design is filled with thin paper strips, which, overlapping each other at a certain angle, create an interesting twisting spiral effect. Detailed master class For making this New Year's paper craft, see the link >>>>

Here is another New Year's card made using this technique. Instructions at the link >>>>

9. Original postcards for the New Year with your own hands. DIY New Year's Eve
We would like to introduce you to another interesting technology Making New Year's cards with your own hands. The Christmas tree and New Year's ball in the photo below are made using this technique.


To make a Christmas tree card, you will need:
Red cardboard sheet
- a sheet of colored origami paper (on one side - dark green,
on the other side - light green)
- scissors or a special knife for cutting paper
- glue
Print a stencil on a piece of green origami paper. Make cuts along the lines on it. Where the trunk of the Christmas tree is located, cut out a piece of paper completely. If you fold a sheet of paper in half before making cuts, you can cut it with scissors. In this case, even a preschooler will be able to make a postcard. If you want to avoid a fold in the center of the card, then it is better to make cuts with a special knife for cutting paper. Now all you have to do is fold the corners back and stick your workpiece onto the cardboard.

The "New Year's Ball" card is made in the same way. The stencil for making this original New Year's card can be downloaded from the link >>>>
The snowflakes from the section were made using the same technique. They can also decorate a New Year's card.

And another do-it-yourself New Year’s card “Christmas tree”, made using this technique.

To make this New Year's card, print the template onto a piece of white cardstock. WITH reverse side stick on a thin sheet of green paper. Using a paper cutter, cut out the corners and fold them over. Now cut out and fold your New Year's card in half. If you want to write New Year's greetings inside, then glue an additional sheet of green paper so that the letters do not show through the holes. For a detailed New Year's master class on making this card, see.
Another idea for a New Year's card that you can make with your child yourself. For a detailed master class, see the photo below.


DIY New Year's card ideas. When making New Year's cards with your own hands, it is appropriate to use colored self-adhesive foil. It can be purchased at craft supply stores.

The last card with which we would like to complete our review of DIY New Year cards is the three-dimensional “Snow Globe” postcard. In the photo below it is shown on the left side. This Christmas card is made using a clear dairy lid. You will find a master class on how to make such original three-dimensional postcards on Veronica Podgornaya’s website.

These two postcards were made by the author of the blog Naftusina's hand-made art. A snowdrift and a cloud are cut out of felt. Christmas tree and bear - figured buttons. There are white beads sprinkled inside the card. The postcard looks incredible! You shake her and it's snowing! On this site you will find two more interesting DIY New Year cards. Santa Claus and the Snowman are hurrying through the snowy snowdrifts. The snowdrifts and cloud are cut out of felt, the characters are made from buttons and felt, the tree is a real twig, which is slightly pasted over with pieces of padding polyester, snowflakes are drawn with a helium pen.

Material prepared by: Anna Ponomarenko
At first glance, it may seem that a postcard is the most banal way to wish a person a Happy New Year. Most often, a card is an addition to the main gift. But despite all our desires, it is not always possible to buy full-fledged gifts for absolutely all of our loved ones and friends. And this is where a postcard always comes to the rescue! But so that the recipient does not feel deprived of your attention, let's learn how to make New Year's cards with our own hands. Let's consider options that all beginning cardmakers can do.
First, let's get acquainted with the basic rules for creating postcards.
Basic rules for creating DIY postcards
- Any, including New Year's cards self made should be initially thought out in terms of composition.
- First, make a draft version of the postcard, and then transfer it to the final version. Prepare all the necessary elements, arrange them in the order you like and only then can you glue them.
- When choosing a design for a postcard, pay attention to the interests of the recipient: what colors he likes best, what exactly he prefers.
- There should be no handwriting on the front of the card unless you have perfectly beautiful handwriting. It is better to make inscriptions using special stamps or cut out ready-made letters or words from decorative paper.
- It is better to write wishes and congratulations inside the card, so do not forget to leave space for this.
- When creating a handmade card, be careful above all else! Even a drop of spilled glue can ruin the entire appearance, so if the error cannot be corrected, it is better to do it all over again.
- High-quality materials and tools are the key to your success. Make a list of everything you need, this will save you from unnecessary expenses and prevent you from forgetting anything.
- Any little thing can be useful in creating a postcard, even those that at first glance are not needed at all. For example, all kinds of ribbons and tags, buttons and bows, ropes and scraps of fabric, pieces of paper, beads, etc.
- Show your imagination, experiment! And if at first it’s difficult for you to come up with something of your own, use ready-made templates.
And since we are talking about the materials and templates used, we classify the postcards according to this principle.
Related articles
 The best amulets against the evil eye and damage Amulet against the evil eye with hands for children
 How to read the Psalter correctly
 Delicious dishes with sausages
 A glimpse of Bella. Romantic chronicle. A glimpse of genius. Messerer about Akhmadulina Boris Messerer glimpse of Bella romantic chronicle
 I dreamed that I was sailing on a boat on the river
 How to cook beef entrecote in a frying pan
 About the company Foreign language courses at Moscow State University
 Which city and why became the main one in Ancient Mesopotamia?
 Why Bukhsoft Online is better than a regular accounting program!
 Which year is a leap year and how to calculate it