
What to make from 10 kopeck coins. DIY coin painting: detailed master class with photos
What can you buy by spending a mountain of coins unnoticed in your home? What if you don’t waste them, but find a more worthy use for the shiny circles? Coins have been used in design for a long time.
This is a very comfortable, practical material that is suitable for both making mosaics, bracelets and stands, as well as for simple decoration of pots for house plants.
Once you get acquainted with these ideas, you will no longer pass by dropped coins! A little imagination, diligence, and this is what you will get. This is very nice!
What to make from coins
- Using a coin minting stamp you can make such a cute pendant. Coins brought from another country will look especially good.
- A picture lined with coins. A little paint, an original frame, a canvas - what else is needed for a piece of modern art? You can give such a gift to a friend and assure him that his material well-being is guaranteed. Good idea!

- A variant of a coin necklace with complex weaving. It will look great with an African style dress!

- Coins can be flattened and the design can be erased. Such flat coins will make an extraordinary decoration...

- Coin buttons are an addition to casual clothing.

- You can preserve the charm of round shapes and get rid of too intrusive shine. Simply paint the coins with paint.

- Frame for mirror or photographs. You won't need too many coins.

- I definitely wouldn’t refuse this!

- Covering a ring with coins and using it as a holder for napkins and holiday letters is an unexpected idea.

- A tray lined with coins! Will fit into any interior.

- A bar counter or countertop in coins will become an expressive detail of the room.

- Just a coffee table. It’s nice to sit and enjoy such a cozy evening...

- Ordinary vases can be turned into eye-catching, interesting things. Covering them with coins is as easy as shelling pears, but the effect!
- Coins can enhance almost any item. Even the horse's head is made of wood.

- Money and letters. Coin lettering is a fun way to set a themed mood in a room.

- An artsy house using coins for the roof! Better than a cookie house. It can be used not only as a bird feeder, but also as a mailbox.

- A whole wall of coins!

- Sometimes coins seem especially appropriate...

- Do
According to the ancient Chinese teachings of Feng Shui, a person's luck and well-being are positively influenced by the use of various signs of wealth. The money tree is called one of the most powerful symbols of attracting material wealth. At the same time, it is not at all necessary to buy a living plant and grow it for a long time. You can create a tree in the form of a painting from coins with your own hands. Such a wonderful craft will fill your home with positive energy of well-being and happiness, as well as bring prosperity.

Canvas for good luck
To make the painting you will need the following materials:
- photo frame, size is selected depending on the size of the tree;
- fabric for the main background, it is better to choose a denser one;
- paper napkins;
- glue;
- coins, all of the same denomination is selected, or they can be of different denominations;
- heat gun;
- acrylic paint, it is recommended to choose black and bronze;
- scissors;
- brush;
- marker or pencil;
- a small piece of foam rubber or sponge.
The master class consists of the following stages. First stage. First you need to carefully remove the glass from the frame and put it aside for a while. Place the cardboard base on the fabric and trace with a pencil. Cut out the fabric and apply a thick layer of glue onto the cardboard. Glue the fabric onto the cardboard and dry thoroughly. Now you can draw a sketch of the future tree.
While the fabric is drying, we don’t waste time, but prepare the coins for work. They need to be cleaned and degreased to make it easier to apply paint.

Second stage. Each napkin needs to be folded in half and cut to get long flats. Depending on the texture of the future tree, the strips are made from one to one and a half centimeters in size.
You can start twisting the bundles. Place a strip of napkin over a cup of cold water. She should be completely wet. Remove carefully so that the strip does not tear or lose its shape.
We hold the strip in the palm of one hand, and with the other we begin to slowly twist it into a tourniquet. The process is similar to creating “sausages” from plasticine. In this case, you should try to twist the tourniquet at an angle of approximately 45 degrees. You need to twist it as tightly as possible and, placing it at a short distance from each other, let them dry well.


Third stage. To make it easier to work with flagella, you need to moisten them a little with water. You can use a flower sprayer. Next, take one flagellum, lubricate it well with glue and place it on a prepared base made of cardboard and fabric. A sketch of the tree will help you distribute the strands in the right direction. But it is worth remembering that you do not need to apply too much glue. Excess glue can degrade the appearance of the wood once it dries.

Fourth stage. To create thin branches of the tree crown, you can use a glue gun. Hot glue is applied along the contour of the branches of the sketch in thin strips. And while it is not yet frozen, we glue the coins. To create a more three-dimensional image, you can paste several layers of coins, placing them in random order. The number of layers and coins depends only on the wishes of the master. The “cobwebs” remaining on the tree after using a glue gun can be easily removed with a stiff brush. After this, the painting must be given time to dry completely.

The final stage. Now the elements of the picture, namely the trunk and crown, need to be primed. Using a piece of foam rubber, apply a layer of black acrylic paint to the entire tree. And again we leave it to dry. The tree trunk will have to be coated with black paint one or two more times. When dry, napkins can almost completely absorb the color.

Next, take bronze-colored acrylic paint and pour a little into a shallow container. We dip the sponge very slightly into the paint and easily, with the same effort, we go over the entire tree and background. If you are not sure that it will turn out well, it is better to first practice on a sheet of paper or a piece of fabric.

Instead of bronze acrylic paint, you can use silver or gold paint. You can try paint combinations on a different surface, this will help you choose the final option.
You can also choose spray paint rather than acrylic paint for your work. When painting with this paint, remember that when applying you need to hold the can at a distance of about 50 cm, and spray with smooth movements. If desired, the frame can be painted or decorated with coins. Then turn our picture frame face down and carefully lay the glass. Secure the resulting picture with clamps to the frame.
The painting with the image of the money tree is ready!

Today you can buy almost everything you want. However, now things made with one's own hands are considered more valuable. And not just because it is exclusive and no one else will have anything like it, but also because a person will definitely put a piece of his soul and positivity into such a homemade product. And this is a very valuable gift! It is worth noting that after reading this article, everyone will be able to conduct a “Crafts from Coins” master class among their family, friends and acquaintances, because there is a lot of information and it is very interesting.
Monisto
So, if a person has a lot of coins that can no longer be used to pay in a store, you can put them to good use. Why not create crafts from coins with your own hands? What could it be? First of all, decorations. You can make a chic necklace that our ancestors wore in ancient times. It's called monisto. How to make such a product? To do this, you need to take a cord or chain, as well as a lot of coins. It is worth noting that the necklace can be either in one row or in several. In order to fasten the coins to each other, you will need to drill small holes in them and thread thin wires. If the necklace will be in several rows, you need to fasten the pennies at the bottom and at the top, if desired, you can also on the sides. You can also attach coins to a chain using a wire that will be threaded through a hole in the chain and into a hole in the coin. If the pennies are attached to the cord, then it can simply be threaded through the holes. You can attach a special hook to this necklace for closure, but it can also simply be tied at the back of the neck with a bow.

Ring
What other crafts can be made from coins? Why shouldn't a man give his beloved a ring? In her jewelry collection, it will definitely be the most valuable, because it will be created by hand. So let's get started. First of all, you need to drill a hole in the coin exactly in the center. How to achieve this? To securely fix the money, you can make a hole in the board into which the penny will fall. Next, using a small diameter drill (about 10-13 mm), you need to make a hole in the coin strictly in the center. To prevent the tool from jumping off, the center can be marked with a core. After these manipulations you should get something similar to a puck. If this is the case, then everything is in order and you can move on. Next, this workpiece must be put on a metal rod and processed with a hammer evenly over the entire surface (as if pressing it against the rod). An important point: in order for the inscriptions on the coin to be preserved, all manipulations must be carried out with a rubber hammer. It is also better to warm up the money a little first, so it will be more pliable and the process will not take much time. However, here it must be said that such coin crafts may not work out the first time; for an excellent result, you will need to ruin a few pennies. So this is the rough result of the decoration. Now you need to bring the product to a beautiful state. To do this, you just need to polish the ring thoroughly. This can be done using a special paste and soft cloth. It is worth noting that these manipulations can take quite a lot of time, so it is better to be patient. Another secret: you need to heat it up again and put it in cold water, so the scale will come off and the polishing will be more successful and faster. That's it, the ring is ready!

Photo frame
If the previous options were quite difficult to implement, then there are easier coin crafts that you can create with your own hands quite quickly. Why not make an interesting photo frame? To do this, you need to take a cardboard of good density (preferably colored) and a photograph, and also stock up on various coins. The photo is placed in the very center of the cardboard, now all that remains is to decorate the frame with pennies. To do this, they just need to be “planted” with superglue. It is worth noting that you can decorate the frame in different ways. Some may find it sufficient to glue a few coins to the corners of the cardboard and stop there. And someone might want to cover the paper thickly with coins, leaving no room for clearance. You will get a money photo frame like this.
Tree
Can also be made from coins. The craft, by the way, is not only beautiful in its result, but can also carry a special meaning and be a kind of magical magnet for money. To make it, you need to stock up on small change (you can have one or different values), and, of course, prepare a tree. What could it be? This can be an ordinary snag from the forest (it can be treated with fabric or paper), to which wire branches will be attached. Here they hang coins, pre-drilled in the very center. A tree can be woven from beads, or rather, the base can be woven with beads and small branches can be made. Only you can hang some coins on them, because they simply won’t be able to hold on. Or you can go the simple route, decorating an ordinary flowerpot with coins suspended on strings or wire.

Statuette
What other crafts can be made from coins? You can make an interesting figurine - a money waterfall. For this you will need a beautiful cup, an old fork, saucer and coins. And, of course, superglue. First you need to bend the fork so that it can hold the cup on itself, and at the same time fit well and stick to the saucer. The base is ready. Now everything needs to be decorated with coins. It is necessary to glue the product from the bottom up, first decorating the saucer with scattered change, then, going up the fork, stick the coins and attach a little change in the cup. That's all, the money waterfall is ready!
Casket
Let's move on: what other crafts made from penny coins exist? Why not make a box out of old odds and ends? To do this, you can paste coins over an old piece of wood, but that will be too easy. Or you can make a box entirely out of pennies by gluing them one to the other. You need to start with the legs, then make the bottom, placing coins on top of one another in the same way as the scales of a fish are located, then build the walls again (you can simply create turrets, only in this case the box will be transparent). To make the lid, you will still need a wooden base - the top from an old box, which is simply pasted over with coins.
Suspension
Crafts made from coins can be quite simple. Why not make a simple pendant. A product made from an old coin will look especially beautiful. To do this, you just need to drill a hole of the required diameter in the money and thread a chain or thread into it. To make the decoration look more beautiful, you can attach a coin to the base using a thin wire. This way the penny will not spin around and will always lie beautifully on your neck.
Is your piggy bank about to burst with coins? And there’s nowhere to put it, and it’s a pity to throw it away? Well, it's time to put your coins to work and make beautiful crafts from them. We have put together a selection of great ideas and step-by-step master classes for you. Today you will understand that it was not in vain that you saved coins all this time.
For crafts, you can use both current coins and those that have long gone out of use. Most often, craftsmen use 1, 5 or 10 kopecks. For jewelry (bracelets, necklaces, brooches, etc.), it is better to choose foreign coins, if you have them - they look more respectable in accessories.
How to drill a hole in a coin?
Let's answer this question at the very beginning, because it will be useful for many crafts. To make everything clear, we have found two short training videos for you.
If you have a drill, make a hole in the coin according to these instructions.
If you don’t have a drill, we will make a hole in the coin using a regular sewing needle.
You won't always need holes, but some of you will find them useful.
How to connect coins?
There are two options here. If you made holes in the coins, you will need wire or special rings for jewelry. All this can be easily found in the creativity departments.
If you want to make a three-dimensional craft out of coins or paste them over any object, you need to glue them together. To do this, it is best to use a glue gun. It's convenient and reliable. If you don't have one, choose superglue that can hold metals in place.
Now let's get to the fun part. Take advantage of the master classes and get to work!
Bowl
Wash the coins in soapy water. It is best to keep them in liquid for several hours. Coins are quite dirty, and this craft will be used often. Next, dry the coins well.

We will need:
- plastic bowl;
- polyethylene;
- glue;
- coins.
Instead of a plate, you can take a balloon. True, in this case the craft may turn out a little askew and not entirely stable. The plate will most likely have to be thrown away, so take the unnecessary one. However, if you are very careful, it will survive.
Wrap the plate in plastic wrap. For reliability, you can secure it with tape. Start gluing the coins. An important point is to glue them by the side edges. Don't worry if the glue bleeds a little; We'll sand it down later.
Leave the structure to dry for 4-5 hours. Then carefully remove it from the bowl and plastic. Take some fine sandpaper and carefully remove any excess glue. Cover the coins with ornamental varnish on top - for reliability.
3D star
You can place any other figure. The main thing is to have a stencil or draw the outline yourself. If you are making a star, you can put the number 23 with coins and use the panel as a gift for Defender of the Fatherland Day. You can make a gift for Valentine's Day in exactly the same way - just choose a heart as a stencil.

We will need:
- photo frame;
- velvet paper;
- stencil.
Insert velvet paper into the photo frame. Remove the glass - we won't need it. Draw a star. Lay out its outline in one layer. Then add another layer of coins. Gradually reduce their number, increase the volume.

In the same way you can lay out a flower or, for example, a Christmas tree. Imagine!
Mirror or frame
You can use coins to decorate a mirror or make a photo frame. This will add zest to the interior.

We will need:
- wooden or cardboard frame;
- ornamental varnish;
- sandpaper;
- acrylic (optional).
If you are making a frame from scratch, you will need to make a thick backing. To do this, use plywood. If you are decorating a finished one, then perhaps it should be sanded and painted so that the spaces between the coins look beautiful.
Simply lay the entire surface of the frame in an even layer or pattern. You can add a second layer to hide any gaps that occurred when you laid down the first batch of coins.
If desired, you can decorate the coins with metallic spray paint.
Feeder
Worried about birds? This means your coins can be used to decorate a bird feeder. The result will be a beautiful and useful craft.

We will need:
- finished house;
- plywood.
If you don't have a ready-made house, you'll have to make it from scratch. You can take a cardboard box and line it with plywood. The most important thing is that the roof is strong enough, otherwise it will not withstand the load of coins. Glue the coins in rows from bottom to top. It is better to lay the last row additionally.
We would not advise you to cover the roof with an ornamental varnish, as this may harm the birds. Only do this if you have a special non-toxic varnish.
Bracelet
If you have some interesting coins from different countries that you brought for good luck, it's time to get them out. Why keep such beauty in a piggy bank where no one can see it? And carrying them in your wallet is somehow boring. If you really want to attract luck and money, always keep coins with you - make a bracelet with your own hands.

We will need:
- metal rings;
- accessories for a bracelet.
Drill two holes on each side of the coin. If the rings are thin, do this with a needle. Fasten the rings and connect them to each other. Add a clip.
Now your lucky coins will always be with you!
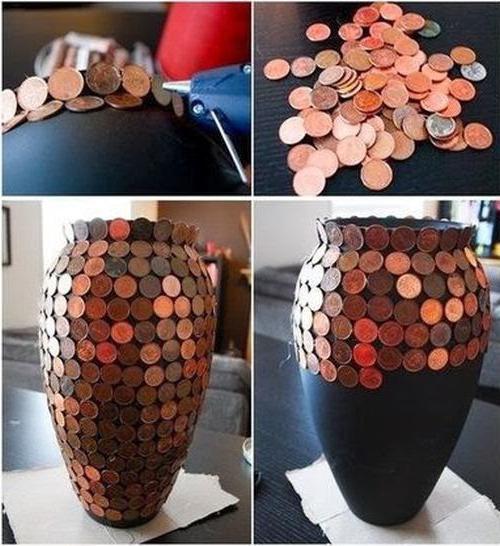
Vase
Coins are a great way to transform old home decor. Take a look at the vase decorating tutorial. Perhaps it will inspire you to remake something else.

We will need:
- vase;
- acrylic paints;
- ornamental varnish.
It is best to paint the vase in one tone. Acrylic fits perfectly on glass, so it is better to choose it. Next, we cover the entire surface of the product with coins. The gaps won't look unsightly if you painted the craft in advance.
An inexpensive set of acrylic paints can be ordered on AliExpress (check this link). Bright colors, excellent quality, high durability - a universal option for a wide variety of crafts.

Many people like to give money trees made from coins to their friends. Why not give a vase in which you can put beautiful twigs or flowers? The same money tree, only more interesting.
Letters
Typically, decor in the form of large letters is very popular with teenagers. So if you have a school-age child, suggest this idea to him. Or decorate your entryway. And letters made from coins can also be a good gift.

We will need:
- letter stencils;
- cardboard or plywood;
- paints.
If you want to make letters on cardboard, choose the thickest one (the kind usually used for boxes). Letters can also be cut out of plywood, if you have such an opportunity.
You can take letter stencils from our selection - this way you will save your time. Next, simply paint the letters cut out from the template to hide the spaces between the coins. Fix the coins in one layer. If the material allows, you can lay out the second and third layers.
You can use this tutorial to make your own anniversary gift. Lay out the numbers from the coins, give the hero of the occasion such a “medal” - let it attract wealth.
Tray
Not sure how to decorate your homemade tray? Or do you need to hide a worn surface? Coins will come to the rescue again.

We will need:
- ready tray;
- coins;
- glass;
- dye.
If you are making the tray from scratch, you will need to sand and paint it. If this is a remake of a finished item, you can skip this step. Glue the coins to the bottom in any order. Or post a pattern.
Then the surface must be covered with glass that matches the size of the craft. If you don’t have glass, coat the craft with several layers of varnish. Do not leave coins just like that - the contact with food will be too close, and this should not be allowed.
Necklace
Here's another great way to keep coins for good luck and wealth on your person. With a little effort you can make a beautiful fashionable necklace. Massive accessories are now in trend, so it makes sense to master this craft.

We will need:
- accessories for necklace;
- hammer;
- rings.
Using a hammer, all the coins need to be slightly flattened. This will help remove the pattern from them, polish and thin them. Still, it’s not very nice to wear ten-kopeck coins around your neck, right?
Now make small holes in each coin. Insert metal rings and attach them to the fittings.
If you work well with a hammer, no one will even guess that you made your jewelry from ordinary coins.
Table
Coins are used to lay out ceilings, floors and a wide variety of furniture. If you have a few thousand extra coins, you can do this. If your supplies are more modest, make a decorative table for the country house.

We will need:
- table;
- glass;
- coins.
We glue the coins with superglue or a glue gun. To make the process go faster, you can apply it not to the coins, but to the surface of the table itself. Move in small sections so that it does not have time to dry out.
It is best to choose a table that can be covered with glass. If you don't plan to put food on it, this is not at all necessary. You can also use varnish or coat the coins with spray paint - that is, use them only to create a beautiful relief.
If you liked these coin crafts, try to repeat any of them - it's not difficult. Bookmark this page or save the pictures for reference so you don't get confused in your steps. You can also create your own works, inspired by these ideas and guided by the attached instructions. We wish you good luck in your creativity!
Views: 10,170
More and more often, coins are lying around the apartment in different drawers and on shelves. If you have accumulated quite a lot of small items, you need to find a worthy use for it. Moreover, you can make decorations, panels, and decorate stands and tables from 10-kopeck coins.
Using a variety of handicraft techniques, it is easy to create a variety of products for interior decoration and just for creative pleasure. And coins go perfectly with many materials.


Decorating frames is a fairly popular type of needlework. Coins from different countries will remind you of your travels and are perfect for decorating travel photos. It's easier to work with a wooden frame - then you can quickly change photos.
The coins are glued to the frame one by one using superglue. It is not advisable to glue a lot of money, since the product will become quite heavy. To disguise the gaps between the coins, the frame is pre-painted in a golden or silver shade.


Jewelry made from kopecks can be very diverse - bracelets, earrings, necklaces. To create complex jewelry, you need special tools and skills in working with wire.
To make a simple bracelet from coins, you will need a decorative copper-colored chain bracelet, small rings, a few pennies, a drill, and a vice. Preparatory activities - drill holes in the coins, then attach each little thing with a small ring to the chain.
The easiest way to weave a bracelet is using special coins with holes. To make the decoration look stylish, it is advisable to use a leather cord.


According to the fashionable trend of Feng Shui, you can attract monetary well-being into your home by decorating with coins. An original version of the craft in this case will be a stylized money tree. To create it you will need clay, wire, coins of various denominations, paint, superglue. Stages of work step by step:
- A round base is made from clay and left to dry.
- A dense trunk is twisted from the wire and individual branches are formed.
- The trunk is glued to the base with superglue. The surface is additionally decorated with coins.
- Coins are glued to each branch, placing them almost horizontally.

To give the craft a finished look, it is painted in one color. It is better to use paint in cans. Both shiny golden trees and matte soft silver ones look original.


An unusual souvenir or gift – a panel depicting a money tree. To create this craft you will need cardboard, corrugated cardboard, twine, PVA glue, acrylic paints, and gold enamel. Step by step process:
- 2 sheets of corrugated cardboard measuring 15x25 cm are covered with ordinary cardboard on both sides.
- A frame 2.5 cm wide is cut out of one pasted sheet and glued to the whole sheet.
- The cut twine is laid out on one side of the picture, forming a tree trunk. The ends protruding beyond the frame are cut off and fixed with glue at the end.
- Coins are glued to thread branches, forming a crown.
- When the panel dries, it is painted on both sides with paint (blue, green, dark gray).

The finishing touch is the application of gold enamel with light sliding movements. Thanks to this, the panel will acquire relief and effectively decorate any room.


It is unlikely that anyone will refuse an original souvenir in the form of a waterfall made of money. Even a schoolchild can create an unusual craft with his own hands. You will need: a metal fork, a saucer with a cup, superglue, silver spray paint, coins. Sequence of actions:
- The two ends of the fork are bent so that the cup can be glued to the fork and fixed to the saucer.
- Several coins are coated with spray paint.
- The base is wrapped with a bandage or cotton pads, which are tied with thread.
- The coins begin to stick in the cup, gradually covering the base of the fork and saucer.

To apply the final decor, the mug and the edges of the saucer are covered with film. The open part of the craft with coins is painted with golden paint.


The box has a rather exotic appearance, all the walls of which are lined with pennies. Creating such a craft from coins with your own hands is not a matter of one day. After all, it will take time to collect many identical coins and gradually glue them together to form a craft.
A great idea is to create a box using a minimum of hard money, a little time and imagination. To do this, you will need a ready-made box (preferably of a certain geometric shape). The essence of the work is to cover the surface of the box with coins. The base is first cleaned of dust and contaminants. It is better to glue metal elements with superglue. Coin boxes made of pennies of the same color look very elegant.


To make a bright money craft, select a vase of any size and shape. You will also need coins (preferably the same size), a heat gun, black paint, or copper-colored paint in a can. Work progress:
- The vase is coated with black paint and left to dry.
- The coins are painted with copper-colored paint from a spray can.
- The pennies are evenly glued to the vase, row by row.
To create crafts, you can use transparent glass vases and decorate surfaces not only with coins. Small colored beads, lace braid - you can combine a variety of materials. Such vases will exquisitely decorate interiors of different styles. Using the same principle, you can decorate a fruit dish.


Creating a craft from a large number of pennies will take a lot of time. You can collect different animal figures, models of cars or ships. You must first draw up a detailed drawing in order to calculate the dimensions of the product taking into account the diameter of the coins. For a spectacular look, all the money is painted the same silver color. The decorative elements of the ship will be stripes of golden coins and blue paper sails.

If you get a little creative, it’s easy to create a picture - an owl made of coins. A great idea is to depict a money tree in the background of the craft and place an owl on a branch. You will need a picture with a frame, coins of ten kopecks and larger, twine, gold paint, and a heat gun.
Initially, a sketch of the painting is drawn on the base. A tree trunk and a branch-support for the owl are formed from pieces of twine. The crown of the tree is laid out with large coins. The body of the owl is formed with pennies, which are glued in a checkerboard pattern, creating the appearance of plumage. Paws, head, eyes, wings are cut out of thick cardboard. All elements are glued to the body. When the glue dries, the picture-panel is covered with golden paint.

There is a belief that a horseshoe is a sign of good luck, a symbol of happiness. It is believed that it is also a talisman or amulet that protects the house and household members from bad luck.
It’s not difficult to create a talisman from coins with your own hands. A blank is cut out of thick cardboard in the shape of a horseshoe. The front side is covered with coins of the same color and size, placing them in a checkerboard pattern. A strong hanging thread is glued to the back of the workpiece and the surface is also filled with pennies.
When hanging a craft on the wall above the door, you need to keep in mind that the horseshoe can be positioned in two ways:
- the position with the “horns” upward attracts positive energy into the house and symbolizes the house – a full cup. The horseshoe is hung indoors;
- Outside the house, the horseshoe is hung with the ends down. It is believed that the talisman protects the home from troubles.
There is an opinion that a donated horseshoe carries a greater energy charge. Therefore, such a souvenir craft will be an excellent gift for any occasion.


An exquisite flower, decorated in topiary style, will always be the center of attention. To create crafts, it is advisable to use 10-kopeck coins. You will also need a foam ball, woolen threads, hot glue, a pot, thick wire, self-hardening paste, and gold paint. Step by step process of creating a flower:
- The ball is wrapped with threads and pasted over with coins, placing them in a checkerboard pattern.
- A spiral barrel is formed from the wire.
- The pot is filled with a self-hardening mass and a spiral is installed in it.
- The wire is wrapped with twine and a ball with pennies is placed on it.
- Decorative sheets are glued to the trunk, and the entire craft is covered with golden spray paint.


Several gold coins are painted separately and are used to cover the base of the pot.
Given the many ideas, you will no longer be able to throw coins into the far corner of the drawer or throw out the table, because it seems that the tabletop can no longer be embellished. Even if you don’t urgently need to create a gift, you can still come up with a sketch of a pendant made of coins in the shape of a heart or an original circle. Ideas are in the air, so you shouldn’t throw coins around, it’s better to collect them in anticipation of creative inspiration.
Related articles
 The best amulets against the evil eye and damage Amulet against the evil eye with hands for children
 How to read the Psalter correctly
 Delicious dishes with sausages
 A glimpse of Bella. Romantic chronicle. A glimpse of genius. Messerer about Akhmadulina Boris Messerer glimpse of Bella romantic chronicle
 I dreamed that I was sailing on a boat on the river
 How to cook beef entrecote in a frying pan
 About the company Foreign language courses at Moscow State University
 Which city and why became the main one in Ancient Mesopotamia?
 Why Bukhsoft Online is better than a regular accounting program!
 Which year is a leap year and how to calculate it