
Large toys for the city Christmas tree. Giant Christmas balls made from CDs. Illuminated option. MK. Idea for decorating a street Christmas tree
Christmas tree decorations can be made from anything. Let's think about what New Year's toys we can make from old CDs.

I found these Christmas tree decorations in one of the overseas stores for only £10.49. But, as they say, we have our own hands. And we can use this interesting idea to decorate a Christmas tree (or not a Christmas tree) in the yard. The advantage of such toys is that they will not get wet, will not fade and will last for more than one winter, especially since they take up very little storage space.


And although I am not a lazy person, I still doubt that I will be able to cut it out so neatly. Therefore, I had to look further...And I found such a magnificent Christmas cross, well, even if it is not very neat, but this one was made by the hands of a non-professional, so there is an incentive to try to repeat it, especially since it only requires 2 disks, glue, cardboard and beads or glitter...

And in the end, I finally turned on my imagination - after all, you can cover the circumference of the disk with a decorative cord, you can glue the cord in the shape of a star, a Christmas tree, or even a bell. Or you can try gluing to it a molding (car) or foil in the shape of a snowflake, decorative stones, ribbons, beads, sprinkle with sparkles... And if you try to cut the disk into pieces and fasten them together, you will end up with something like a garland - and not a simple one, and sparkling under the rays of the sun!!!
Making snowflakes from CDs
1) CD partitioning
Take a ruler and mark lines at 8 ends. As shown in the picture.


Mark 2 additional lines on each side of the expected end of the snowflake, as shown in the photo.

2) Cutting a snowflake from a CD
The most difficult thing to make is cutting. Be very careful and careful, cut CDs are very sharp.
We cut out the snowflake with slow movements, otherwise the disk will simply burst.
The complete sequence of cutting a snowflake is shown in the photo below.
First, cut out the supposed tips of the snowflake's legs.


Then we bend the excess parts up and cut them off.


It should look like this:

We cut out small triangles, 2 of them at each end of the snowflake.

Congratulations, you have done the hardest part, in the process of making a snowflake, now you need to erase the marker lines paper towel soaked in alcohol.

If during cutting any of the edges of the snowflake break off a little, the operation can be repeated.
A snowflake cut from a CD can be hung as a Christmas decoration on the Christmas tree. On a window, wall, etc. To do this, you can make a fastening from wire or thread.


Well, that's all, now you know how to make snowflakes from CDs.


Expectation New Year's holidays always exciting. Of course, this is not only because of the fabulous New Year itself, but also because of the upcoming “vacations” that both adults and children are looking forward to. Many people go to festivities on the night from December 31 to January 1; an event next to the beautiful Christmas tree is also obligatory. Usually it is placed somewhere in the city center or in several places where the main celebrations will take place. Street Christmas trees are usually decorated in advance, but you can contribute to the decoration and make a large decoration for your city Christmas tree yourself.
At the same time, you don’t have to spend a lot, look for some expensive materials in stores, you can only show your imagination and make everything from improvised materials, which are often lying around unnecessarily in almost every home. It is especially interesting to do this with children. This fun will help develop imagination, improve motor skills and just have fun with your family.
Large New Year's toy - "Angel"
Option No. 1 – a toy made of tubes and a disk
You will need:
- computer disk - few people use them anymore, so you probably have 1-2 unnecessary ones,
- straws for cocktails (it is better to use thicker ones) - from 16 pieces,
- hot glue,
- aluminum wire (you can use thick wire),
- 2 mugs made of thick cardboard,
- thick thread.

Procedure:
- One of the tubes needs to be strengthened. To do this, insert a pre-prepared length of wire inside it. This is done so that the tube does not break. It will be the basis of the entire frame.
- Prepare in advance 2 “washers” of cardboard with a hole cut out in the middle so that you can insert a tube there so that it is held inside.
- Glue both circles on both sides of the disk in the middle, where there is a hole.
- Next, we put the disk on a reinforced tube and lubricate it with hot glue so that the structure holds. When it dries, you can continue working.
- Thread a strong thread through a straw with a disk, string 2 more straws on it and make a triangle from this structure.
- Add 2 more straws using a thread. You will get 2 triangles with one common side.
- Then continue in the same order, you will end up with a polyhedron.
If desired, you can use more tubes, depending on how many possibilities and your imagination are enough to create a figure
The joints between the tubes and the core where the cardboard mugs are glued can be covered with tinsel or something else in the New Year's theme.
Option No. 2 – a ball made of bags
This version of a large DIY Christmas tree decoration for a street tree is suitable even for the little ones. The instructions are simple, and the bags can be found in any home.

Christmas tree toy "Ball"
You will need:
- paper (any),
- colored shiny bags,
- cake strings or gift bags,
- PVA glue.
Procedure:
- The inside of the ball will consist of crumpled paper. To do this, take absolutely any paper, you can even use old newspapers. Crumple them one after another, gradually “winding” the next one onto the resulting ball. To make the layers stick better, they can be periodically lubricated with PVA glue. Surely the student will have it in his schoolbag; it is a necessary thing at school.
When the ball is already big enough, the right size for a street Christmas tree, then elegant packages will come into use. It can also be wrapping paper, which is usually used to wrap gift boxes.
- Wrap the paper ball with wrapping paper or colored bags and secure with glue.
- Tie the resulting shiny ball with fancy colored ropes and make a loop at the top so that the toy can be easily hung on the city Christmas tree.
If desired, the ball can be additionally decorated with beads, beautiful hairpins, bows, and snowflakes.
Option No. 3 – Christmas tree toy made from a plastic bottle
This option is suitable for creative people who know how to draw. Although children can leave their scribbles on this simple object. After all, the main thing is creative imagination and joy from the work done!

You will need:
- plastic bottle (any size),
- paints for decoupage.
Action plan:
We don't take into account glass bottle, although it would look more impressive, this item is too heavy for a Christmas tree and can break branches, so we sweep it away right away.
In this version of the street Christmas tree decoration, you only need your imagination. You can depict whatever you want on the bottle. It’s better if it relates specifically to New Year’s themes. For example, this is a fairy-tale hut dusted with snow. Or the face of Father Frost, or maybe the depicted figures of the grandfather along with the Snow Maiden. It could be an elegant Christmas tree, a drawing of a beautiful ball toy, or a snowman. Yes, whatever your heart desires!
The main rule when working with such a toy is that you first need to completely paint the plastic with one general background color.
Option No. 4 – “delicious” candy
This toy is one of the simplest and most standard toy to make with your own hands for the Christmas tree. It is done very easily. You will need paper or something soft, for example, cotton wool or foam rubber, padding polyester. This will serve as the inside of the candy. Make a “filler” in the shape of a thick sausage of the desired size. Wrap it on top with shiny colored paper intended for wrapping gifts. Roll the paper tightly on the sides and tie with bows. Don't forget to attach a loop.

Large Christmas tree toy "Candy"
Option #5 – penguins made from a burnt out light bulb
You probably have burnt-out incandescent light bulbs piling up in your home. You collect them, and then take them all at once to a special bin for such things. But don’t rush to do it, because soon New Year, but making a toy for the Christmas tree is a must. To make this you will need regular incandescent light bulbs and decoupage paints. In fact, you don't need any special artistic skills to draw a penguin, it's very simple. Paint the light bulb in front white. Make, as it were, 2 circles - on the top of the light bulb (below the base) and on the bottom, most convex part. As an association, mentally imagine the number 8, and you need to draw it with white paint on the front. The top will be the face, the bottom will be the stomach. Paint the rest of the unpainted surface of the light bulb with black paint. All that remains is to make a cute penguin face: eyes and beak, everything is ready! Glue the loop to the base. Alternatively, you can wrap the base with rope or twine.

Conclusion
Show your imagination, create, and then you will remember the New Year holiday with bright moments. If you want to do something more unusual and intricate, then look on the Internet for a photo of a toy on a street Christmas tree. There are plenty of options, and you don’t need to limit yourself to these five. You can use papier-mâché, soccer balls, and even hats as a base!
We are all preparing for the New Year, preparing gifts, thinking about how to decorate the beautiful Christmas tree and decorate our homes. You can, of course, buy ready-made Christmas tree toys, the choice of which is retail networks very wide.
But those who like to create a variety of crafts with their own hands will be able to make excellent jewelry, for example, from used CDs, which can serve as an excellent base for making exclusive toys.
Christmas tree decorations from disks are made quite easily, and for this you will need simple materials:
- DVD/CD product;
- paper snowflake;
- a simple pencil;
- thin brush for painting;
- scissors;
- black marker;
- plate;
- semolina;
- candle;
- thick needle;
- tweezers;
- a simple pencil;
- yellow threads.
On mirror base Apply a snowflake and carefully trace it along the contour. It is necessary to ensure that it moves, otherwise the decorations will turn out sloppy. We remove the snowflake template, and evenly apply PVA glue to the outline with a thin brush.
It is important to know that excess glue will leave unsightly stains on the surface that will be very difficult to remove.
Spread into a plate in an even layer semolina and once again we pass the glue along the contour of the snowflake, after which we place the disk on the plate with cereal on the side where the design is applied.
Then we take out our decoration, turn it over and if there are places where the cereal does not stick, then we coat them again and lower them into the semolina again. After everything is dry, use a blush brush to brush off the excess. Beauty!
Now we need to make a loop for our New Year's decoration. To do this, light a candle, heat the needle and melt two holes in the disk. Hold the needle with tweezers. We thread a thread about 15 centimeters long into the holes, tie a knot and send this beauty to the Christmas tree.
Drawing on disk
There is another New Year's toy made from disks that is definitely worth making.
To do this you need to prepare:
- three or four disks;
- the same number of New Year's themed drawings;
- thick thread;
- small snowflake template;
- glue;
- blue and white paper(one sheet at a time).
According to the template, cut out fifteen paper snowflakes. We lay out a short length of thread on the disk so that we get a loop on which our toy will hang. Then we cut out a circle, the diameter of which should be 2 centimeters less than the diameter of the disk.
We attach it to the disk, fixing the thread. Along the edge, almost right next to each other, we glue snowflakes, alternating white and blue, and in the middle - a New Year's drawing that can be cut out from a New Year's card.
Such decorations can be hung on the Christmas tree or given to friends as cards, writing congratulations and wishes on the back of the disk.
Eggshell masterpiece
To make the next toy we will need:
- CD;
- sheet of paper;
- scissors;
- primer for decoupage;
- PVA glue;
- white acrylic paint or gouache;
- eggshell;
- napkin with New Year's drawing and varnish (for hair or for decoupage).
First of all, seal the hole with a small circle. Then we cover the surface of the disk with a decoupage primer. If there is no primer, then it can be replaced by mixing PVA glue and white gouache in a 1:1 ratio.
After this, generously apply PVA to the disk and lay out the pieces eggshells. The shell should cover the entire base. Cover the shell with two layers of white acrylic paint(you can use white gouache). Take a napkin, place it on the disk and cover it with glue. We cut off the excess napkin in a circle, and then coat the disc with varnish. We glue a ribbon or magnet to the back, and our New Year's toy is ready.
Caterpillar and ladybug from CDs
Waste CDs allow you to make a funny caterpillar, ladybug, fish, snail, dog and other cute decorations.
For this, in addition to disks, we will need:
- white cardboard;
- self-adhesive paper;
- velvety paper;
- glue;
- satin braid;
- a simple pencil and scissors.
Let's start production cute caterpillar. To begin, cut out five paper circles with a diameter of 7 centimeters, two horns, ten legs and four strips of cardboard 16 centimeters long and 3 centimeters wide. We seal the middle of the disks with circles. We attach a mouth and eyes to one.
We turn our products face down, line them up in a broken line and connect them with strips of cardboard. Glue the legs and horns. We place loops on the three upper disks, which we fix with cardboard squares using glue. We turn the caterpillar over and decorate the places where the disks connect with cute bows made of satin ribbons.
For making " ladybug“Cut out 2 red wings, as well as black antennae, dots, a head and 6 legs 1 cm wide and 10 cm long. We glue all these details onto the front part, and a loop onto the back part.
Making a fish
 To make a fish, we will need a disk, cardboard, orange, blue and dark blue satin ribbon, black and red paper. Take cardboard and cut out part of the tail from blue and blue we make scales, red paper is needed for the gill wings, and black paper is needed for the eyes.
On reverse side To our base we glue a loop, as well as part of the tail and fins made of orange satin ribbon.
We make a tail from the same tape and glue it to the front part. Add scales, gill covers, eyes and the fish is ready. For the snail, cut out the body from cardboard and yellow paper, bows from orange paper, and eyes from black paper.
We decorate the disk with strips of colored paper and glue it to the cardboard body. Cover the resulting blank with a body made of yellow paper. We attach the mouth, eyes, decorate our snail with sequins and bows.
Cute dog
To make a cute dog out of cardboard and paper suitable color you need to cut out the muzzle, from the black one - the eyes, and from the brown one - the paws, ear and nose. We attach a loop to the side of the disk that we consider to be the wrong side.
Now we just assemble the dog’s face and glue it to the front side. Add paws and decorate with a star and a twig made from a green leaf.
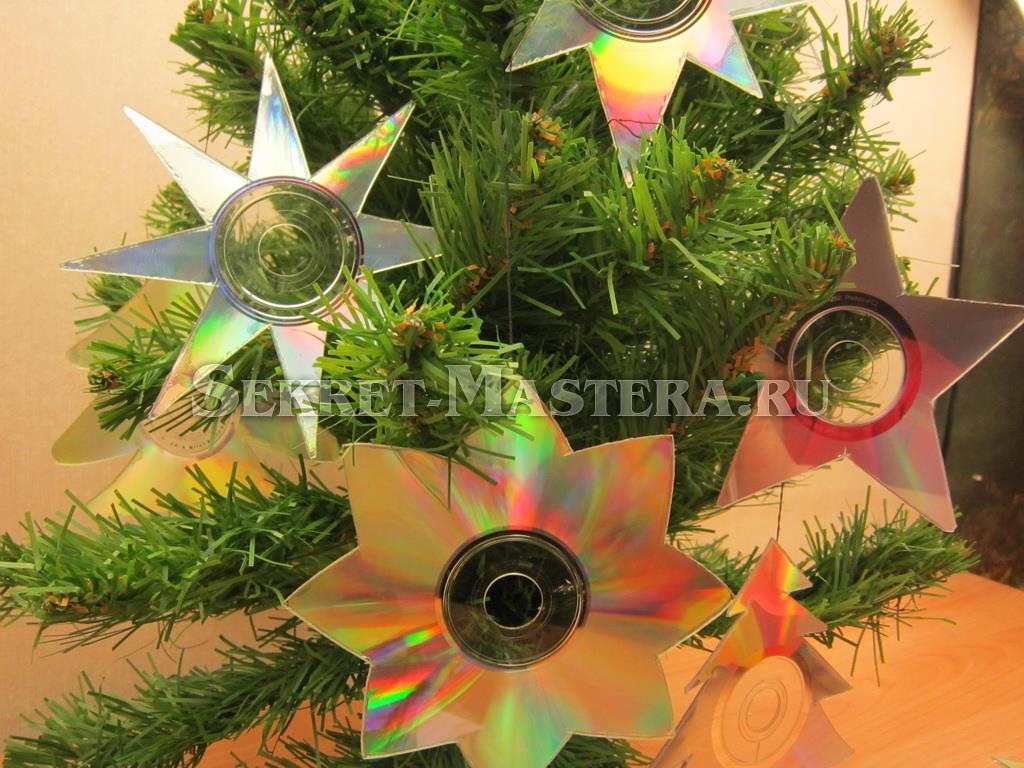
So, thanks to the mirror surface, used CDs get a second life on the Christmas tree, and many masterpieces can be made from them. They are suitable for cutting out stars and bells. Small mirror pieces are perfect for gluing New Year's balls.
A large number of damaged and unnecessary disks gives room for creativity. The website Secret of the Master reviews many crafts from CD DVDs. And of course, the disks with their mirror surfaces should be on the Christmas tree for the New Year, but not just in the form of disks, but in the form of specific crafts.
How to make Christmas tree decorations from CD DVDs with your own hands
The method of making the craft is simple - we cut the disk with tailor's scissors. Unfortunately, not all discs can be converted into beautiful crafts. It all depends on the quality of the disc and the quality of the plastic. The possibility of cutting is determined simply - take large scissors and cut off a small sector from the disk with your own hands. If the cut is smooth and without cracks, then this is our disc.
1. Draw a figure for cutting on the non-mirror side of the disk. The example shows photos of drawings of a five-pointed star, a Christmas tree and three versions of an eight-pointed star. The method of drawing an eight-pointed star is shown in detail.
Step 1. Divide the disk into four parts
Step 2. Draw more lines
Step 3. Divide the disk into eight parts
Step 4. Draw rays of different lengths
Step 6. Draw narrow rays
2. Using scissors, carefully cut out the contours of stars and Christmas trees according to the drawing. This work requires some physical effort and large quantities discs can lead to calluses on the hands.
3. Use scissors to trim the sharp edges. You can lightly smooth out the unevenness with sandpaper with a grain size below medium.
Five-pointed star from CD DVD
Eight pointed star
Related articles
 The best amulets against the evil eye and damage Amulet against the evil eye with hands for children
 How to read the Psalter correctly
 Delicious dishes with sausages
 A glimpse of Bella. Romantic chronicle. A glimpse of genius. Messerer about Akhmadulina Boris Messerer glimpse of Bella romantic chronicle
 I dreamed that I was sailing on a boat on the river
 How to cook beef entrecote in a frying pan
 About the company Foreign language courses at Moscow State University
 Which city and why became the main one in Ancient Mesopotamia?
 Why Bukhsoft Online is better than a regular accounting program!
 Which year is a leap year and how to calculate it