
Cages for keeping rabbits together. DIY rabbit cages: drawings, diagrams
Rabbit breeding is one of the most profitable areas of livestock farming. Rabbits are quite unpretentious, reproduce quickly and grow well. The only thing the owner must do is provide for the animals nice home. In a properly designed cage, rabbits will reproduce faster and become less sick.
A cage for rabbits can be bought ready-made - today there are many different designs from any materials. But it’s much cheaper to make a cage yourself. In addition, this will allow you to economically distribute the space allocated for the rabbitry and choose the most suitable type design and, if necessary, modernize it. Learn more about how to make a rabbit cage at home with video and photos in this article.
What determines the choice of cell design?
The rabbit needs enough space, and the choice of design for the cage should be based on this factor. When starting to breed rabbits, it is necessary to build at least 3 types of rabbit hutches:
- for males;
- for pregnant females;
- for breeding young animals.
The main type of cages are structures for fattening young rabbits.
There are 3 various types rabbitry:
- on open air;
- in the barn;
- portable structures.
If rabbit cages are installed under open air, you need to choose a shaded place on the site that will be protected from wind and drafts. The location should be such that the rabbits are warmer in winter and cooler in summer.
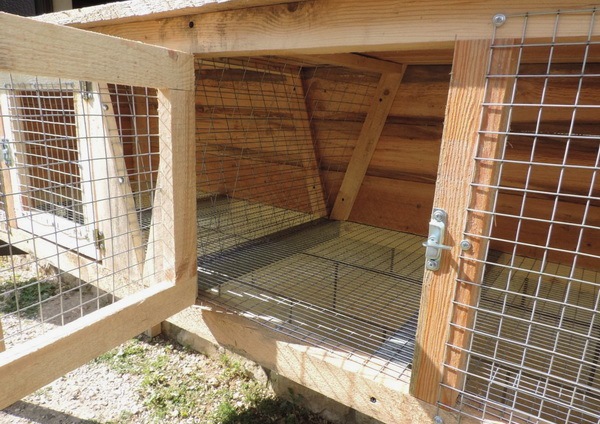
If the rabbitry is installed in a barn, the roof on it can be made of mesh, because there is no need for protection from precipitation. A house with a walk is considered an ideal option (shown in the photo below).

For this design, the back wall of the cage is made mobile; if necessary, the latch is opened, and the rabbits can go out for a walk. The walking area is fenced with a net and wooden blocks. This allows animals to eat pasture. When the grass in the fence is completely eaten, the rabbitry is moved to another place.
Attention! The length of the cage should be at least one meter; for large breed rabbits it should be increased to 1.5-2 meters. The width is at least 60 cm, and the standard height is 50 cm. At the same time, the back wall should be 5-10 cm lower than the front to form a slope.
How to choose material for a rabbitry
The main requirement for the material from which the rabbit cage will be made is safety. The material must be non-toxic and non-traumatic. Rabbits love to chew on everything, they should not be poisoned or injured by parts of the cage.

The most popular materials for rabbit hutches are wood and metal mesh. The mesh cell should be no less than 1.7x1.7 cm, but no more than 2x2 cm. Rabbits' paws should not fall into the mesh, as this could cause the animal to be injured and break a limb.
You should not buy wood from expensive construction stores; rabbit houses do not require high-quality material. A rough-cut board or timber, which can be purchased on the market at a low price, is quite sufficient.
Important! All protruding fragments must be cleaned with sandpaper so that the rabbits do not injure themselves on the wood.
You also need to pay close attention to the fasteners and the edges of the mesh - there should be no sharp objects inside the rabbitry.
Common cell designs
Most often, a standard cage design is used, divided into two sections. In such a “house” two rabbits live at the same time: these can be two males or pregnant females (photo below).
The essence of this design is that in one building and under one roof a cage of two “rooms” is built, separated from each other by a manger or a partition. A manger is a feeder for hay or grass; it is most often made of mesh in the shape of the letter V. Feeders for dry food and drinking bowls are attached to the sides of the rabbitry. Each of the two compartments has its own door made of metal mesh.
The bottom of the cage can be made from the same mesh or wooden slats can be used for this. Slats are more preferable, since it is more comfortable for rabbits to sit on them, and in cold weather their paws will not freeze to the floor. But rabbits can damage wood with their teeth, so metal flooring will be more durable.
In order to effectively remove manure from a rabbitry, two methods are used:
- A tray made of plywood, boards or plexiglass, which is installed under the grid floor of the cage. To clean the cage, the tray is simply pulled out along the guides.
- Bunker made of galvanized metal or wood. It is installed below the floor level of the cage so that waste flows into a container installed under the cage (shown in the photo below).

Such a two-section cage can be covered with a removable roof, then it will be easier to clean the inside of the “house”. If the cage is installed outdoors, it is covered with roofing material (slate or tiles).
Attention! It is not recommended to use metal for roofing, as in the summer it will heat up in the sun, which will lead to overheating of the rabbits.

If the owner dreams of breeding a large number of rabbits, it is necessary big square for the construction of cells. To save space on the site, the cages are made in two tiers. Three-story structures are no less common. The cage frame, in multi-story construction, must be strong enough to support the weight of the entire structure and animals.
Making a three-story cage requires a special pallet design. In this case, it will not be possible to use the bunker method due to lack of space, and pull-out trays are not very convenient, because the height of the cage will be significant.

For a rabbit “house” of three floors, it is more convenient to use inclined pallets. Each of them is located at a slight angle to one of the sides of the cell. All waste and manure will flow down pallets from the top tier to the bottom, eventually ending up in the waste receptacle.
Arrangement of the feed compartment and nesting
Each cage should have a place for eating and walking, and a separate area for sleeping and resting. Therefore, the free space of the compartment must be divided by a partition. A hole measuring 20x20 cm is cut out of a sheet of plywood or a board made of boards, and it is made at a height of 10-15 cm from the floor level (a similar design is shown in the photo).
The feeding and nesting compartments must have their own doors: mesh for the feeding compartment and solid for the nesting compartment. Through two doors it will be more convenient to get the rabbits out and clean the cage, because its length often exceeds 1.5 meters.
The nesting compartment should not be too large; the rabbits should feel warm and comfortable here. The parameters 30x60x50 are quite sufficient, that is, it is necessary to separate about 30 cm of the width of the cage with plywood or boards. You can make a separate roof over the nest or arrange it under a common roof.
Arrangement of queen cells
Queen cells must be installed in cages containing pregnant or lactating females. They can be mobile and installed as needed, or stationary.
The floors in the queen cell should be solid, the dimensions of this “house” made of boards or plywood are as follows - 30x30 cm, height - about 20 cm. It is not necessary to make a roof in the queen cell, but with a roof the kids will be much warmer in the winter.
Important! Among experienced rabbit breeders, there is a version that there is no need to build queen cells at all - the female herself will choose a place convenient for herself and build a nest.
Insulation of the rabbitry
In regions with cold winters, it is better to move cages with rabbits to barns. If this is not possible, the “houses” must be insulated. To do this, the walls, floor and ceiling are made double, and the void is filled with insulating material:
- mineral wool;
- polystyrene foam;
- straw.
To prevent the insulation from getting wet, it can be placed in plastic film, the edges of which are sealed.
IN northern regions Queen cells need additional insulation, because newborn rabbits can quickly freeze and die. The bottom of the queen cell is made double, and a medical electric heating pad or a small fragment of a “warm floor” is placed in the cavity.
Attention! It is very important to hide electrical wiring from rabbits; they can easily chew through it.
Instructions for collecting the cage

You should start assembling your rabbitry by studying the project. Having familiarized yourself with the dimensions and understood the design, you can proceed to assembly:
- First of all, assemble the cage frame. It is most often made from wooden blocks measuring 50x50 mm. The assembled frame is installed in the place where the rabbitry will be located.
- The floor is made by attaching a mesh or wooden planks to the bottom, which are filled in increments of 1.5 cm.
- A pallet for collecting waste is made according to the design laid down in the project.
- Now you need to mount the walls and partitions. For the back and side walls, solid sheets of plywood or knocked down boards are most often used. It is necessary to ensure that the fasteners do not protrude into the cage.
- The front wall is made of mesh. First, knock down a wooden frame from bars, and then use nails or screws to attach the mesh to it.
- Performed in the front wall of the door using awnings and installing locks.
- The front wall is attached to the main part of the cage.
- They install mangers for hay, partitions, nests, queen cells, feeders and drinkers inside the rabbitry - all parts must be fixed and stationary so that rabbits cannot move them.
- The roof is being installed.
Making a cage for rabbits with your own hands is not at all difficult. This approach will help save space and position the rabbitry in the most convenient way.
Cages with two or three floors significantly save space, and they are also easier and faster to maintain. A self-made rabbitry can be easily modified, if necessary, converted into a compartment for young animals or added another floor. If rabbits feel comfortable in their new “home”, they will grow faster, reproduce better and get sick less.
Raising rabbits is a profitable and uncomplicated activity. These animals do not require special care and exceptional conditions of detention, so 2-3 eared fluffies can be placed on summer cottage or even in an apartment.
Many novice farmers are involved in breeding rabbits. And the first thing you should purchase for a rabbit farm is cages.
 Rabbits are animals that do not require special living conditions. That’s why you don’t have to buy houses for them: you can make them yourself.
Advantages of handmade houses:
- during construction, all the features of the premises, its location and conditions of maintenance are taken into account;
- the costs of setting up a rabbit farm are significantly reduced;
- Making cells yourself will help avoid defects, which are often allowed at the factory.
An example of a homemade house in the photo.
Advantages of factory cages:
- ideal design, which provides optimal conditions for the life of animals;
- the structure is equipped with nests, drinking bowls, feeders, trays;
- Factory products are constantly being improved, their designs are becoming more complex: by purchasing a ready-made cage, a farmer can be sure that he will become the owner of modern equipment.
Factory houses are shown in the photo.


Cell types
 If you are seriously going to start breeding rabbits, then you will have to build several rooms:
- for fattening rabbits;
- for keeping female rabbits with cubs;
- for males.
To provide housing for rabbits, you need to build an entire “residential complex”. It can be installed both outdoors and in a barn: it all depends on natural conditions specific region. You can develop drawings for creating cells yourself or find ready-made ones in specialized magazines and on the Internet.
Cages for males
 Males are housed in separate houses. This avoids fights, competition for food, as well as unplanned mating (if males and females are kept in the same room). The size of the house should be such that the rabbit can move freely inside it. If the males are cramped, they will become lazy and obese. And this can affect reproductive function: rabbits will stop producing offspring.
 Houses for rabbits with rabbits should be spacious enough. They are located in one tier and consist of two compartments: the main and uterine. To prevent the babies from freezing in winter, the uterine compartment must be thoroughly insulated.
Rabbits at the age of 2–3 months are placed in such houses if they were unable to gain the required weight while living with their mother. To give the female the opportunity to give birth to new rabbits, the grown-up babies are placed in a separate room and fattened to the desired weight.
Types of cells
Now there are a lot of modifications, but the most popular design for keeping rabbits is still a two-section cage.
 You can make a house for adult animals with your own hands. It will take several hours to create a home, but you can be sure that the room meets all the requirements for keeping furry pets.
The finished cage for adult animals is shown in the photo.
Stages of work:
- Make a house frame from 4 wooden beams. It should be rectangular; its dimensions are equal to the length and width of the future product.
- Place the house on its legs. To do this, take 4 beams: 2 of them should have a length equal to the height of the front wall + 30 cm, and another 2 – the height of the back wall + 30 cm. The frame of the front wall is formed by long beams, the back - by shorter ones (a difference of 10–15 is enough cm). Screw them to the rectangular base so that it rises 30 cm above the floor. These will be the legs.
- Attach galvanized mesh to the rectangular floor base so that it covers middle part premises. Leave a space of 35–40 cm long on each side for nesting compartments. Cover the floor in the nests with plywood of a suitable size so that it lightly grips the mesh.
- Install the side and back walls of plywood and complete the frame of the house. To do this, secure 1 long beam at the very top between the front side beams.
- Separate the nesting compartments from the rest of the room with slats. Between these slats and the back wall, install dividers: plywood sheets with holes cut in them. The holes are needed to allow rabbits to move freely between the nesting and feeding compartments. Attach a roof to each nest.
- Divide the room into 2 sections with a cross beam. Make feeders out of plywood and screw them on different sides from the dividing strip.
- To ensure that the bottom holds well, turn the structure over and secure the mesh with nails and slats.
- Make a bunker for feeders from 4 sheets of plywood, which should be slightly smaller in height than the house. The hopper should look like a "V" and expand towards the top. Attach it between the feeders so that after pouring the food from this funnel can be easily fed into the feeders.
- Closer to the back wall, make a manger for rougher food: hay and grass. Their width should be 30 cm. To make it convenient for rabbits to pull out blades of grass from there, make walls of wire rods on both sides.
- Attach a roof to the cage. It should protrude slightly above the cage. In the middle, where the feeders are located, build a slider door that you can pull out to add food. For convenience, attach a wooden or metal handle to it.
- Attach doors made from slats to the front wall. Stretch the mesh between the slats. The nesting compartments can be left without external holes, or they can have solid wooden doors.
Drawings for making such cells are easy to find.

Houses for three-month-old rabbits
For up to three months, rabbits are kept in groups of 6–8 individuals, so group housing is used to keep them. They are made in the same way as double houses. The only difference is that for large number rabbits require a different feeding system: they simply cannot eat all together from a small feeder.
Stages of work:
- The frame of the house is made in the same way as the frame of double cages for adult animals. However, there is no need to divide the room into two sections. The cage will consist of nesting and feeding compartments. In this case, the nesting compartment should be 1.5 times smaller than the aft compartment.
- Cover the floor of the nesting compartment with wood planks and separate it from the feeding compartment with a plywood wall with a hole for the movement of animals. The outer wall of the nest should be made of plywood.
- The floor and front part of the aft compartment are made of mesh. In the front part you need to attach a door made of slats.
- Place a feeder along the entire length of the feed compartment. It should be positioned in such a way that part of it is in the cage, and part is outside (for the convenience of laying hay). It is made of mesh so that it is convenient for animals to pull out the grass. It is better to raise the feeder 3-4 cm above the floor so that the food is not contaminated with waste from the baby rabbits.
There are ready-made drawings for making such cells.

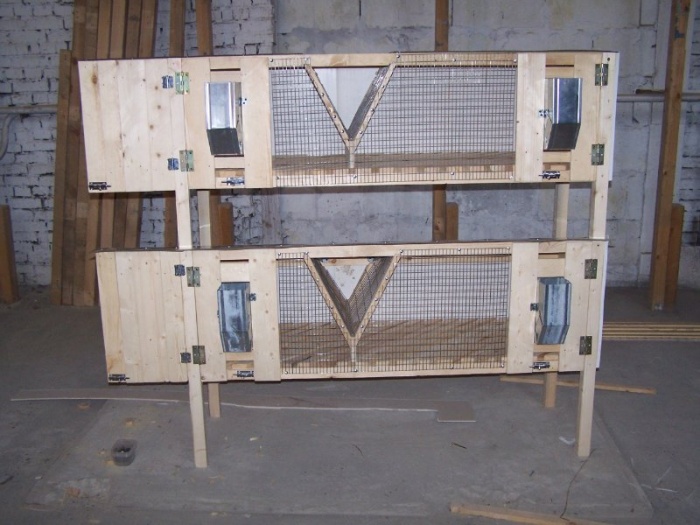
Two-tier (three-tier) shed
 Two-tier and three-tier structures are made according to the same scheme as two-section houses for adult rabbits. But in this case, several cells are located above each other in tiers.
Stages of making a two-tier shed:
- Make 3 rectangular frames. They will become the floor and roof of future cells.
- Secure them onto long beams. Connect the first rectangle to the beams so that legs 30 cm high remain below. Fix the next rectangle at a height of 50 cm above the previous one, the third at a height of 10 cm above the second.
- Attach a galvanized mesh to the first and third rectangles, which will serve as the floor for the aft compartment. Equip both houses in the same way as a regular two-section cell.
- The second rectangle will serve as both a roof for the lower house and a pallet for the upper one. Between the second and third rectangles you need to install a removable box into which waste from the upper house will be poured through the mesh.
In this way, you can make not only a two-tier, but also a three-tier shed. If you make several of these structures, you will have a real rabbit farm.
What a multi-tiered structure for keeping rabbits might look like can be seen in the photo.
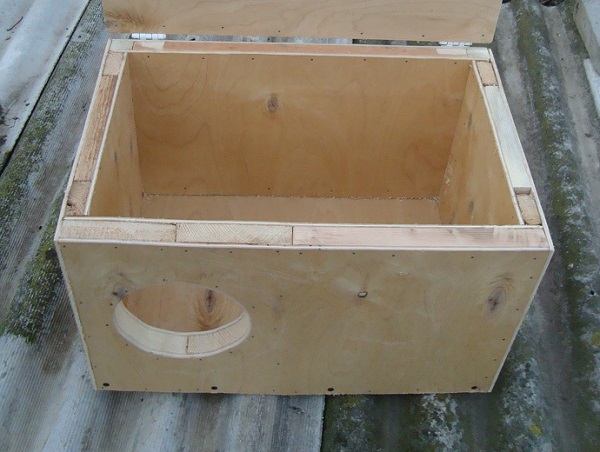
House for a rabbit with a nest
To make a house for a rabbit with a nest with your own hands, you need to take into account some of the features of this structure. The house for the rabbit is built separately from other buildings. It would be good if it was portable so that animals could be moved from the street to the barn.
Stages of work:
- Put together a frame for the house, make the back wall and sides from plywood. This structure should have two compartments: the main and the uterine.
- For each of them, make a separate door: to the compartment for the rabbit - from a mesh, to the queen cell - from plywood or thin boards.
- To prevent the baby rabbits from freezing, insulate the queen cell. It is advisable to make it a double floor, walls and roof, in the space between which you need to lay insulation: polystyrene foam, straw or any other material. If winters are very cold, then a “warm floor” system is suitable: a heating pad is placed between two floor levels. The wire from the unit is routed outside so that the animals do not gnaw it.
- The roof is covered with water-repellent material.
The photo shows what a house for a rabbit with a baby should look like.
Do you need a house with a walk?
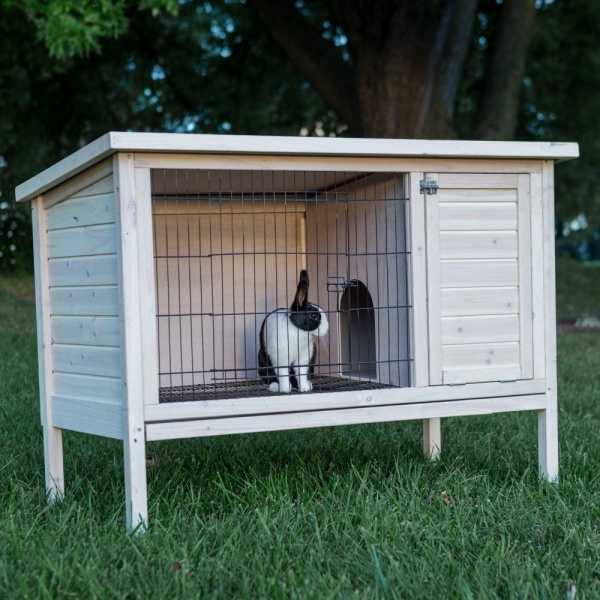
 If the owner of a rabbit farm has a large green area at his disposal, then houses with a walk in this case are an excellent option. They look the same as regular rabbit houses, only on the back wall they have a door through which the rabbits are let out for a walk.
You can make a walking area with your own hands. Behind the cage you need to equip a large enclosure. Its frame is made of wooden slats, and the walls are covered with a dense mesh. It is better to place the enclosure on the sunny side: rabbits spend most of their lives in dark cages, and they simply need the sun.
Advice! If your farm is safe enough for rabbits to graze on grass, then run houses can be made without legs. Then the animals will be able to eat pasture. And when the grass in the enclosure runs out, the rabbit’s home can simply be moved to another place. If on a farm there is a possibility that mice, cats or martens will get into the enclosure, then the enclosure will be equipped on stilts.What is the advantage of cages with walking? The thing is, rabbits need space to run around. If they have the opportunity to be in the fresh air and periodically stretch their paws, they will get sick less, gain weight faster and reproduce more actively. In addition, the fur of such animals will be much fluffier and shiny than that of their sedentary relatives.
A house with a walk can be like in the photo.
Place for a house
The choice of location for the house depends on climatic conditions region. If winter frosts are very rare in your region, then rabbit houses can be safely placed outside. However, it is worth choosing a place where there are no drafts and excessive humidity: rabbits are susceptible to colds.
Advice! You can keep rabbits indoors, but the ideal option is combined keeping: in the summer, rabbit houses are displayed outdoors. Fresh air, and in winter they go back to the barn or house.If you are installing shad cages, it is advisable to arrange them in two rows and turn the facades towards each other. An adult must pass freely between the rows.
Rabbits do not like intense lighting, but if the houses are located in a barn, then the room should be equipped with several lamps. They should illuminate the rabbit's home for 8-10 hours a day.
Materials
 To make cells with your own hands, it is recommended to use the following materials:
- wood (beams, slats, plywood);
- galvanized mesh with a small mesh size (it depends on the size of the rabbits);
- plastic for finishing work;
- slate or tiles for the roof if the cage will be located outside.
It is not recommended to use metal for arranging rabbit cages. Under the rays of the sun, this material heats up greatly, and in the cold season it freezes. In such a home, rabbits will feel uncomfortable, begin to get sick and stop breeding.
Tools
To make a rabbit house with your own hands, you will need the following tools:
- hammer;
- roulette;
- wood hacksaw;
- plane;
- scissors for cutting mesh;
- pliers;
- nails, screws, self-tapping screws, corners;
- screwdriver and screwdriver;
- sandpaper.
Cage dimensions
 The size of rabbit cages depends on the size of the animals. A single cage for a male rabbit should have a width of at least 0.6 m and a length of 0.8–1.1 m. If the rabbits are large, then the size of the section should be increased. One rabbit weighing more than 5 kg requires a room with a length of 1.3 to 1.5 m.
The size of the room for young animals depends on the number of rabbits. They can be placed in groups of 5–8, and with compact planting - 12 individuals per house. The width of the cells in this case should be 1 m, the height should be from 0.35 to 0.6 m, and the length should be 2–3 m.
In any case, one adult rabbit should not have less than 0.5–0.7 m2, and one cub should not have less than 0.15–0.2 m2.
Having studied these simple recommendations, you can easily equip your rabbit farm. If you make houses for animals yourself, the enterprise will cost a small amount. And rabbits bring considerable income: after all, not only the tender meat of these animals is valued, but also their wool and manure.
However, the cage should be selected with special care, based on the number of individuals, their age and sex composition.
Group for young animals.
 The concept of “young animals” includes animals that their mother has already stopped feeding with milk, but which have not yet reached reproductive age. In the case of rabbits, cessation of lactation occurs in 70% of cases between 30 and 45 days after birth.
At this time, jigging is carried out. Individuals are divided into those for slaughter and those intended for breeding. The latter are also differentiated by gender. The container for young animals should be located at some distance from the ground when kept outdoors, and be free and clean. If a utility room is used for maintenance, it should be well ventilated and bright.
Animals to be slaughtered are placed in groups of 6-8 individuals (read more about slaughter). Some breeders increase the number of animals to 10-15. The area of the enclosure must be at least 0.12 m² per animal. Breeding young animals are kept in 4-8 individuals with an area of 0.17 m² per individual. Sometimes females and males are kept together until 3 months of age, but it is better to separate them in advance to avoid premature mating.
In such variants a pitched roof is used. This creates a certain height difference, which allows pets to feel comfortable. It is made of dense waterproof material. The optimal height difference will be from 60 cm to 30 cm. The depth for a group of 6-8 individuals can be up to 80 cm.
For adult animals.
 Seating of young animals after 3 months of age is carried out due to their growing aggressiveness. Males increasingly get into fights and do not tolerate the proximity of other representatives of their sex.
Females can be kept in small groups of 2-3 individuals. Males of reproductive age should only be present one at a time. If there is no possibility for individual seating, castration is performed. It is especially important to avoid fights and “biting” on the skin in order to obtain fur. Therefore, the slaughtered ones are usually castrated, while the rest are seated.

The size of a cage for adult rabbits depends on their breed. The norm is a height of 35-40 cm and a width of 120 cm and it is better for them to hang on a mesh wall. This will eliminate the possibility of bowls turning over, and the animal will not experience hunger or thirst.
The shed is two-tiered.
 This system serves to save space during breeding. A shed is a series of cages arranged in one or more tiers. Two tiers are the best choice because they allow you to reduce the working area without complicating the care and control of the growth and development of animals.
This design serves primarily for outdoor use and is used in the southern regions. However, some breeders use it for summer keeping animals or as a way to organize an enclosure in a barn.
To do this, he will need a strong steel mesh, roofing material (for example, slate) and boards. The shed is built on a one-way basis. A concrete foundation will increase its stability. A more advanced design includes the presence of pallets and a manure channel for removing waste.
Double cage with queen cell.
 This design is used for females. The queen cell is a removable compartment in which newborn babies are kept until they reach the age of one month. It is also called the stern compartment. The main part is called the stern. There is a 17*20 cm hole between them.
A double room is suitable for two females with rabbits or a female and a male. The separation between compartments can be done using a mesh or a solid wooden partition. It is better to make the floor from wooden slats in 1.5 cm increments so that the manure can be poured into the tray located below. This will protect the “house” from excessive pollution and humidity.
Double cages with mesh aviary.
 This design also has the name “Klenovo-Chagadayevo”. It is used for non-pregnant females of reproductive age. Also suitable for young animals. Sometimes a container with an enclosure is used for mating. Then a male is placed in one half of the structure and a female in the other.
 The construction of cages for breeding in a garden or household plot usually involves keeping animals in it only during the warm season. For its location, it is better to choose a moderately shaded place. Good decision will be placed in a dry area of the garden surrounded by trees. This will protect the animals from overheating and wind. When choosing the size of cells for, it is worth starting from their number and needs.
An interesting design solution for the construction of cages was proposed by the breeder Nikolai Zolotukhin. In its version, the floor has a narrow strip made of mesh. In his experience, animals eventually begin to defecate in this place without any training, minimizing contamination. When choosing a Zolotukhin cage, the dimensions should be increased by 10 - 15 cm.
IN wildlife rabbits live in cozy burrows. When kept at home, cages are suitable for them, but for a rabbit that is expecting offspring, it is very important to create favorable conditions. This is necessary so that the rabbits remain healthy and the mother has the opportunity to raise them in a warm and calm atmosphere.
That is why it is necessary to have queen cells for rabbits in your arsenal. You can make these yourself, but there are certain nuances of their installation that you definitely need to know about and take them into account when arranging the queen cell.
The need for a queen cell
Experienced breeders know that queen cells for female rabbits are needed not only in the cold season. Since in nature rabbits live in burrows, they can safely feed their offspring there. In an open cage, it will be very difficult for them to do this, since the female will be constantly worried about attention. If you do not place her with the rabbits in the environment that is intended to fulfill the maternal mission, then it will be problematic for the animal to carry it out.
In addition, newly born rabbits have no fur, which becomes a problem not only in winter. The immunity of newborns is very weak, so the slightest draft can lead to illness or death. In a cage for rabbits with a queen cell, heat is retained very well, which has a beneficial effect on the rabbits. After the offspring gets stronger, they themselves crawl out into the free space of the cage.

Making a queen cell with your own hands
It is not difficult to assemble a cell with a queen cell, especially the simplest variety. But in the process, you need to take into account all the main nuances that will help you create a truly high-quality place for the birth of your offspring.
Tools and materials
Before directly assembling the queen cell, you need to prepare those tools and materials that may be needed in the process. Materials needed:
- Sheets of plywood with a thickness of 3 mm.
- Boards
- Slats with a thickness of 2.5 cm
- Insulating material.
- Loops.
Advice! Instead of slats for the queen cell, you can use the remains of the boards so that installing the structure for rabbits with your own hands will be cheaper in cost.
The cheapest option is to use sawdust as insulation. Thus, the queen cell will be not only cheap, but also completely environmentally friendly. In addition, the thermal insulation properties of sawdust are simply excellent.

Important! Insulation in any case must be insulated from contact with animals.
The tools for making a queen cell will need those that any home owner has: a hammer, a saw, a screwdriver, a tape measure, a saw or jigsaw, and sandpaper.
Queen cell size
Before making a queen cell, you need to select its size and make a detailed drawing indicating the dimensions. After creating a design project for the queen cell, the material can be prepared in accordance with it. First of all, the number of parts and the size of the queen cell frame are calculated. It is necessary to prepare 8 slats with a length of 56 cm each, which will be used to make the front and rear walls, roof and bottom, and 6 slats with a length of 31 cm for the side slats and the bottom of the structure.
Next, you need to cut the sheets of plywood into the required size parts. The front and back walls will be made of plywood in the form of a rectangle, the length of which is 56 cm and width 30 cm. 4 such elements need to be made.
The side walls are made of rectangles, the length of which is 35 cm and the width of 30 cm. You also need 4 of these parts. The bottom and lid for the queen cell will require 4 rectangular sheets of plywood with a length of 56 cm and a width of 35 cm.
The number of parts is explained by the fact that it will be necessary to insulate the queen cell, so elements are needed for the internal and external sides.

Manufacturing technology
After preparing all the parts, you can begin assembling the structure in accordance with the diagram. It is performed according to the following algorithm:
- We stuff the appropriate slats onto the plywood. The selected type of insulation is packed inside the cavities with maximum density. At this stage Special attention You need to pay attention to the absence of gaps and cracks.
- A second plywood sheet is attached on top of the elements filled with insulation. These actions are repeated with all walls.
- We provide the front wall with an entrance, which can be cut in the shape of a square or circle.
- To speed up the work, the front wall can be made of boards. In this case, you can cut out the entrance with a jigsaw or saw on the side of the board. It is enough to keep the diameter of the entrance within 15 cm. Such a hole will allow the female to freely exit and enter, while internal heat will be retained.
- We fasten all the walls with self-tapping screws to each other in the following sequence: attach side walls to the bottom, then we mount the rear one. The top cover must be placed on hinges so that it is possible to maintain the cage and monitor the offspring. In addition, on a hot day you can always open the lid slightly to ventilate the interior of the queen cell.

Now the cozy house for posterity is ready. Such a queen cell can be placed inside the finished cage, if its dimensions are sufficient, or you can attach a frame of beams to the surface of the front wall and cover it with mesh, thereby obtaining a full-fledged cage for rabbits.
If desired and necessary, you can slightly improve the cell with the queen cell. For example, it is possible to slope the floor so that it is possible to effectively clean its contents or increase the size if individuals are bred large breed. For those regions where the climate is particularly harsh, it is possible to provide accommodation heating element under the floor of the cage so that the female and her offspring feel more comfortable.
To create a high-quality queen cell, you must follow certain rules, which will make the design as convenient as possible:
- There is no need to make a queen cell that is too large in size, since the female may decide that this is a cage and will begin to defecate there. In turn, the insufficient size of a cage for rabbits with a queen cell will be inconvenient, which will not allow the female to turn around inside, and the danger of litter crushing cannot be ruled out.
- If the female is inexperienced, then you need to line the bottom of the queen cell with straw, as she may simply forget about it. But for an experienced rabbit, these actions are not necessary - she will prepare a place for herself.
- To prevent the bottom of the queen cell from rotting from feces, you need to lay a galvanized sheet on it, which is covered with straw with a thickness of 20 cm. If this layer is smaller, the rabbits may freeze.
- To construct a queen cell, there is no need to use material from freshly sawn coniferous trees because the smell essential oils will scare away the female, and she will not use the structure for its intended purpose.
- The hole does not need to be made too high so that the grown rabbits can crawl out of the hole. But too low will not work either, since babies do not need to go beyond the queen cell. It is best to install a small threshold near the hole so that the female cannot carry those babies that have attached themselves to her outside the queen cell.
Conclusion
Following detailed instructions From this article you can easily create a queen cell for a rabbit. Its installation is mandatory, since only in comfortable conditions does a female rabbit have the opportunity to feed her offspring and bring the already strong and healthy babies outside.
Raising and breeding rabbits refers to profitable pursuits. If you create optimal living and growth conditions for animals, you can get quite big benefits with a minimum of costs. Of considerable importance self-cooking nutritious food and making cages for rabbits with your own hands. The article offers a guide to the process of making houses with photos and watching videos.
Preparatory work
 Before you build a rabbit cage, you need to thoroughly think over the design and make a drawing. The dimensions will be indicated on it, and the details of the rabbit cage will be drawn separately. Dimensional drawings or diagrams will help you accurately calculate the quantity necessary materials, which is quite difficult to do without accurately drawing all the details. The drawing will also be needed if the design changes during the assembly process, it will be clearly visible which elements need to be redone and which ones should be left the same.
Types of cells by design
General requirements Do-it-yourself homemade rabbit cages include:
- required space, expressed by floor area;
- ease of manufacture;
- ease of cleaning, disinfection, feeding and transplanting;
- long-term operation;
- inexpensive cost of materials and the resulting final product.
A common and convenient option for a do-it-yourself cage for a domestic rabbit is double rooms connected in pairs. Such designs are perfectly used when raising young rabbits, but there are also other options for connecting and placing rabbit houses:
- single-section;
- compact sets consisting of three sections;
- group cells big size for young animals.
In order not to waste extra space, cages are made depending on the age of the animal, its breed (height) and the number of representatives in the house. The standard sizes are:

Main stock rabbits are raised in single-tier and two-tier cages, but in a rabbitry it is better to use single-tier houses. If animals are bred for meat, then houses can be built in three tiers, although such a multi-story house for rabbits has not become particularly popular.
In a multi-tiered structure It is difficult to clear manure, it is inconvenient to feed, preventive examination of pets of the lower and upper tier takes much more time. Mechanical distribution of feed is practically impossible. A lot of effort and expense is required to heat such piles; ventilation and lighting of the premises becomes difficult.
A do-it-yourself rabbit cage is made from mesh with holes 2.5 by 5.0 cm or 2.5 by 2.5 cm. Galvanized or plastic-coated metal mesh with smaller cells is used on the floors. Sometimes the floor is made of hardwood, it is assembled from slats with a cross-section of 2.5 by 3.0 cm; during the manufacturing process of the floor, the sharp edges of the slats are rounded and smoothed with sandpaper. The slats are placed at a distance of 1.6–1.8 cm from one another.
Young rabbits during the period of fattening and growth they are kept in the same room, so a separate house is made for them, appearance which can be seen in the photo.
Newborn baby rabbits with female rabbit also placed in a common separate room, then the house is made into two sections for the main livestock of young animals and the uterine compartment. It is recommended to keep male rabbits in a different compartment. Crowded cages will have a negative impact on the growth of young rabbits, as they will not be able to be active. Do-it-yourself houses are located at some elevation from the general floor in the room or the ground.
Material for making rabbit houses
 It is advisable to choose natural material for the construction of cages (thick plywood, bars, boards, wooden slats). The grid is described above and the dimensions of its cells are given. Used to cover the roof various materials, you can use the remains from covering the house. To connect wooden parts you need screws and nails, you will need iron sheets and devices for hanging cage doors, locking devices in the form of hooks or latches.
One of the options The material for the walls is adobe, brick, various waste building materials. The roof is covered with roofing felt, roofing felt, or a straw covering can be made. Straw is used for winter insulation of walls and floors. If they make cages that can be carried or moved, then this is especially important for choosing the optimal location in the winter cold and turning the facade of the house in the warmest direction.
Choosing an installation location
Popular with farmers installing rabbit houses outside, that is, in the open air. Home cages are placed at a height of 0.5 m from the ground and equipped with a good-quality roof. In this case, the problem with ventilation is spontaneously solved, and the animals receive natural Sun rays. In winter, in addition to insulation, the cages are wrapped in polyethylene to protect against cold winds.
The houses have their entrances facing south and are located in places that are windproof and calm from strong winds, without drafts. To make it easier to clean up after your pets, a ditch is made under the cage to drain waste. IN summer period the cages are covered with suitable material from direct sun or a removable canopy is made.
Making cages for rabbits with your own hands
Offered step-by-step instructions for building rabbit houses, details can be seen in the photo and video:

Options for cage arrangement and features of animal separation
 Houses for female rabbits with offspring They make them paired and house two females with a brood in separate rooms. The cage can be made as an option for temporary overexposure or permanent housing for rabbits, it all depends on the size. The last type of room involves dividing it into two 45 cm wide and separating it from the feeding area by a partition with continuous filling. Sometimes it is more convenient to make the partition removable. After dismantling the wall, such a room is used to keep young rabbits without a mother.
In order to most completely isolate the housing and feeding area, a hinged shield is made that does not stop the animal from moving between compartments. If there is no partition and hinged shield, then a queen cell is placed in the compartment. In the nesting compartment, a shelf is made for the suckling queen during her rest. Its recommended dimensions are 26–30 cm; the shelf is placed at a height of 25–32 cm from the floor surface.
If the cage has a solid floor made of tightly planed boards, then it is provided slight tilt towards leading edge , where a small gap is left, about 2–2.5 cm wide, for liquid to drain. This cage design is suitable for keeping young rabbits, if size allows. The queen cell is removed, and the rabbit uterus is transplanted to another room.
In order for the rabbits to feel at ease, up to 2.5 months the size of the area per pet should be calculated at 0.2 square meters. m per individual. As the rabbit grows, the housing area per head is calculated at 0.35–0.4 square meters. m per animal. If the conditions are not met, then the rabbits are transplanted from other housing facilities or an enclosure is made for young individuals.
IN summer time year or in warm climatic zone cell arrangement is allowed, four walls completely covered with mesh, the roof remains solid. Half of the cage is separated by a partition and used for raising young animals, taking into account living standards. The second half is used as a walking area for rabbits, which develop poorly without movement. In warm weather, this option is considered ideal.
In summer, mesh cages contain a queen with a brood, while a hole measuring 25 by 42 centimeters is made in the middle wall, stopping the movement of small rabbits with a closing valve. In such houses you can accommodate up to 15 heads of young individuals.
On the front side of the door on hinges or hinges made from different materials . The right one, which opens the entrance to the sleeping compartment, should preferably be made of a solid covering; it is rarely used and is constantly closed. Its use is provided only in case of replacement of the litter. For the convenience of the rabbits, the bottom of this room is lined with solid material, for example, linoleum, and a layer of hay or small sawdust is poured on top.
The left door operates more often and should not be blind; it is often made of mesh, so it is more convenient to observe the feeding of pets, add food to them and pour water. The feeder in the feeding compartment is in a vertical position. The material for its walls is steel wire, which is located at a distance of 30 mm from one another. At intervals, the animal pulls out its food (grass or hay).
 Rabbit poop area provided in one of the corners of the dining room. To prevent urine and feces from being retained, the floor is made of mesh, through which waste products fall into a drain pan or gutter, from where they are easily washed out with water. To prevent the development of unsanitary conditions, you need to ensure that no food waste or feces is left on the mesh bottom.
Having completed the construction of the rabbitry, I want the building to serve faithfully long time, so some people unknowingly begin to treat wood with various antiseptic solutions. This should not be done, since pets love to chew on the cage and harmful chemical substances can cause poisoning of animals.
Similar articles
 The best amulets against the evil eye and damage Amulet against the evil eye with hands for children
 How to read the Psalter correctly
 Delicious dishes with sausages
 A glimpse of Bella. Romantic chronicle. A glimpse of genius. Messerer about Akhmadulina Boris Messerer glimpse of Bella romantic chronicle
 I dreamed that I was sailing on a boat on the river
 How to cook beef entrecote in a frying pan
 About the company Foreign language courses at Moscow State University
 Which city and why became the main one in Ancient Mesopotamia?
 Why Bukhsoft Online is better than a regular accounting program!
 Which year is a leap year and how to calculate it