
DIY Valentine's envelope made of paper. The best DIY Valentine's card ideas
Today we will tell you how to make valentines with your own hands using the best ideas. Master classes on making valentines with your own hands will help you make a beautiful and unforgettable gift for your soulmate. On Valentine's Day, it is customary to give valentines to those you like or have feelings for. love feelings. We did excellent selection, which contains the best ideas, master classes and the highest quality and most understandable videos on how to create valentines with your own hands.
Get inspired and create colorful cards for your family, loved ones and friends on February 14th!

Valentine book


Cut out a rectangle from the gift box.

We cut out several leaves from the notebook, slightly smaller than cardboard, and round the corners.

On sewing machine sew the middle

Writing a love letter

We sew buttons on the front and back sides, write the lyrics of your favorite song on the cover (or something else, we chose the lyrics from the Katy Perry song - Teenage Dream), tighten it with threads.
Valentine's card "I love you"

We bend the cardboard. Cut out a heart from fabric. We sew it to the cardboard. We sign with a pen.
Valentine's card “We are together”

We will need:

1) A sheet of cardboard with a cut out window
2) A Polaroid photo card and cut out a heart in it, or a sheet of paper: make a photo card out of it and cut out a heart
3) Series of photographs

Glue the photo into the postcard using tape

Glue a Polaroid photo card to the first page

Valentine's card made of paper and floss threads

«
Valentines hearts

How to do:

How to do:
1) Cut out hearts of 3 sizes from beautiful paper (large, medium, small)

2) To give the hearts a little sophistication, draw a line along the edges (with a pen, pencil or chalk)

3) To give the overall heart volume, we fasten the hearts with adhesive foam.
4) Bend the corners

5) You can leave it like this, or you can make a general applique as in the first picture
Scrapbooking: Valentine's card with a secret
DIY valentine volumetric
Volumetric valentine “Heart”

They are made very simply, it takes us no more than 20 minutes (this is all together: confetti, envelopes and the valentines themselves)

Let's make some coffetti for a more festive look.

Full instructions and templates below!


DIY valentines quilling

Big Valentine
Valentine's card “You Are My Favorite”

Little Valentines
Origami heart-box

* Detailed wizard class in the article: “ «
Beautiful DIY valentines
Unusual Valentine
Original valentines

We will need:
- 1) cardboard or colored paper(you can print colorful patterns on the printer)
- 2) glue stick
- 3) scissors
- 4) white paper
- 5) handle

1. Cut out multi-colored circles (to make them even, place the cup on a sheet of paper, trace, cut out).


2. Carefully fold your circle in half so that one end slightly overlaps the other. Apply a little glue so that the circle does not fall apart.

3. Find the center of the opposite end and fold it so that the top and bottom paper touch.

4. Pinch the sharp ends together until the valentine looks like a fortune cookie.


5. We write wishes for Valentine's Day and put them in our valentines. One thing won’t be enough, so move on to step 2 and continue making as many as needed.


How to do:
Valentine "Love Heart"


We will need:
- Colored strips of paper 5 mm wide
- A4 paper for valentine and envelope
- Scissors
- Duct tape or tape
- Paper heart diagram and paper envelope diagram (download and)
How to do:
- 1) Print out a paper heart template. We used plain paper white, but you can use any color paper. Cut it out using scissors or a knife.
- 2) Cut 14 paper strips 5mm wide.
- 3) Use duct tape to keep your heart from bunching up.
- 4) Trim off excess
- 5) Print the template for the envelope. Cut it out and glue it together. You can use the remaining paper to make confetti.


How to do:
- 1) Trace a credit card on a piece of cardboard and cut out the base
- 2) Cut out a heart from paper, attach it to a piece of felt, circle it with a pen, cut it out
- 3) Sew the heart to the base using a needle and thread
- 4) Write nice words
Unusual DIY valentines
Volumetric valentine box


You can say 2 in 1, both a valentine and you can put a gift inside (some goodies, for example).
Valentina " Happy Day St. Valentine"

Simple Valentine Card with Buttons

* Detailed master class in the article: “ «
DIY Valentine's card for a guy

Such a heart will perfectly decorate holiday table, will show your love and give a romantic atmosphere.
* Detailed master class in the article: « »
DIY Valentines video
Valentine card in scrapbooking style
Hairpin – Valentine Kanzashi
Origami Valentine card on a stand
Tree with 3D Valentines
A DIY tree with valentines will help you create a romantic atmosphere.

To make such a tree we will need:
- pink paper
- shiny braid
- birds (sold in any craft stores)
- branches
- white spray paint or acrylic
- white jug or vase
How to make a tree:
- first you need to collect several branches in a bunch (not one or two, but several, since too sparse branches on our tree will not look very attractive), cut the branches to the same length
- cover the branches with paint - either spray or acrylic
- evenly distribute the birds on the branches and secure them either with clothespins (often sold complete with birds) or tie them with ribbon

- for 3D valentines we will need hearts cut out of pink paper, which are cut as follows: one to the middle at the top, the other to the middle at the bottom. Then we insert the hearts into each other through these slots, stretch the ribbon - the 3D hearts are ready

- hang valentines evenly on all branches

You can make a Valentine card for February 14th with your own hands. This article offers many interesting options for creativity.
Valentine - a mandatory attribute of Valentine's Day on February 14. Even if you don't give anyone a gift on this day, you should definitely give a valentine to your loved one, a friend, a parent, or even a stranger. Not giving a Valentine on Valentine's Day is... bad omen, dooming you to loneliness and misunderstanding throughout the year.
In modern stores, a person can find a wide variety of valentines: large and small, postcards and leaflets, heart-shaped or rectangular, decorated and simple valentines. But, they are all exactly the same, since they are the product of the work of printing publications. It’s much more pleasant to give and receive as a gift handmade valentine.
A handmade valentine is a product of incredible beauty, as well as a real, sincere declaration of love. Don’t be afraid to make cards yourself, because The activity is exciting and creative. You can make any of your fantasies come true. They will come to help beginners and professional needlewomen famous decoration techniques:
- Scrapbooking
- Craquelure
- Quilling
- Decoupage
- Embroidery
- Application and much more.
Before you start your work, you should definitely familiarize yourself with the ideas for creating valentines with your own hands in order to understand and decide for yourself what kind of future card you want to see. After this it is advisable draw an indicative design on a draft, pick up and get to work.
One of the most popular techniques in decorating cards is quilling. Quilling- This is a kind of volumetric applique made of thin colored paper ribbons, twisted into a reel and glued to the surface.
Using quilling you can create patterns and drawings of incredible beauty: monograms, floral motifs, figures, even write words. You will need it for work quilling kit(thin wooden stick and a set of colored ribbons), as well as the glue with which you will attach the pattern (as a rule, hot or rubber glue is used, as well as instant-drying glue).
Valentines using quilling technique:
Valentine card with floral motifs using quilling technique  Openwork valentine using quilling technique
 Simple and stylish valentine card using quilling technique
  Valentine card - card decorated using quilling technique
  Unusual valentine using the quilling technique “seals”
 Pattern on a Valentine's card using the quilling technique
Another spectacular and popular idea for creating a festive Valentine's card is three-dimensional postcard. This method allows you to make a real work of art from a simple sheet of paper or cardboard. All you need is a base for the valentine, scissors and a diagram according to which you can cut out the pattern.
In addition to the three-dimensional pattern, the card can also be decorated with ribbons, pebbles or beads, sprinkled with sparkles, or glued with a paper applique with designs. Of particular importance and will add charm to the postcard congratulatory inscriptions, printed on a printer, cut and glued.
 Valentine card with voluminous hearts
 Options for voluminous postcards for February 14
 Valentine card with three-dimensional figures and pattern
  Valentine's card with voluminous inscription
  Postcard for February 14th with a Valentine card inside
 One of the most beautiful techniques for needlework is scrapbooking. Postcards made with the help of are incredibly beautiful, an abundance of decorative ornaments and special elegance. In addition, this technique is not complicated and all it requires is your inspiration and imagination.
In your work you will need a lot of different decorations that you can find in any art store: ribbons, beads, lace, beads, gold and silver threads, inscriptions, flowers, pictures, gold sand and sparkles, and much more.
Before you begin your work, you should get acquainted with ideas and examples of ready-made valentines and only then start creating the design of your product. Sketch out a rough sketch of the finished card, taking into account all the decor you have. All decorations should be attached to the base with “powerful” glue (hot, rubber or instant-drying glue).
Valentine's card ideas using scrapbooking technique:

 Valentine card in the shape of a heart, scrapbooking technique
 Beautiful valentine using scrapbooking technique
  Simple Scrapbooking: Valentine's Card Ideas
 Stylish valentines using scrapbooking technique
 Postcard decorated using scrapbooking technique for February 14
 DIY Valentines - master class: photo
There are many options and ideas for creating holiday valentines: from simple to complex. Are extremely popular hanging valentines, that is, those that can be received as a gift and hang on the wall, as well as any other surface.
You can make a simple, but very effective hanging valentine from a set of simple materials and tools: red cardboard, pink colored paper (or pink ribbons for quilling), scissors, glue and a wooden skewer.
Cut out a heart of your preferred shape and size from cardboard (a postcard or just a figurine). The quilling ribbon should be cut on one side many times (see photo). Gradually wind the quilling serpentine onto a thin skewer, coating each turn with PVA glue. The finished flower should be removed from the skewer, and its base should be crushed so that it has a flat bottom.
IMPORTANT: The flower is attached to the card using PVA glue. You can attach flowers over the entire area of the cut out heart, you can decorate just the edges, or even “write” a voluminous word.

 Step-by-step DIY postcard made from paper and cardboard
 If you are not good at needlework, but want to make a beautiful and elegant Valentine's card, drawing will help you! Postcards “in the spirit of minimalism” have been very popular lately. The main thing is to make a bright accent that compensates for the “emptiness” of your product.
For work you will need:
- A sheet of thick cardboard, maybe with a pattern. This will be the basis for the card.
- A sheet of paper (any, for a template)
- Paints for painting (any)
- Tassel or signet in the shape of a heart
Work step by step:
- Fold a card-book from a sheet of cardboard
- Cut out a heart of the correct shape from paper. To do this, you just need to fold the piece of paper in half and cut out half of the heart. By opening the leaf, you will get a proportional heart pattern.
- Cut out a small heart from another sheet of paper or cardboard and glue a match to it. This will be a signet - a tool for leaving a drawing.
- Place the cut out heart template on the front of your card.
- Dilute red and pink paint in the palette.
- The resulting signet should be dipped in liquid paint and the pattern should be left inside the template. If you don’t want to make a signet, you can paint hearts with a regular brush.
- Press the template firmly against the card so that the ink from the stamp does not bleed under the paper and leave streaks.
- Once you have printed a large number of small hearts, remove the template and wait for the paint to dry completely.
- When the drawing is dry, sign the card. Valentine's card is ready!
 DIY Valentine card made from simple materials
 Valentine - heart in hands with your own hands
Valentine card “heart in hands” is very popular because it is a fairly simple product, but at the same time an effective card. You can make such a postcard from either plain paper or cardboard.
You will need the following materials and tools:
- A sheet of cardboard or paper.
- Paints or markers for coloring Valentine's cards.
- Scissors for cutting (preferably manicure ones - they will help you cut out each element in detail).
- A simple pencil for drawing a template.
Step-by-step work for creating a valentine “heart in hands” and a template for cutting:

 Job Description
 Cutting template
 IMPORTANT: Finished product You can decorate it to your liking using any decorations and methods. Be sure to sign the valentine inside with your own hand.
 Finished product: Valentine card “heart in hands”
 DIY paper valentines for school: templates
Together with your child, you can make beautiful and original valentines out of paper for a competition or just to give them to your friends. Such postcards will be much more beautiful than purchased ones and every classmate will be pleased to receive them.
For example, try making a simple paper card from a single sheet of paper or cardboard. Cut it out according to the template and color it as you wish. Sign with your own hand or paste a printed inscription. If desired, you can sew a ribbon loop to the card so that the Valentine can be hung.
 Simple paper valentine for children and adults
 Ordinary sewing or knitting threads can also serve as a great idea for creating a festive Valentine's card. Use a sheet of cardboard as a base. Its front part will be decorated with a heart. For work, choose contrasting colors, for example:
- White paper - red thread
- Red paper - white thread
Use PVA glue to draw a heart on the front of the card. This can be done conveniently with a brush. You should apply a thick layer so that it does not have time to dry. Unwind the thread in advance and gradually, layer by layer, apply the thread to the glue to get a fluffy and tangled figure. On the other hand, if you use crochet thread, you can carefully lay out each strip and get a beautiful shape.
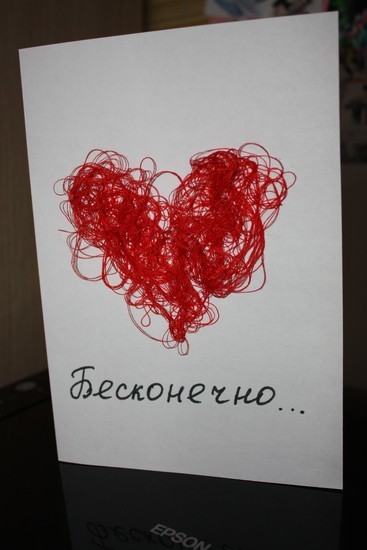 Finished product: Valentine card with a heart made of threads on paper
 Using thread and paper applique (colored, craft or even packaging), you can create a huge number of options for valentines. Here are some examples:
 Valentine card made of paper and thread: heartbeat
 Valentine card made from two sheets of paper: applique
  Card-book for February 14th made of colored hearts and brushwood thread
 You can use any decorations as decoration for a paper card: beads, ribbons, coffee beans, eggshells(craquelure), felt, fabric, lace and much more.

 Paper card for February 17, decorated with coffee beans
 If you have the opportunity to buy cardboard or craft paper, you can create incredibly beautiful cards. As a rule, such paper has a variety of patterns, prints and designs.

 Paper valentines for friends
 SECRET: If you don't have such paper, you can print it on a printer. To do this, enter “February 14 background” in your browser’s search engine and select any picture. Or, use those suggested in this article.

 Background: paper hearts
 Background: Valentine's Day lettering
 Ideas for creativity: background for February 14
  Background: blue with hearts
 Background: white with hearts
  Background: drawn hearts
 Ideas for creativity: calendar for February 14
 DIY Valentines from fabric patterns
If you want to move away from the stereotypes and templates of usual paper cards, ideas for creating fabric valentines will help you. A modern valentine does not have to be in the form of a book or leaflet. Why not sew it from felt or textiles?
Such a souvenir can pleasantly surprise the person to whom you give it. The most common shape of a fabric valentine is a heart, because it is symbol of the holiday and a person in love. This souvenir can be hung anywhere in your home and stored, regardless of the calendar date - it will always please the eye and give pleasant emotions.
 Variety of fabric valentines
 What a fabric valentine should look like is up to you to decide. The most common are:
- Keychains in the form of hearts, bears or birds
- Pendants
- pads
- Wreaths on the wall
- Toys

 Different types of fabric valentines
 Fabric valentine patterns:
 Cat Valentine: pattern
 Mice-Valentines: patterns
 Valentine Heart: pattern
 DIY fabric heart using decoupage technique
  Valentine cat: pattern
 Valentine: pattern
 DIY Valentine card for mom: ideas, photos
Children love Valentine's Day very much, not because they are in love with someone, but because on this day they can tell their mother how much they love her. This is done not only with the help of words, but also with the help of a beautiful homemade valentine.
There are several bright and original ideas make a beautiful valentine. For this you will need thick paper and some decorative elements (beads, ribbons, lace and much more).
A simple but very touching card is made from one sheet of paper and scissors. To do this, you need to use double-sided colored paper. Fold the sheet in half and place your hand on the front of the card. Trace it with a pencil.
IMPORTANT: One side of the circled hand must touch the fold of the card; there is no need to cut it, it will hold the valentine together.
When folded, the card will only resemble a hand, but when mom opens it, she will see a heart, which is represented by two hands, and this surprise will delight her. In addition, you can write wishes and declarations of love on the inside of the card.

 Simple DIY Valentine's card for mom
 Another way suggests you to do hanging card, which you can decorate your home on a holiday. For this valentine you will need:
- Three sheets of colored paper (for example, pink, red and white).
- Glue (preferably dry glue stick)
- Scissors
- Small thin ribbon
Choose a color for the base of the card and cut out a large heart from it. On the other two, you should trace your hand as carefully as possible with your fingers open. Both paper hands are cut out and placed on top of each other to form a heart.
DIY Valentine card from children's handsIMPORTANT: Before gluing the heart from the cut out hands to the base, you should insert a thin ribbon in the form of a loop under them.
Other ideas for creating children's valentines:

 Paper valentine decorated with buttons
 Valentine applique
 Valentine card with colorful hearts
 Do-it-yourself voluminous valentines: ideas, photos
Volumetric postcards can be divided into two main types:
- Postcards with three-dimensional decor
- Cards with a surprise
In the first case we're talking about about the unusual decoration of the front part of the product: flowers, figurines, lace, and so on. The easiest way to make a pattern is using the quilling technique - this is the most affordable and easy-to-use decor.
Using paper strips you can write words, make lace patterns, hearts, flowers and any shapes. The contrasting use of colors will help you make a card of incredible beauty.
The most impressive and uncomplicated postcard will be one decorated with simple serpentines made from thin strips of paper. Just draw or cut a certain figure and cover the space inside it with twisted ruffles.

 Volumetric valentine with the inscription “love”
 Volumetric valentine with a heart in the shape of a serpentine
 Simple voluminous valentine
 DIY Valentine's cards with children
By creating valentines for children and adults together with your child, you teach him not only that this holiday one must respect and honor its traditions. But you also instill in him a love of creativity.
Spend enough time to really create beautiful card for February 14. Surprise your child with unusual valentine ideas. Show how diverse and creative creativity can be.
- Valentine's Topiary
- Valentine's card with envelopes (in which you can place surprises or ordinary compliments on notes).
- Valentine cards decorated with appliqués, ribbons and decorations.
- Valentine frames on the wall
Valentines ideas:

 Valentine's Topiary
 Valentine card with envelopes
 Valentine card with decor and applique Valentine - frame for the wall
 Video: “How to make a beautiful valentine for Valentine’s Day. - Postcard for February 14th”
Valentine's Day. There are a few weeks left until February 14th, you can already start thinking about a gift, looking for recipes delicious dishes for a romantic dinner... You can get several sheets of multi-colored paper, scissors and glue and make interesting valentines with your own hands, stylishly decorate your house in romantic colors, and beautifully decorate your holiday table.
This article contains the most interesting handmade ideas for Valentine's Day. We hope that with our help, your significant other will remember this day for a long time. So, we will surprise you with all kinds of hearts, let's go!
For these romantic crafts you will need colored paper, scissors, glue, sometimes even wire and salt(!), but we can promise you that you will not need any special skills and secret ingredients that can only be “obtained on a full moon by spitting through an empty well.” » not required!
1. Decorate the house!
Lovers' wreath on the door

Cut out a circle with a diameter of 30-40 cm from plain white paper. Cover it with cut out hearts. Choose the desired tone yourself - the wreath can be made more delicate, using white and light pink hearts, or it can be more passionate, choosing red and burgundy colors. You can make it in a trendy combination of pink and black or in a gothic style using black and red hearts. You can also choose different sizes of hearts - this will make the wreath more voluminous and textured.
An interesting option is a wreath of roses.

How to make, see our detailed.
If you want something more cozy and warm on a cold February evening, pay attention to the option.

You can decorate a door, window or hang it on the wall with a wreath.
Garland of hearts
We string the cut out hearts onto a thread. A very simple and beautiful decoration. Please note that the hearts can be strung either crosswise or lengthwise. If you string it across, you get a vertical garland that can be used to decorate a doorway.

If along, then horizontally - such a garland can be hung on the wall, decorated with it on a bed, a window, or pulled across the entire room under the ceiling.


It's even easier to make a garland with clothespins. Then it is better to cut the hearts out of thicker paper so that they do not become deformed due to the clothespin. And of course, you can attach romantic wishes, favorite photographs, memorable candy wrappers and tickets to such a garland.

Romantic little things
Remember how, as children, we “grew” crystals on sticks in a saline solution? Try making these crystal hearts for February 14th!
The heart can be made from colored wire, after which it must be placed in a concentrated saline solution (in warm water add salt gradually until it stops dissolving). You just have to wait a few days, and to make the heart grow faster, change the solution to a new one every 2-3 days.

And, of course, candles! Decorate candle stands with hearts, but don’t forget about fire safety!

2. Make your own valentines!
The most important paper heart on this day is your Valentine's card. And you can make it yourself and it will turn out no worse than store-bought, even more original! For example, you can send...
Message in an envelope
We string 6-8 hearts on a thread and put them in an envelope...

You can write words on each of the hearts, which will form a phrase as you pull out the hearts. Do not confuse the beginning and the end when putting the message into the envelope, otherwise you will end up with “I love you, I am Zina” instead of “Zina, I love you” :)
A couple more options with envelopes - mini messages with nice words and compliments and an envelope that opens into a heart


Card with hearts
Here are some easy, cute ideas for designing romantic Valentine’s cards:

Another idea for a voluminous card with two hearts flowing into each other - it turns out to be a very symbolic valentine. It will take you only 10 minutes to create it - follow ours and this is what you will get in the end
Here's a video tutorial on how to make a Valentine's card with hearts resembling balloons on strings
Subscribe to our youtube channel so as not to miss new master classes on Valentine's Day and February 23
Button hearts
Cool cards are made with button hearts - bright and cheerful

Valentines cards with photos
A happy photo of you together can be the best Valentine for Valentine's Day. Add a line of wishes in Photoshop, a few hearts and insert it into a nice frame. Or make a heart from your small photographs

And also Origami Valentines. Watch this simple video tutorial that shows you how to make a beating heart out of a piece of paper.
In the nomination "Valentine in last minute» This simple cardboard heart wins. Your loved one is almost here, but your valentine is not ready? Feel free to tear off a piece of the box and, following this simple video instruction, create a romantic surprise.
3. Let's have fun with our colleagues!
To do this you will need plastic (and basically any) soldiers! On the hearts we write heartbreaking requests for help, such as “Elena Arnoldovna, you killed me with your smile!”, “I can’t fight these feelings anymore!” “I’m dying of love for you,” “I’m completely smitten by your gaze!” We “distribute” the hearts to the soldiers and place the regiment dying of love on the tables of colleagues, window sills and in the locker for coffee cups.

4. Have a romantic tea party

Cute tea bags. We have already written about this. You can decorate the entire tea ceremony in a romantic style.
However, you can drink hot tea outside from a thermos and, hugging each other, look at the romantic sky lanterns in the shape of hearts flying into the sky.
5. Making bookmark hearts
What could be simpler - take two hearts of different sizes and glue the small one onto the large one (only top part, and the bottom bookmark will just “cling” to the desired page!)

6. Bouquets of hearts
We fasten 6-8 hearts together with a pin, attach the pin with the resulting bud to a “twig”, which can be a wire, a cocktail tube or a real tree branch. The flower is ready. We make 5-7 flowers for a bouquet, of different sizes and shades. We “decorate” the petals with wishes and compliments!

And this option will especially appeal to those with a sweet tooth - we secure the flower not with a pin, but with a lollipop candy

7. Delicious love. Cooking a romantic breakfast for your loved one
We will delight our loved one with goodies on this day. I will not include a recipe for baked salmon with exotic sauce in this article; there are many similar instructions on the Internet. Let's focus on the beautiful presentation. Pancakes and scrambled eggs can be prepared in special molds. You can cut hearts from all kinds of fruits and vegetables: carrots, strawberries, bananas, apples and kiwis.


Don't forget your breakfast table

Breakfast table in bed "Flying Dutchman"
You can often hear that Valentine's Day is not a Russian holiday, but does the origin of this celebration really matter? The tradition of exchanging postcards has already become very firmly established in our culture.
Shops specializing in souvenirs and postcards offer the most incredible types of gifts, ranging from a standard postcard to congratulations in the form of crosswords, puzzles and charades.
Despite such a wide selection of romantic products, lovers strive not to deviate from tradition and create valentines from paper with their own hands.

It is very difficult to resist the cutest heart-shaped cards that are usually presented on St. Valentine's Day. Valentina.
The beauty of such postcards made with my own hands, is that with the help of these paper hearts people want to say about their love and tenderness.
How to make a two-color Valentine card
In this master class I will show you how to make such a craft. It can also be used as a gift bag.

We will need paper of two colors, in my case it is red and white. If you want to use it as a bag, it is better to take cardboard. The dimensions of the craft are at your discretion. So, take the paper, fold it in half and draw this diagram.

Use scissors to cut strips.


We pass the first strip of white paper between the strips of red. The next red one is between the white stripes, and so on.

Then take the next one white stripe and do the same in a checkerboard pattern.


Our first craft is ready!
DIY valentines for interior decoration
In this master class we will look at how to make hearts like this to decorate walls, windows, curtains and so on. I think your significant other will be pleasantly surprised to see such a colorful decoration, which will undoubtedly put you in a festive mood.

We cut out hearts of various sizes from red paper.

We make these cuts.

Apply glue to the edge of the paper and glue it together, creating a bulge, as shown in the photo. We do the same with all the other hearts.


We attach it to the wall using thin double-sided tape. If you plan to decorate the curtains, you can attach them using tailor's needles with a ball on the tip (they are also called a “hat pin”).

DIY valentine pendant using quilling technique
Quilling, in our opinion, is paper rolling, that is, the production of various compositions and decorations from twisted special paper strips. In this master class I will show you how to make such a decoration - a pendant with your own hands using the quilling technique.

We buy special paper for quilling.

We twist these spirals.

Glue the end of the strip.

We make two spirals of different sizes.

And another small dense circle. Then, pressing one edge with two fingers, we give it the shape as shown in the figure.

We assemble the structure - glue all the elements together.


That's all, our heart-shaped pendant is ready.
Gift for lovers “Hearts connected by the golden thread of the fate of Moira Clotho”
According to Greek mythology, the fate of people is woven with golden threads by one of the three moiras - Clotho. That is why we decided to add this element to the decor of our gift for the day of love, family and fidelity. Two hearts are tightly bound to each other by fate itself, what could be more romantic. Making such a craft with your own hands is not at all difficult and will take a little time, but what a subtext!

You can make similar souvenirs from clay or buy plastic, but the most accessible and popular material was and is salt dough. It is done very simply:
- Take a tablespoon and measure out an equal amount of finely ground salt and any flour. Mix.
- You can simply add water, but it is better to mix it with PVA glue in a 1:1 ratio. At 2 tbsp. Add 2 teaspoons of salted flour and 2 teaspoons of water.
- Mix the resulting mass well in a convenient container, and then knead it in your hands. We put it in a bag. After 10-15 minutes. The salted dough is ready to be used to make a valentine with your own hands.

Let's start creating:
1. Make two flat hearts. Of course, you can roll out a sheet of dough and cut out figures with a special mold, but we don’t need banal stamping.

2. We make impressions on our blanks. We used an old openwork comb; embossed buttons, knitted napkins, lace or simply intricately twisted ropes would also work.

3. Before sending the product to dry, do not forget to make holes. Drying time depends on the thickness of the dough; ours took about 2 days to dry. You can speed up the process and bake the hearts in the oven. If they brown too much, use this as a decorative technique and add flames.

4. Decorate crafts. We did not cover up the curls and only slightly shaded them, and the mother-of-pearl only emphasized the relief. Salt dough accepts any paint well, although some may require a preliminary primer, for example, acrylic. Gouache, watercolor and even lipstick fit perfectly.
5. All that remains is to tie the golden threads, each heart has its own. We intertwine them according to the principle of chain links.

“Hearts connected by the golden thread of Moira Clotho” - such a craft from salt dough made with your own hands, you can decorate a frame with wedding photos. If you don’t have one yet, glue magnets to each heart and the gift for the day of love, family and fidelity will turn into an exclusive holder for love messages on the refrigerator - after all, there’s never a day when we don’t look into it).

DIY photo frame “You are in my heart”
I suggest you make a photo frame with your own hands “You are in my heart”, it can easily become a souvenir for March 8 or a gift for the Day of Love, Family and Fidelity. And it’s even more pleasant to receive such gifts, made with your own hands, just like that, from the heart and for no reason!

It is most convenient to sculpt frames from polymer clay or plastic, but for “testing the pen” we chose a more accessible material - salt dough. To prepare it we will need:
- 1/2 cup any flour
- 1/2 cup finely ground salt
- 1/4 cup tap water.
After drying the product, the dough will become stronger if water is mixed with PVA glue; some people add wallpaper glue. And yet, after all the ingredients are mixed, the dough should be kneaded well in your hands and removed for 10-15 minutes. plastic bag. It will become more plastic and homogeneous.

Let's start creating a photo frame with our own hands:
1. We make our heart from two parts. Roll the dough into sausages so that the middle is thicker than the edges. We connect them and give them shape. We also sculpt a couple more small hearts, they will become pendants.

2. Flatten the workpieces. We did this using a book wrapped in cling film. Trim the edges. We ended up with a small wave on the inside, so we decided to leave it, it’s even more interesting. We sculpt 3 more tiny hearts, they will be connected in a row and become the third pendant.

3. Make holes, three on the frame itself and one on the heart pendants. Tiny ones don't need to be holed. Once again we critically evaluate our salt dough craft, if necessary we correct, smooth and send it to dry.
4. We decided to add some decor to the frame and made three small flowers on bent stems. The centers were made recessed, since rhinestones will be glued into them. Flowers also need to be dried.

5. When all the details of the gift for your loved ones have dried well and become hard as a stone, you can start painting. We used gouache. Pearlescent is a very inexpensive eyeshadow!

6. We work with super glue. We choose the composition with flowers that we like the most, applying them this way and that, then gluing them. Don't forget about rhinestones! Cut the fishing line to the required length. Apply a drop of glue to each small heart without holes, arrange them in a row at the required distance and place the prepared piece of fishing line in the glue.


7. We assemble all the parts of the frame. We thread the fishing line through the holes and tie all the pendants. We choose the length of the fishing line arbitrarily, as you like. By choosing fishing tackle, we hoped to lighten the composition and give the product some airiness. It seems that we succeeded, although a thin chain would have looked almost worse.

So the gift is ready, created with your own hands with your soul, and most importantly, in a single copy! If there is varnish in a can, great; a thin layer of it will not only give the product shine, but also protect the decorative coating.

How to make a gift for Valentine's Day from plasticine
This lesson tells you how to make an interesting congratulatory heart from ordinary plasticine - a souvenir for Valentine's Day.
Before February 14, children and educators will be looking for such lessons to give gifts, so this information is especially for them.

For a small congratulatory heart, prepare:
- plasticine - it is desirable that among the blocks there are red or lilac, as well as green colors;
- toothpick
The heart itself can be scarlet or lilac, as shown in this tutorial. It will also be decorated with roses. Bright flowers are the companions of any holiday, especially when it comes to Valentine's Day. Green is needed for leaves. Open the set, take the pieces that you like. On sale today you can find different plasticine, even neon, glitter or hot pink, so go by the one you have.

Mash a red or lilac block of plasticine in your hands. To ensure that the heart is not too small, but also fits in the palm of your hand, do not skimp on the basic plasticine. If it is difficult to knead the block completely at once, then do it gradually, in parts, and then roll it into a large ball.

Press the soft mass into a ball on top. But don't make the cake too flat. In the future, this blank should be turned into a three-dimensional heart. Squeeze the cake with your fingers from below, sharpening the tip, and also press it from above, giving it a characteristic, well-known shape. When the main heart is ready, take care of the decoration.

Pull out several thin threads to imitate roses. All threads can be scarlet, or use 3 different colors for decoration (white, yellow and red). Glue small green dots onto one side of the heart. Press down each one on top with a toothpick.

A few teardrop-shaped green leaves will also be needed. Draw veins on top with a toothpick. Twist the red, white and yellow threads into spirals. These will be some kind of rose buds. Three pieces are enough or cook more.

Form a bouquet on the other side of the heart. First glue on a few green leaves, then attach 3 spiral flowers. Such decoration will ennoble the plasticine valentine; it will immediately become bright and expressive.

An interesting gift for Valentine's Day is ready. We easily molded it from plasticine to please our soulmate or loved one.


Paper Valentine card
In this master class we will make an original Valentine's card in the form of a heart-shaped balloon.

To make a postcard we will need:
- A sheet of white and pink (red) paper;
- Simple pencil;
- Felt pens (colored pencils);
- Scissors;
- Stationery glue.
First, let's make a template. To do this, bend the sheet in half and draw half a heart from the fold line. Then, without unbending the sheet, we cut out the part and unfold it. It turns out to be a heart. So we got a smooth part with identical sides.

Now cut out 2 identical hearts from pink or red paper. To do this, attach a template and trace it. And then cut out the resulting heart.

Glue 1 piece onto a white sheet of paper. To make it more convenient, it is better to glue it closer to the top of the sheet. And from the heart we begin to draw the basket itself with a simple pencil. We draw the ropes and bags that are tied to the sides.

Then we will draw with a felt-tip pen. We outline the ropes in green. Please note that the first 3 ropes are in the foreground, so they go from the heart to the front of the basket. That is, the lines cross the back side and extend to the front. 1 rope on the sides and 2 on the back.

We paint the bags with any color. Using a brown marker, draw vertical stripes on the basket to imitate boards. It is advisable to draw stripes at approximately the same distance from each other.

Let's paint the basket itself yellow. Now take scissors and cut out the resulting balloon. But we cut it out, stepping back slightly from the edge so that there is a white outline. But you don't need to make it too wide.

Now take the second heart and glue it on white paper. We cut it out, also retreating from the edges.

Now we bend the heart in the center, but do not draw a fold. Just raise the sides a little. We coat the fold with glue and glue the part to the main one so that the fold is in the center of the first heart. That is, we put one heart on top of the other.

The white outline of the top heart can be painted with red glitter nail polish. You can use a shiny pen. Or you can not touch it and leave it as is.

All you have to do is write your congratulations and the card is ready!

Souvenir - a pebble with a Valentine's card made from salt dough, master class
Making an original souvenir with your own hands is much easier than it might seem at first glance. We made our own craft using salt dough. The figurine is so simple that even a child can make such a cat with a heart. In addition, all the ingredients for making such a gift are the most affordable materials.

All we need is:
- one article at a time spoon of flour and salt;
- one teaspoon each of water and PVA glue;
- crayons, pastels or eye shadow;
- spray can (if not, hairspray will do).
Let's get started.
1. Using flour, salt, water and glue, make a dough-like mass. Knead it thoroughly in your hands.

2. Pinch off a small piece of dough and make a heart. Flatten the remaining material and form it into a flat rectangle with elongated corners.

3. We send the workpiece to dry. You can speed up the process using the oven.
4. Turn the dried dough into a kind of stone. Rub the dry dye into the figurine with your fingers. It is not at all necessary to make the stone gray.

5. Using a pencil, felt-tip pen or paints, draw a muzzle, paws and tail on the pebble.

6. All that remains is to glue the heart and spray the craft with varnish, which is completely optional.

Here is your handmade salt dough souvenir, made with love. The pebble cat can become a refrigerator magnet that you can use to attach a love note. You can decorate a gift box with it and it will be much more interesting than a banal bow. And if you carefully make a hole in the figurine at the sculpting stage, you will get an exclusive keychain for lovers.
DIY panel pincushion for Valentine's Day
On Valentine's Day, it is customary to congratulate not only your significant other, but also your friends and girlfriends. What can you give to a friend who is passionate about needlework? Handmade gifts are always appreciated, even if your friend knows how to create a lot of things on her own.
You can give her a box for storing beads, buttons, decorated using decoupage or scrapbooking techniques, a set for storing tools, and other handicrafts. Or you can knit a small heart-shaped pincushion and place it in a heart frame-stand.
Such a needle case can be mounted on the wall near the table for needlework and all the needles and pins will always be at hand and will certainly never get lost. A homemade gift, moreover, carries a piece of your soul and is always filled with positive energy. Some craftsmen claim that handmade gifts can serve as a kind of amulets.
Any skeins of yarn, knitting needles, a hook, a small piece of soft wire, any filler (cotton wool, synthetic fluff, polystyrene foam) will be useful for this work.

First, cast on 100 stitches on the knitting needles and knit 3-4 rows in stockinette stitch.


Closing the loops, insert a thin wire into the resulting cord and sew the cord.

To get a more aesthetic appearance of the cord, we tie it over the top with single crochets, covering the entire cord.

Due to the soft thin wire, the cord can be given any shape. We bend it into the shape of a heart. It is acceptable to make a slightly irregular shape for the heart.

Let's start knitting the heart-pincushion. From 15 chain stitches we knit a chain, make another loop for lifting and knit a square using single crochet stitches.


Then we knit semicircles from two adjacent sides of the square.


We get a heart. But for the pincushion we need two such parts. We repeat the previous steps and knit the second piece of the heart.


We sew the heart together and stuff it with stuffing.

You can tie it around the edges with lace using a hook.

Now it's time for decoration. We’ll make some cheerful flowers as decoration. First we make the middle.

And then we tie them with colored petals.


The last step is to sew all the elements of our panel onto the “heart” frame.


Now you can mount it in the work area. Well, if you liked the idea of a homemade gift, then complement it with chocolate and a card. Your friend will be delighted.

Handmade heart soap
For some, their favorite thing is to watch their favorite TV series, for others it is to sit with their favorite book or play an interesting game on the computer, while others like to engage in their favorite hobby. So, for many, a favorite hobby is soap making. In this master class I want to tell you how to make handmade heart soap.

Before you start making soap, you should prepare everything you need:
- white soap base;
- dyes: red, violet and green;
- alcohol;
- fragrance to your taste;
- pipettes or syringes;
- stirring sticks;
- dishes for soap base;
- soap mold.
When everything is at hand, everything is easier to do. Before pouring the soap base into the mold, you need to sprinkle it with alcohol, this will make it easier to remove the soap from the mold.
The soap base needs to be cut into pieces and melted in the microwave at the lowest temperature.

Then add coloring and flavoring. I will make the inscription “I love you” green. You need to pour it carefully, using a syringe or pipettes, so that the mixture does not go beyond the edges of the inscription. Now you should wait until the layer dries. If there are air bubbles on it, then you need to sprinkle it with alcohol, this will help remove them.

While the layer dries, prepare the base for pouring another layer. I want to make the next layer purple. To do this, melt the soap base in the microwave and add purple dye and flavoring to it. The more dye you add, the more saturated the color will be.
Pour the purple base onto the frozen previous layer. Before that hard layer need to scratch and sprinkle with alcohol. This is necessary so that they are better bonded to each other. It is necessary to fill in such a way that there is enough space in the mold for the last layer. Let the purple layer dry while we prepare the next layer.

My last layer will be red. To do this, melt the soap base in the microwave and add red dye and fragrance to it. Don’t forget to scratch and spray the bottom layer with alcohol.

That's it, the original heart-shaped soap is ready, you can give it to your beloved girl or guy. A gift made with your own hands is always more expensive than a purchased one.


DIY valentines with a paper butterfly
Here is such an elegant and original craft with beautiful butterfly. It can also be used as a gift bag.

Print and transfer to paper folded in half.

Of course, you can choose any color for the butterfly; in my case, it’s white and blue.

We make these cuts to the middle of the butterfly. In one half - from below, in the other - from above on both sides.

We assemble the structure - we “thread” two halves into these cuts, first on one side, then on the other.


Well, that’s all, your DIY valentine with a butterfly is ready! I think it will look beautiful in red and white.
Cut it out as shown in the photo.


And we assemble the structure by threading the spiral curls into each other.


The history of valentines
Valentine's Day is an ancient holiday, so it has acquired a whole range of stories related to the traditions of this celebration.
The appearance of written valentines is usually attributed to the 15th century. However, it is impossible to say for sure who exactly became the author of the first such message. There is an opinion that the pioneer of this tradition is the Duke of Orleans, and this was in 1415.
At this time, the Duke was in captivity, and he really missed his usual surroundings. Most of all, he missed his wife, so he began to create postcards in which he sincerely described his high feelings for his wife. In the British Museum you can still look at the very first Valentine, which gave rise to such a glorious and enduring tradition.
Another theory says that the first such postcard was found in 1477 in the British library. This valentine was written by a girl asking her lover to prove to her the sincerity of his feelings. In addition, she wrote that she would insist on a larger dowry if the man agreed to start a family with her. This postcard was purchased from a family of librarians back in the thirties. However, it became public knowledge only recently.
Valentine cards began to gain popularity closer to the 18th century. With the help of such postcards, young people in love conveyed their feelings to each other. The inhabitants of England had a great passion for writing these postcards; in this country, hearts were made from colored paper and were also signed exclusively with colored ink.
The popularity of sensual cards led to people becoming more and more serious about creating them, and acrostic messages began to appear. In such a verse, the first letters of each line form a specific word, often it was the name of a lover or beloved.
The card was cut out using scissors and decorated around the edges with tiny letters. Such a message could not leave anyone indifferent. A special stencil was actively used to decorate them.
The first serial batch of love cards was released in early XIX century. They were hand-drawn and presented in black and white. They did not create a big stir, however, progress was not canceled, and soon colorful and bright postcards appeared.
All over the world, Valentine's Day is celebrated on February 14th. The main tradition of this holiday for many years has been the presentation of valentines.
In addition to the popular stories about the appearance of the main attribute of this holiday, there are also several lesser known ones. One of them tells how a church minister named Ternii Valentin was sentenced to execution. His fault was that, contrary to the emperor’s ban on soldiers marrying, he entered into marriage alliances between soldiers and their lovers.
Thorn Valentine was a true minister of the church, but while waiting for his bitter fate, he experienced a truly wonderful feeling that united all those couples he had married in his time. Thorn Valentine sincerely fell in love with the daughter of the executioner who was supposed to execute him.
On the day of the scheduled execution, Valentin wrote a beautiful letter filled with romance to his beloved; as a signature, he noted “from your Valentine.” After the execution, he was called a martyr and was considered another victim who suffered for the church.
February 14th was made Valentine's Day. The letter, written by a Christian martyr, became a symbol and tradition of the main holiday of all loving hearts of the world.
From the above it is clear that there are quite a few theories about the appearance of valentines, but these stories still have something in common, each of them is permeated with a great feeling called love.
Love is the most wonderful feeling, for the sake of which people did not spare their lives and went to great lengths to reunite loving hearts. Life is not predictable and can have both pleasant and unpleasant turns, in order to survive all the hardships you definitely need to look for your love.


How to make such a souvenir - see here..
It does not matter at all which story is true; what is much more important is that this holiday is very loved in all countries of the world. Especially the younger generation. And of course, everyone remembers cute cards, which are the best congratulations on this day. Nowadays, young lovers often exchange virtual valentines.
Valentine's Day traditions
It's time to move on to the traditions of Valentine's Day. In all corners of the world, people in love are waiting for this romantic holiday. It has existed for a very long time and over the years it has simply acquired all sorts of traditions.
Each country can boast of its own customs associated with this identity. Congratulations on Valentine's Day are not always limited to presenting a Valentine's card or going to a restaurant for a romantic get-together. Large quantity loving people seeks to legitimize their relationship on February 14.
- In some countries, representatives of the stronger sex present clothes to their ladies on Valentine's Day. If the gift is accepted, the woman gives her consent to create a strong and loving family. Of course, the clothes are far from an original gift, however, the approach itself is very unusual.
- An old story says that previously any girl in love could approach the object of her feelings and ask him to become her husband. If the man refused, then he had to present the woman with a silk dress as a gift, and put on a silk belt with a heart strung on it. Now this tradition is not relevant, but still brides and grooms try to show originality when choosing a gift.
- A very interesting belief is that the first man a girl meets on Valentine's Day should become her Valentine. At the same time, the desire of the stronger sex is not particularly taken into account.
- There is a sign that a girl who sees a robin on Valentine's Day is destined to marry a sailor. If a representative of the fair sex meets a goldfinch, then the groom will be rich, and the sparrow he meets promises happy life with my poor husband. In fact interesting prediction will be an original and unusual gift.
- For centuries, European young ladies have been writing their names on pieces of paper on Valentine's Day and then putting them in a box. The man is asked to pull out one piece of paper at random, thereby choosing a companion for the coming year.
Video lessons
How to make a soft valentine with your own hands
How to make unusual cards
Postcard for Valentine's Day
Idea for a postcard for Valentine's Day using Scrapbooking technique. Master class
It should be noted that in terms of popularity, Valentine's Day is second only to New Year and Christmas. Women are much more likely to buy Valentine cards, accounting for 85% of all cards purchased. Make your loved ones happy and don’t miss out on the long-standing tradition - on February 14, you should definitely give your beloved a Valentine’s card.
These cute cards can be either a stand-alone gift or go with another gift. Often, the one who gives the card prefers to remain incognito, thus forcing the recipient to seriously suffer from guesswork.
Valentine's Day, as you know, is celebrated on February 14th. It is also called Valentine's Day and valentines are given - small cards in the shape of hearts. However, a valentine card looks quite simple, but a heart made with your own hands, and decorated in an original way, will definitely delight the recipient.
You can make your own Valentine cards from any materials, for example, cut them out of felt and decorate them with beads, ribbons, and lace. The scrapbooking technique is widely used to decorate valentines. Below we have collected interesting options, how you can make a valentine with your own hands and what materials to use for this.
SOFT VALENTINE HEART MADE OF FELT OR WOOL
A handmade woolen heart will definitely please your loved one. Also, such a valentine can be an excellent interior decoration for Valentine's Day. For work we will need:- a piece of red or pink felt (the size depends on the desired result) or an old cashmere sweater, which, by the way, can be bought at any second-hand store;
- cereal for filling: rice, pearl barley, barley or buckwheat;
- needle and thread;
- paper heart template;
- scissors;
The operating procedure is as follows:
You need to cut out a heart blank from paper, use it as a pattern, attach it to felt or wool and cut out 2 parts. Then the two halves are sewn together along the edges, but not completely - you need to leave a hole through which to turn the valentine inside out and fill it with cereal. The filled valentine must be sewn with a hidden seam. That's it - your Valentine is ready!

Similar soft hearts can also be sewn from any other fabric with a romantic pattern. And use padding polyester or holofiber as filling.


DIY PAPER BOOK-VALENTINE CARD
Any Valentine card always contains a wish or a declaration of love. What if one Valentine is not enough? Then you can make a whole valentine book out of paper, especially since it won’t take much time.To work you need:
- colored paper (4 sheets of A5 format);
- scissors;
- pencil;
- glue.
The operating procedure will be as follows:
Fold together 4 sheets of A5 colored paper, draw a double outline of the heart and cut it out as shown in the picture).


Then strips are cut out of colored paper to wrap around the outer heart.

Inner Heart It turned out in the form of a book where you can write down congratulations and confessions.

HEARTS FROM DISPOSABLE PAPER PLATES
Who said that disposable plates are boring, but with a little imagination and using available materials you can turn them into cute hearts that you can use to decorate a room or give to someone. In addition, when working with scissors and felt-tip pens, the baby develops fine motor skills handsFor work we will need:
- disposable paper plates (can be colored or white);
- red, crimson and black markers;
- colored paper;
- scissors;
- glue (you can use a pencil).
The operating procedure is as follows:
A heart of any shape is cut out from the bottom of a disposable plate. Strips of approximately 5-7 mm wide are cut from colored paper and of such length that they cover the cut hole in the plate. The more colors the better. Using glue, glue multi-colored strips in a chaotic order as shown in the figure.

The resulting hearts can be hung as room decoration, or they can be given as a valentine.

LIVE VALENTINES-PAPER ENVELOPES

Try making these cute valentine envelopes with emotions with your baby. Smiling, frowning, surprised - they are all so different! To work you will need the following tools:
- colored paper (pink, red, other romantic colors);
- markers;
- scissors;
- white paper.
Operating procedure shown in the picture:


Then circles of white paper are glued onto this envelope. on which eyes and a mouth are drawn. Valentines' expressions can be very different - from smiles to gloomy faces.
Related articles
 The best amulets against the evil eye and damage Amulet against the evil eye with hands for children
 How to read the Psalter correctly
 Delicious dishes with sausages
 A glimpse of Bella. Romantic chronicle. A glimpse of genius. Messerer about Akhmadulina Boris Messerer glimpse of Bella romantic chronicle
 I dreamed that I was sailing on a boat on the river
 How to cook beef entrecote in a frying pan
 About the company Foreign language courses at Moscow State University
 Which city and why became the main one in Ancient Mesopotamia?
 Why Bukhsoft Online is better than a regular accounting program!
 Which year is a leap year and how to calculate it