
What is salt dough made from? DIY play dough that always works
Modeling dough is a mass reminiscent of plasticine, but softer, does not stick, does not stain, does not have a strong odor and does not cause allergies. How to make salted play dough at home? The best homemade dough is made from salt, flour and cold water.
Working with plastic mass is incredibly exciting and useful in terms of development fine motor skills. This helps to activate brain points responsible for coordination of movements, objective actions and speech. And this is not all the advantages of modeling dough, it:
- Increases perseverance.
- Develops logic and creative thinking.
- Improves concentration and perception.
- Develops the ability to work with small objects and helps in mastering the subtleties of manipulation.
Every mother can make a healthy mass, because the technique is not much different from preparing dough for dumplings. In this article I will look at the most popular recipes. I'll start with the classics and later switch to more complex options.
Classic recipe for salted play dough
I offer a classic recipe for salted modeling dough, which involves the use of the simplest ingredients found in every kitchen. It is incredibly popular among experienced craftsmen, people with little experience and beginners.
Ingredients:
- Flour – 300 g.
- Salt – 300 g.
- Water – 200 ml.
Preparation:
- Pour salt into a deep container and add some water. I advise you not to use all the liquid at once, since in each individual case the moisture content of the flour is different.
- After the salt has dissolved, add the sifted flour. First, mix in a bowl. After forming a lump, transfer the mixture to a work surface and complete the process. To increase plasticity, gradually add water.
- Place the finished dough in a plastic bag and put it in the refrigerator. After two to three hours, the salted mass is ready for use.
Video recipe
From the indicated proportions you get quite a lot of salt dough. If large crafts are not planned, reduce the amount of ingredients by half or quadruple. If there is any remaining mass, store it in film in the refrigerator, just as you store slime mass. In this form, it retains its original qualities for a month.
How to make dough in 5 minutes

If crafts from salt dough have turned into a family hobby, I recommend arming yourself with a recipe that will allow you to make another portion of elastic mass at home in 5 minutes.
Ingredients:
- Flour – 1 cup.
- Water – 1 cup.
- Soda – 2 teaspoons.
- Salt – 0.3 cups.
- Vegetable oil – 1 teaspoon.
- Food coloring.
Preparation:
- Pour a mixture of salt, soda and flour into a small saucepan, pour in water along with vegetable oil. Place the container over low heat and heat for a few minutes, stirring regularly. Add coloring and stir.
- Watch the thickness of the dough. If it sticks to the spoon, it's ready. Place the mixture on a plate to cool. After this, knead thoroughly with your hands.
- Store the salt dough in a bag or food container, otherwise it will dry out. If the mixture has dried out, don't worry. Add a little water and knead.
Video cooking
Quick salt dough has another advantage - a long shelf life. If all rules are followed, the dough retains its properties for several months. You won't be bored with this material.
Recipe without starch with glycerin

Some craftsmen coat the surface with a layer of varnish to add shine to their crafts. But this result can be achieved without the help of paints and varnishes, because there is glycerin, sold in all pharmacies.
Ingredients:
- Boiling water – 2 cups.
- Flour – 400 g.
- Glycerin – 0.5 teaspoon.
- Sunflower oil – 2 tablespoons.
- Cream of tartar - 2 tablespoons.
- Fine salt – 100 g.
- Dye.
Preparation:
- Make the base. In a small container, combine cream of tartar, vegetable oil, salt and flour.
- Bring water to a boil in a small saucepan. Add flour base, coloring and glycerin. Cook until the mass has a homogeneous consistency.
- Cool the resulting mixture and knead thoroughly. Add flour if necessary.
Having made a figure from dough without starch, you will see that it has a pleasant shine. This craft will be a wonderful gift for your mother on March 8th or a friend’s birthday.
How to make play dough without flour

The highlight of this plastic mass is the absence of flour in the composition. The technology for preparing salted dough for modeling is suitable for craftsmen who do not like working with white, quick-flowing ingredients.
Ingredients:
- Starch - 1 cup.
- Baking soda– 2 glasses.
- Water – 0.5 cups.
- Natural food coloring.
Preparation:
- In a deep bowl, mix starch and soda. While stirring the mixture, pour in water in a stream.
- Place the container with the ingredients on low heat and cook until a ball forms.
- Place the cooled mass on a floured surface and knead. The dough is ready.
There is no flour in this dough, but it is perfect for modeling. Use this easy-to-make plastic material to create a variety of shapes that will show off your talent to others.
What can be made from salt dough - examples of crafts

We looked at the technology for preparing salted dough for modeling. It's time to put the salty material to work. If you are a beginner, I recommend starting with the simplest figures. Over time, having gained valuable experience, switch to more complex crafts.
Experienced craftsmen make various figures and compositions from salt dough. The result depends only on your imagination. In this part of the article I will give several good examples With step by step instructions on production. They will help even children learn the basics.
Mushroom
- To create a hat, roll a small ball and press lightly on one side.
- Make a sausage. When rolling one side, press down slightly. You will get a leg.
- All that remains is to assemble the figure. To increase reliability, use a toothpick.
- After the dough has dried, decorate the mushroom as desired.
Beads
- Roll several dozen equal-sized and even balls from the dough. Place the balls on toothpicks.
- Leave the balls on fresh air for a few days to dry. I recommend turning the beads over several times a day.
- Carefully remove the toothpicks from the dried balls. String beads onto a ribbon or cord. For a more beautiful product, color the beads with markers.
Christmas toys
- Roll out the salt dough into a layer. Using a cardboard stencil or cookie cutter, press out the shapes.
- Use a cocktail straw to make holes in the figures. Dry the dough.
- All that remains is to decorate the Christmas tree decorations and thread a beautiful ribbon through the hole.
Rose
- Make a cone using a small amount of dough.
- Roll into a small ball and roll into a flat cake. Attach the fragment to the cone.
- Attach a similar element on the opposite side. You will get a bud.
- Roll some balls and make petals. Attach to the flower in a circle.
- Bend the upper edges of the petals slightly back and press the sides.
- After the dough has dried, paint the figure scarlet.
Puzzles
- Make a large stencil of a shape out of cardboard, such as a cat. Roll out the dough into a layer. Using a stencil, cut out a large shape. Leave the dough until the morning to dry.
- With a sharp knife cut the cat figurine into fragments. Wait until completely dry.
- Use markers or gouache to color the craft. Once dry, coat each piece with a layer of clear varnish.
Video examples of figures
As you can see, salt dough is ideal for creating simple and complex shapes and compositions. And these are just a few ideas. With the help of your imagination you can create a variety of toys, decorations, souvenirs and other crafts.
In conclusion, I will share the secrets of experienced craftsmen who will make working with material more productive and the result more impressive.
From salt dough you can make a huge number of crafts, for example: flowers, animals, various figures, inscriptions, numbers, toys, paintings and whatever you want! Modeling from salt dough is called bioceramics. The advantage of salt dough is that it is convenient to work with, this material It is absolutely harmless and crafts made from it will delight you for several years. In this article we will look at how to make crafts from salt dough with your own hands.
You will need: a glass of wheat flour, a glass of extra salt, half a glass of cold water, a bowl.

Recipe

The finished salted dough should not stick to your hands or crumble. It should be cool and easy to sculpt. I recommend watching the video master class!

There are two most common ways to dry salt dough. The first method: the finished craft will dry on its own. The main thing is that straight lines do not fall on it sun rays, otherwise it will crack. The craft can be placed on a flat surface and wait a few days. Second method: dry the finished craft in the oven for 3 to 6 hours (depending on the size of the craft). Drying occurs in batches with breaks. One approach is 1-2 hours. For quick drying in one go, set 75-100 degrees in the oven, and then the craft will dry in an hour. At a temperature of 120 degrees, the craft will dry in 30 minutes, but it is better to dry it naturally.

There are two most common ways to color salt dough. The first method: after drying, paint the finished craft with acrylic paints or gouache using a brush. Second method: food coloring is diluted in water, then added while preparing the dough. When the craft is completely painted and dried, it must be coated with transparent manicure or furniture varnish in 2-3 layers. Each layer must dry before applying the next. This way the craft will last for a long time.

You will need: colored salt dough, stack, clear manicure polish, toothpick.
Master class

The salt dough star is ready!
Salt dough caterpillar
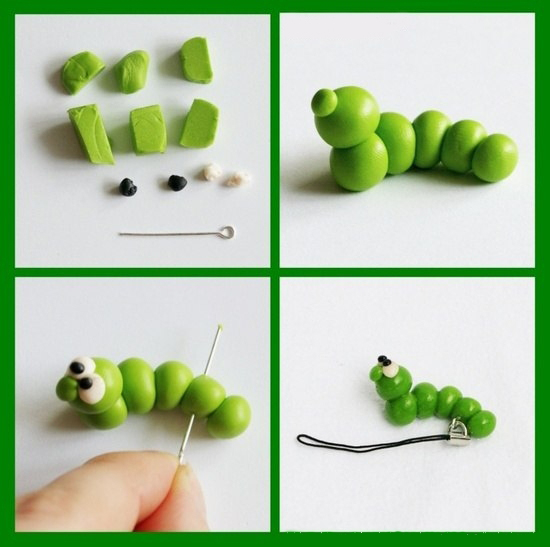
You will need: colored dough, knife, pva glue, toothpick, pendant, clear manicure polish.
Master class
- Roll out the sausage.
- Cut it into 6 equal parts.
- Roll into balls.
- Glue 5 balls together.
- Glue the head.
- Make a nose and eyes, then glue them on.
- Poke a toothpick into the hanging area.
- Dry the craft.
- Attach the pendant.
The salt dough caterpillar is ready!
Salt dough apple

You will need:
Master class
- Make half an apple, make the inside flat, pressing it onto a flat surface.
- Make a thin flat center and glue it to the main part.
- Roll 6 seeds and a stick, then glue to the apple.
- Blind the leaves, then glue them.
- Dry the craft.
- Apply varnish and wait until completely dry.
The salted dough apple is ready!
Salt dough elephant

You will need: colored salt dough, pva glue, clear manicure polish.
Master class
- Make the elephant's body by rolling an elongated ball.
- Make 4 legs in the shape of plump sausages.
- Make a proboscis.
- Make the elephant's ears in this way: roll out 2 flat cakes, glue flat cakes of the same shape of a smaller size and a different color to them.
- Make a small ponytail.
- Blind your eyes.
- Assemble the elephant in the following sequence: glue the legs to the body, then glue the proboscis, then the ears, eyes and tail.
- Dry the craft.
- Apply varnish and wait until completely dry.
The salt dough elephant is ready!

You will need: salt dough, foil, a candy bowl or similar plastic container, gouache, a brush, clear manicure polish, a modeling board, a knife or a stack.
Master class


You will need: salt dough, nail scissors, pva glue, acrylic paints or gouache, brush, manicure polish.
Master class

Salt dough hedgehog is ready!
Owl (eagle owl) made from salt dough

You will need: salt dough, pva glue, nail file, manicure scissors, acrylic paints or gouache, brush, wooden board with a pendant, clear manicure varnish.
Master class

The salt dough owl is ready!

You will need: salted dough, the base on which the craft will be attached, for example, a board or plate, a glass or a knife, a sheet of paper, a simple pencil, a garlic press, a rolling pin, pva glue, acrylic paints or gouache, a brush, clear manicure polish, cloves.
Master class

Salted dough fruit basket is ready! I recommend watching the video master class!

You will need: salt dough, knife, rolling pin, pencil, sheet of paper, sandpaper, acrylic paints or gouache, brush, clear manicure polish, glue gun or pva, a base for crafts, for example: a board with a frame, transparent manicure varnish.
Master class

Salt dough pencil

You will need: water, flour, extra salt, cardboard jar for the frame, PVA glue, scissors, a piece of decorative rope or corrugated paper, gouache, brush, button, stacks, acrylic varnish for crafts, toothbrush.
Master class
- Knead the salted dough in this way: add a glass of flour, a glass of salt, add water, then knead until the desired consistency of the dough. Separate part of the dough, add beige gouache, then knead.
- Roll out the cake to a thickness of 10-15 mm.

- Apply PVA glue to the outer rim of the jar and wrap it with dough. Cut off the excess with a stack and smooth the joints with a damp brush.
- Create a small dotted texture with a toothbrush on the surface of the dough.
- Knead the dough brown, roll it into a flat cake 10-15mm thick.

- Cut a 5cm wide strip of brown pastry and glue it to the bottom of the jar.
- Make 2 large owl eye bases from white dough, then glue them on.
- Make a beak out of brown dough and glue it on.
- Make eyes from turquoise dough and glue them on.
- Roll out 8 strips of pink dough, twist them into 4 flagella and make a bow, then leave it to dry for 2 hours.
- Make droplet-shaped owl wings using brown dough, then glue them on.

- Weave ropes of beige dough and glue them onto the neck of the jar.
- Roll out a sausage from white dough, draw the texture of the lace with a stack and glue it as a collar under the beak.
- Place the craft in warm place for a day.
- Paint the bottom and wings with brown gouache and decorate with white dots.

- Draw the pupils and eyelashes with black gouache, wait until the paint dries, then paint white highlights on the eyes.
- Glue a pink bow above the wing.
- Glue a button with a bow from a corrugated strip onto the lace.
- Cover the craft with varnish and wait until it dries completely.
The salt dough pencil is ready!
Salt dough dachshund

You will need: salt dough, simple pencil, scissors, cardboard, paints, brush, rope, toothpick, foam sponge, clear varnish, PVA glue.
Master class

The salt dough dachshund is ready!
Boletus mushroom made from salt dough

You will need: salt dough, light bulb, paints, brush, foil, cardboard, masking tape, superglue, PVA glue, paper napkins, clear varnish, stack.
Master class

Boletus mushroom made from salt dough is ready! I recommend watching this video!
Funny pigs made from salt dough

You will need: salt dough, paints, brush, foam sponge, stack, thin rope, toothpick, black gel pen, PVA glue.
Master class

Funny salt dough pigs are ready! I recommend watching this video!

You will need: salt dough, baking sheet, rolling pin, knife, sheet of paper, acrylic paints, brush, ribbon, water, shoehorn, pencil, sandpaper, clear manicure polish.
Master class

Salt dough is a very simple and affordable material for original crafts self made with your own hands. You can buy ready dough, for example, such as Play Doh, in the store. Or you can do it yourself and even in several ways. They are similar to each other, but each master develops his own secrets over time. Let's learn the basics before experimenting.
Methods for preparing salt dough
The simplest recipe for preparing salted modeling dough at home is to combine salt, flour, and water in different proportions. We will need:
- one glass of “Extra” salt;
- two glasses of flour;
- 3/4 cup of water, always cold.
Stir the dough until it turns into a homogeneous mass. This activity is not entirely childish. Adults can handle it better.
Tip: When you prepare the dough, add a little hand cream or vegetable oil. Then the mixture will be more plastic.
To check if it can be worked with, tear off a small piece and use it to sculpt a small piece. The dough should not crumble, otherwise the crafts will not work.
Some experts advise first combining salt and the required portion of flour, and then gradually adding water. Others first dissolve a portion of salt in water and only then add flour.


The secret of another recipe is in different proportions and a secret ingredient. To make play dough with your own hands, you need to mix:
- one glass of wheat flour;
- one spoon of wallpaper glue;
- two glasses of fine salt;
- one glass or so of cold water.
Tip: Try not to store the finished dough for too long. Otherwise, it will acquire a grayish tint, which will affect the quality of the crafts.
Some masters experiment with different types of flour. For this use:
- three glasses of wheat flour;
- one glass of rye;
- one and a half glasses of cold water;
- two glasses of salt.
Combine the components into a homogeneous composition in an already known order.
Tip: Dough made from a mixture of rye and wheat flour is easier to process.
The mixture for modeling crafts has the desired consistency if it:
- does not crumble;
- does not tear;
- comes off easily;
- quite dense.
You can knead the dough using a mixer. It's okay if the mass is too soft. Mix a little more salt and flour, add to the existing dough.

How to make colored dough
It is much more interesting to sculpt from colored materials, especially when you need to involve kids in a creative activity. It is difficult for them to paint products after baking. Young children should prepare the colored mass right away. It will turn out no worse than Play Do.
The easiest way to make colored dough at home is to add the color of paint you need to the water required by the recipe. Acrylic paints and gouache will also work. True, the products will turn out to be a delicate pastel color. In order to achieve richer and richer shades, as in the Play Doh sets, try out another method in practice.

We define the color of each of them.
Do not paint over the entire mass. The light shade will be useful for you to make the face, arms or legs of the future salt dough product.
When using the second method of coloring, you should be careful not to stain your clothes or furniture with paint. Your hands will instantly become multi-colored. But the paint washes off quickly. To avoid trouble, it is better to knead the colored dough over the sink.
How to store salt dough
It is not recommended to leave play dough idle for a long time. Otherwise, our homemade Play Doh set will dry out. If you do not plan to use all the modeling mixture at once, put it in a plastic bag and close it tightly. Otherwise, after a while you will have to prepare a new one. The composition should be stored in the refrigerator. Instead of bags, plastic containers with lids are also suitable. You can use yogurt cups.
How to dry crafts
Drying products or baking them is the most crucial moment in working with dough. Even more important than kneading the material. If you do not adhere to the drying rules, then all the efforts and labors of your creativity will end up in the trash. There are three ways. to dry salt dough products.

- Natural. Leave the modeling dough for room temperature and forget about it for a couple of days or even weeks. You cannot speed up the drying process using hot radiators or fireplaces.
- In the oven. This procedure reduces drying time to one to two hours. However, it all depends on the thickness of the craft. It is important to start drying the salt dough in a cold oven, gradually increasing the temperature. Don't forget to turn the products over so they bake evenly. At a temperature of 50 degrees, the craft is ready in 1-2 hours.
- Combined. You can leave the products at room temperature for a while and then dry them in the oven. To brown it a little, raise the oven temperature to 200 degrees.
Salted play dough, which you can make yourself, is no different from store-bought Play Doh and has a number of advantages. It is safe to swallow if you do not add any glue as per the recipe. It is easy to prepare, you can dry it yourself and paint it with any colors. Varnish coating guarantees the safety of the product for many years.
Using various natural materials for creativity in lately has become increasingly popular. This is especially useful for children. So, let's look at a few recipes on how to make salted play dough.
How to make salted play dough: list of recipes
There are many recipes for salt dough, everyone finds one more suitable for themselves, which is pleasant and successful to work with.
Recipe No. 1.
You should take:
- four glasses of flour;
- two glasses of fine salt;
- two glasses of warm water.
If you want to prepare colored dough, then take the necessary paint, ink or gouache.
Knead the dough for about ten minutes, kneading it well. As a result, it should be soft and without cracks. It should not stick to your hands.
This dough should be kept in a closed container or polyethylene, because it dries quickly when exposed to air. You can start working with dough prepared in this way right away.
Recipe No. 2.

You should take:
- two cups of flour;
- one cup of salt;
- two-thirds cup of water.
To prepare the dough for this recipe, you should take boiling water. You need to pour salt into it and wait until it dissolves.
After that in salt water you should add all the flour, pouring it in carefully and stirring constantly. The result should be a thick and fairly hard dough.
Recipe No. 3.

You should take:
- two glasses of flour;
- one glass of fine salt;
- one glass of water.
Mix the salt with the flour, then slowly pour in the water and knead the dough until a plastic mass is obtained.
If the dough turns out to be dry, add a little water, and if it’s runny, add flour and salt.
You need to knead the dough for ten or fifteen minutes in order for the result to be better.
Recipe No. 4.

You should take:
- one hundred grams of wheat flour;
- one hundred grams of rye flour;
- 400 grams of salt;
- one glass of water;
- two tablespoons of wallpaper glue.
Adding to the dough rye flour, you change its color from white to a warm brown shade. But if you use only rye flour for the dough, it will turn out inelastic and hard. This is why wheat flour should be added.
To prepare the dough, mix flour, glue and fine salt. Then add water. The dough must be kneaded and kneaded well so that it does not tear or crumble during modeling.
Advantages and disadvantages of salted play dough over other materials
Of course, each material has its own disadvantages and advantages. Let's consider those for salt dough.
- you don’t need special funds to prepare it;
- After it, it’s easy to wash your hands and work surface; it also leaves no traces;
- there are recipes (prepared without glue) that are absolutely safe for children if they get into the mouth;
- proper preparation of the dough is the guarantee that it will mold well and will not stick to your hands;
- products made from it can be dried in the oven, or simply in the air;
- the surface of the prepared dough product is well suited for painting with almost any paint;
- When covering a finished and painted product with varnish, it is well preserved for many years.
If we talk about shortcomings, then there are actually none, except that the product takes a long time to dry. It is important to follow the technology when preparing it, otherwise the crafts simply won’t work out.
In order for the dough to turn out well, you should follow some tips:
- You need to take fine salt for the dough, preferably “Extra”, but if there is none, then take regular salt and grind it in a coffee grinder;
- to make the figures, use a baking sheet, then reverse side the product will turn out smooth;
- Add water to the dough gradually, use only cold water (unless the recipe says otherwise);
- if glue is used, it must be diluted with water to the consistency of sour cream;
- Transparent furniture or art varnishes should be used for fixing and protection;
- It is not recommended to store the finished dough for more than three days;
- To color the dough, you can also use natural dyes, for example, curry, nutmeg, instant coffee, cocoa powder, cinnamon, cumin (all ground);
- After baking already painted products, their color changes.
What can be made from salt dough?
 You can make almost anything from salt dough. Various figures for the Christmas tree, refrigerator magnets, keychains or just items for decoration. An experienced craftsman can make a full-fledged painting from this material!
To prepare the figures, you can use all available materials - from children's molds to various more professional tools. Various impressions are made while the dough has not yet dried. To connect the parts, use a wet brush.
After preparing the product, it must be dried. This can be done in the oven (as the professionals do) or outdoors. The main thing is to wait until it dries completely.
The most important thing is that you can then play with dough products or they can simply stand as decoration. By following all stages of preparation, the product will be strong and durable. Creative success to you!!!
How? You haven't read yet:
I suggest you get acquainted with another way to develop fine motor skills - with modeling. And you and I will sculpt from the dough. Practical, simple and environmentally friendly.
In addition, salt dough has many advantages:
it can be done anytime, at any time;
it is safe (even if it gets into your mouth);
it molds wonderfully and does not stick to your hands (of course, if it is mixed correctly);
the dough does not leave marks on the work surface and is quickly washed off;
easy to dry and paint;
you can work and play with it without fear that it will break or lose its shape...
We offer you several recipes. Choose the one you like.
Recipe No. 1 “Salted play dough”:
A glass of salt is mixed with one glass of flour. Then add 5 tablespoons of sunflower oil and a little water. To give a certain color, colored gouache or juice (carrot or beetroot) is added to the kneaded dough. You can also add diluted warm water paints for coloring Easter eggs.
Recipe No. 2:
Preparing salted play dough involves mixing 1½ cups of flour with a cup of salt and 125 ml of cold water. Water is added in small portions, and the dough is kneaded like dumplings.
Recipe No. 3 (soft for crafts):
In two glasses of flour, mix one glass of salt and 125-130 ml of water (the volume of water depends on the type and type of flour). It is advisable to add 1 tablespoon to this recipe. low-fat cream for hands, sunflower oil or dry wallpaper glue (optional). To knead a homogeneous mass, you can use a mixer or blender.
Here are a few more recipes that differ slightly, but perhaps they will become “yours.”
200 gr. = (1 cup) flour
200 gr. = (0.5 cup) salt
125 ml. water
Please note that salt is heavier than flour, so they are the same in weight, but in terms of volume, salt takes up about half as much.
MASTER Class - Knead dough (for beginners)
For thin relief figures, add your choice:
- 15-20 g (tablespoon) PVA glue or
- starch (tablespoon)
- wallpaper glue (mix it with a small amount of water first)
FOR EXAMPLE:
Strong dough for large products:
200 gr. flour
400 gr. salt
125 ml water
Dough for fine work:
300 gr. flour
200 gr. salt
4 tbsp. glycerin (can be purchased at a pharmacy)
2 tbsp. glue for simple wallpaper + 125-150 ml of water, pre-mix.
It is better to use a mixer for kneading - this will simplify the task, and the dough will turn out better.
ATTENTION ADVICE:
* Pancake flour (or with additives) - NOT (the figures will rise like good dough for pies and will crack)
* Iodized salt - NOT (large inclusions do not dissolve, subsequently the dough is not homogeneous - it becomes grainy)
* WATER - best VERY COLD, be sure to add 50 ml parts after each addition, stir (due to the fact that for different flours, it may be necessary different quantities water).
* Salt is first mixed with flour, and only then water is poured into the finished mass.
*Salt dough is stored in a plastic bag or tightly closed container. Salt dough from plastic bag It is better to take it out in small pieces, since lumps of dough quickly become covered with a crust and when rolling or molding, these dry crusts spoil the appearance.
What equipment and tools will you need for creative modeling with salt dough:
- Rolling pin (this item is the most necessary!).
- Knife (stack).
- Comb (needed for making baskets).
- Ballpoint pen refill (to make holes and different patterns).
- Figured knives for cutting out cookies or a ready-made set for working with plasticine.
- Buttons, hairpins, beads, rings, lace and much more to make interesting and delicate prints.
There are three main methods used to dry dough.
- The first is oven drying at a temperature not exceeding 800C for an hour or even more (the period of time depends on the size and thickness of the product).
- The second method is drying on a radiator or in the open rays of the sun in natural conditions. The second method is longer, but no less effective.
- The third method also suggests drying salt dough crafts in the oven, but putting them in a cold oven, and then gradually preheating the oven to 1500C. The figures should cool down there. And don’t be upset if the dough swells or cracks in places after drying. “Salt dough. Crafts" can be fixed! These two troubles occur when the flour is chosen incorrectly or the drying is performed incorrectly. Remember, the simpler the flour, the better it is for modeling! You can take low-grade rye and wheat. And you can dry the products in stages, in an oven preheated to low or with the door slightly open. But it’s better to let the craft dry on its own. If cracking occurs after painting, it means the dough is not completely dry, and it needs to be dried in air, and the roughness should be smoothed out with sandpaper and painted again. The cause may also be excessive thickness of the product. In this case, the excess is removed from the back or bottom. When drying in the oven, the figures need to be rotated regularly to ensure even drying. If a piece of a part breaks off, you should not glue it; you need to smooth out the unevenness and cover it with decorations. The dough is glued and glued with PVA glue.
Life little man is full of many achievements, most of which can become key in its development. Just think that banal finger movements stimulate speech development! The reason for this is that the brain centers responsible for speech and the work of the fingers are located nearby, and the development of one zone significantly affects the development of the other.
Recently, an interesting study was conducted in Japan, during which it was noted that if children under the age of 5 spent most of their time at the computer and learned to write using a keyboard, they simply stopped talking... Because when typing on a keyboard, the points that participate in the development of areas of the brain responsible for speech. So, dear parents, don’t skimp on coloring books and pencils for your baby, and always call your little helper to sort out peas for soup or wind threads into a ball.
Dough modeling basics for kids
Modeling from dough for children can be started at 1.5 years old, but you can get acquainted with dough already at one year old. The first lessons are very simple and they all go through three stages: you show it yourself, then you do the same with the baby’s hand, and the last thing is you invite the child to do it himself. Don't forget to comment on all your actions and name the objects.
Example: You roll a small ball and use your finger to form it into a flat cake (pancake). Then you make a similar ball again, take the baby’s index or thumb and use it to make a pancake. Don’t rush to quickly get your baby to become independent. Let him see enough of your actions to ignite the desire to try it himself. To begin with, it’s good to roll a larger ball and simply place it in the baby’s palm. Let him feel its texture, properties, stretch it and poke his finger into it. It is possible that he may not like this activity at all, then put the dough in a container for a while and try again after 1-2 hours.
Another option for modeling dough for children: make a large pancake and, together with the baby, attach different beans or shaped pasta to it, making simple patterns. There are quite a few options for practicing with dough, even for a child just starting to sculpt:
- Pinch off the pieces and glue them back
- Roll sausages and balls with your finger or palm
- Flatten the balls with your palm and smear them with your finger
- Clap the dough with your palm
- Roll balls and sausages of different sizes
- Stretch, squeeze, poke, throw and more
An activity like dough modeling is very useful for children. And there are many ways to play with the sculpting process, just use your imagination. The koloboks make wonderful snowmen or apples that can be used to feed toys. Sausages can be a snake or a string if you connect the two ends, and if you fold the sausage in a spiral, you will get a snail or a flower. A pancake can become a hat or a plate, and if you pull it on thumb and attach a sausage to the side, you will get a jug with a handle. You can also put several small balls on the flatbread and you will get a pizza, and by placing a bean in the center of the pancake and folding it in half, you will get a pie.
The next stage of dough modeling for children is not only more creative, but also more exciting and educational. When you and your baby have mastered koloboks, pancakes and sausages, you can try to start making the first crafts: draw a bird and invite your baby to feed it, pinching off small pieces of dough and gluing them next to the bird.
Related articles
 The best amulets against the evil eye and damage Amulet against the evil eye with hands for children
 How to read the Psalter correctly
 Delicious dishes with sausages
 A glimpse of Bella. Romantic chronicle. A glimpse of genius. Messerer about Akhmadulina Boris Messerer glimpse of Bella romantic chronicle
 I dreamed that I was sailing on a boat on the river
 How to cook beef entrecote in a frying pan
 About the company Foreign language courses at Moscow State University
 Which city and why became the main one in Ancient Mesopotamia?
 Why Bukhsoft Online is better than a regular accounting program!
 Which year is a leap year and how to calculate it