
It's called cutting vegetables and fruits. Carving - artistic carving of vegetables and fruits
Carving – “cutting out patterns.” A high-speed descent for skiers with a series of carved turns, long-term styling of curls and curls, patterned carvings on wood, stone, soap, ice, vegetables - all this is included in the concept of “carving”.
We present the most beautiful works of artistic carving of vegetables and fruits.
(12 photos of fruit carvings)
The edible direction of carving (culinary carving) - cutting out marvelous patterned figures from vegetables and fruits - is used today by many chefs to decorate holiday tables. 
The intricacy of figures carved from various products brings culinary carving closer to a primitive art form. But such art is very short-lived, because the material here is living and tender material - vegetables and fruits. 
History of carving.
This unique art arose in medieval, half-starved, populous Southeast Asia, and not in more prosperous Europe. 
Europeans had quite a variety of high-calorie foods at their disposal. The diet of Europeans included meat from domestic animals, fish, poultry, fruits, cereals, game, vegetables... The prepared dishes had to be, above all, nourishing and tasty. Even the tables of the European nobility were not particularly decorated. 
But in ancient Asia there was no such variety of products. Often Asians had to be content with predominantly plant foods. An ordinary meal often turned into a whole ritual, and the design of any product was given special attention, which gave impetus to the development of the whole art of decorating dishes. 
One century replaced another, and the artistic carving of fruits developed its own special national features.
Chinese-Japanese technology is characterized by images of dragons, inscriptions with congratulations, and historical scenes. Sino-Japanese carving comes down to extruding hieroglyphs or figures using a standard set of notches and stencils. 
Thai carving masters have a more subtle carving technique and a more complex set of tools. The festive table in Thailand is traditionally decorated with carved flowers, because the symbol of this state is the orchid. To create amazingly graceful flower arrangements, narrow and thin “Thai knives” with a whole arsenal of cutters of different configurations are used. 
It is clear that Chinese-Japanese technology is much easier to master. But the work of Thai masters looks much more refined and beautiful. 
Carving today.
Interest in carving came to European countries along with the fashionable passion for oriental cuisine. Restaurant chefs have become interested in curly cutting to give table settings an unusual and attractive look. 
Exhibitions food products And cooking shows It has already become a long-standing tradition to decorate with all kinds of fruit carvings. After all, there are no qualitatively new ideas and inventions like carving in modern cooking. 
What is carving? In cooking, this is the artistic cutting of vegetables and fruits. Carving first appeared in southeast asia. Later, this art penetrated into Europe, but was not so widespread due to the differences in taste preferences of Europeans and Asians. After the popularization of restaurants, the need for carving appeared. The premises required decoration, and the dishes required beautiful and original presentation.
Products and Tools
You can use a wide variety of carving products. Both fruits and berries and vegetables are ideal. The preparations can be made immediately before serving or in advance. Some blanks at proper storage will not lose their appearance within a few days. For fruits that tend to darken, it is recommended to sprinkle lemon juice. For beginners, it is important to know that the color scheme and quality of the products play a huge role.
Currently, the technique of curly cutting of fruits has become popular both in Russia and throughout the world. Decorations made from fruits and vegetables are suitable for any type of celebration. For beginners, it is important to take into account that the type of art presented will require a lot of patience, attention, developed imagination and a good eye.

You can learn the skill both at home, thanks to virtual publications and literature, and in specialized courses. Passes large number exhibitions and master classes around the world.
Features and technique
Even the most ordinary dish that we are used to seeing on our table every day, decorated in carving style, will whet the appetite and lift the spirits of all members of your family. Beginners should remember that even expertly cut foods should be tasty. Complex products made using the carving technique are intended for aesthetic pleasure, and not for consumption.
A variety of vegetables are suitable for decorating the salad:
- potato,
- radish,
- pumpkin,
- cucumbers and others.
If you use tomatoes, they should be medium in size and have smooth, seedless flesh. Perfect pepper will do with its diversity color range. Each vegetable should be combined in color and taste.
Vegetables are ideal for decoration meat dishes. When combining products, it is better to choose contrasting colors, this will make your dish more vibrant. Perfect colors will be: green, red, yellow.
A few tips for beginners: first, the vegetables need to be washed and dried well. When performing decorative cutting of fruits, you should avoid excessive decoration of dishes; too much decoration will not give a good visual effect.

Photo gallery


There are a number simple ideas for carving. Even a beginner can cope with the tasks.
- The simplest thing you can make is a flower from a tomato. To do this, cut the vegetable in half and cut off unnecessary parts. Using a sharp knife, cut it into thin slices. After this, we stretch the slices and begin to twist them into a flower. To prevent the flower from looking lonely in the dish, we make cucumber bells. To do this, use a sharp knife to cut the cucumber in the shape of a petal towards you. It should look like a bell. Onions can make beautiful water lilies. Add the resulting vegetable carving to cold cuts and you're done!

- You can make an unusual cone from carrots. To do this, cut out scales over the entire area of the carrot. After finishing the work, you need to lower your workpiece into ice water about 15 minutes and the decoration is ready. Also, by carving carrots, you can make many different flowers, such as dahlias, lilies, calla lilies and many others.
- If your kids are reluctant to eat, then carving vegetables or fruits will help them fall in love with foods they don’t like. Having decorated any dish in an unusual way, you will see with what appetite it will be eaten. The simplest thing is to do it ladybug from tomato. To do this, cut the tomato into two equal parts and place them on a lettuce leaf. We make the head, legs and spots from olives. You can make a huge variety of animals and insects from vegetables; all you need is your imagination. It’s best to involve your baby in the process, because a homemade dish will be even tastier. A process such as carving vegetables or fruits will develop perseverance and imagination in a child.
What to make from fruits and berries
You can also make many original decorations for your table from fruits and berries. The most suitable fruits are:
- apples
- watermelon
- pears
- fresh lemons and oranges
The most common carving of fruits and berries is a watermelon basket. You need to cut it just before serving. Fill the basket with a variety of sweet and sour fruits.
You can cut beautiful swans from an apple for a fruit plate, the main thing is to use sharp knives. A tangerine will make an original flower. In general, all citrus fruits are ideal for carving.
You can make a whole picture out of fruits, without necessarily taking a complex plot. Skewers are allowed. Fruits can be placed on the dish in any order, the main thing is that in the end it all looks beautiful and appetizing.
People who see vegetables and fruits as more than just food engage in carving. The art of creating unimaginable things from food. Carving of vegetables and fruits is suitable for decorating a table on a holiday, as a hobby or professional hobby.
For beginners in artistic cutting, you will need three Thai knives, any vegetable or fruit.

- First. You will need a small cucumber and a carving knife.
- Second. Cut the cucumber in half. From the cut side, cut out five small triangles on the sides.
- Third. On each triangle we make cuts in the form of teeth.
- Fourth. Cut a petal from the outside of each triangle in the middle. Stick the knife no deeper than the thickness of the cucumber peel.
- Fifth. Do not cut off the peel all the way around.
- Sixth. Remove the seeds and pulp from the center. Add a piece of carrot.
- Place the finished flower in ice water for a while.
Apple swan
Showing your imagination, decorate the table with an apple swan.


Potato rose

- First. Medium raw potato, Thai knife.
- Second. The potato should be oval, neat in shape, without eyes.
- Third. Cut a round groove in the middle. Make it wide and slightly rounded on the sides.
- Fourth. Cut the petals with a knife at an angle. Slowly, carefully.
- Fifth. Move gradually towards the core.
- Sixth. Large petals. Cut so that the base of the petal is thick and the edge is thin. Hold the tuber firmly in your hand.
- Seventh. Remove excess pulp between the sheets. All rows are cut out in a chaotic order, like a real rose. The main thing is not to rush. Upon completion of the work, cut off the excess at the bottom, giving it a shape.
Carrot cone

- First. Carving knife, raw carrots.
- Second. Clean and cut out a square tail.
- Third. Round off the tail and edges.
- Fourth. Mentally divide the thick edge into six parts, cut out triangular scales for the future cone.
- Fifth. We create a platform for the second row. Under the scales, we cut out a plate two millimeters deep along the contour. Remove carefully. You will get a small depression.
- Sixth. Cut out the scales.
- Seventh. Repeat steps five and six until you run out of carrots.
- Place the pine cone in ice water.
Carrots are a malleable material; you can use it to create many decorations for dishes and tables. Examples step by step instructions can be seen in the video.
Artistic cutting is a fascinating activity. Step by step description with photo for easy learning will help turn your plans into reality.
From this article you will learn what carving is and how you can create real works of art from products. Essentially, this is artistic cutting of products; in addition to the already familiar fruits and vegetables, the list of products for cutting also includes cheese and chocolate. You can also cut on many other materials, not just food. But in this case, we will look specifically at the products. Below are several examples of carving from vegetables and fruits, a photo selection of finished models not only from the “gifts of nature,” but also from chocolate and cheese.
Carving photo


In addition to products, a carving master also needs tools with which he creates his masterpieces. Here is an example of such a set.

Master class on making lilies from cucumbers
This master class for beginners will help you take your first steps in mastering this type of culinary art such as carving. To work, you will need cucumbers, as well as a special oval knife and a nauzette, as well as scissors and a regular sharp knife.

Take a cucumber and cut a 7-8 cm piece from it, cut off the tip. After this, use a special knife to make a leaf-shaped cut, but without cutting it all the way.

Continue making the remaining leaves close together, turning the cucumber in a circle.

Now take a sharp knife and cut off all the excess in a circle 1 - 2 mm thick.

Using an oval knife, make the second row of petals so that they are staggered with the first petals. Then again cut 1 - 2 mm in a circle to prepare the site. Do this as many times as the workpiece allows.

After all the petals are cut out, you need to carefully remove the middle with a knot or a regular knife.

For the core, cut a piece of suitable size, make decorative notches on it and insert it inside.
Also, do not forget that the lily petals need to be trimmed with scissors to give their tips the desired shape.


The core can also be attached using a toothpick and the entire flower attached to the stem, which can be made from any suitable material.

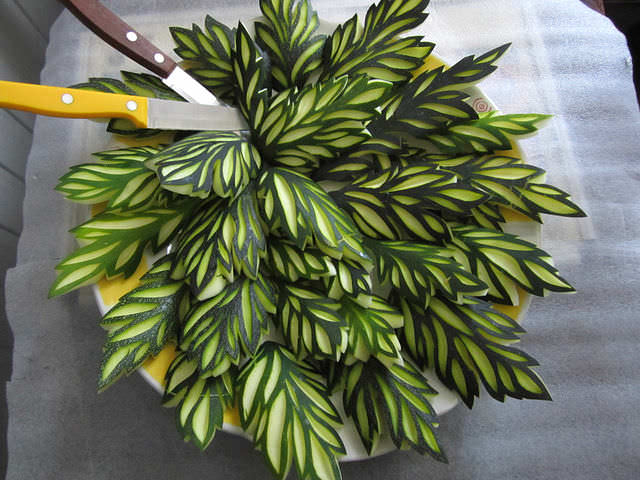
Carving lessons will help you master this art and teach you how to create not only compositions from fruits and vegetables, but also entire paintings, for example, like this:


It will be very easy to surprise your guests thanks to this art. After all, home carving is significantly different from professional carving, but this does not make it any less impressive. For example, you can decorate your holiday table with these cucumber leaves:

Or create these swans from apples:

And if you have seafood on your table, it would be nice to decorate it with apple crabs:

Carving is also useful for children’s parties, because it’s not very easy to present favorite dish in the form of funny figures - great idea! Children won't even notice it if it's a variety of pictures or animals made from fruits and vegetables.


For those who want to study this art in more detail, below there is a video that will help you succeed in this.
And here is a great video lesson on how to cut vegetables and fruits:
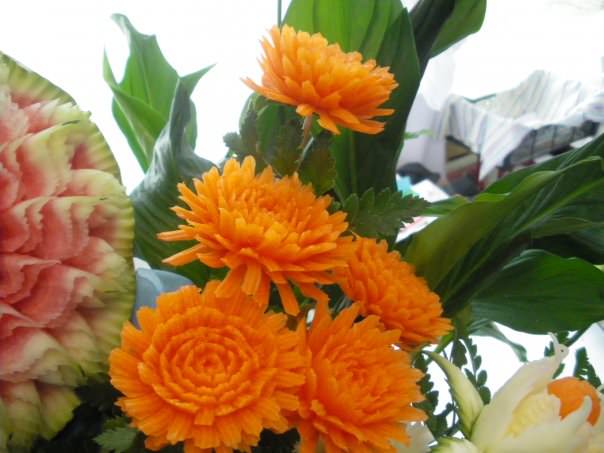
Famous tangerine men:
Carrot butterflies:
Pepper flowers:
But interesting ideas for children's parties or just for every day:
And these masterpieces are created with the help of craftsmanship and chocolate:
If reading this article has inspired you to do more... vocational training, then there are special courses. Their prices vary depending on the number of days of training and the type of course. Such lessons can cost starting from 10,000 rubles. and up to 30,000 rub. With these activities you can turn any lunch or dinner into a masterpiece, and your children's parties will be a blast! All that is required is patience and self-confidence! Good luck!
Content
Serving a dish can be a real art if you use your imagination and learn several techniques of one of the types of needlework - carving. Cutting out various shapes, flowers, animals and other elements from fruits and vegetables can not only result in a spectacular result, but is also a fun process. And although from the outside it seems that it is difficult, with a certain perseverance and the desire to learn carving, everything will definitely work out.
Culinary carving for beginners at home allows you to make unusual and entertaining figures from vegetables and fruits. To start working on this type of needlework, you can first take a few sharp knives different sizes and try your hand. Professional craftsmen who have been carving for many years have a whole set of tools that help them create real culinary recipes.
Carving lessons for beginners, which step by step explain the nuances and subtleties of the entire process, will allow you to learn how to make culinary masterpieces that will decorate any holiday table.
Preparing for the cutting process
Before you start learning and practicing cutting fruits and vegetables, you need to prepare. The entire set of specialists is not needed at the initial stages of development, but some tools should still be present.
 In addition to carving knives, scissors, a spoon with round and sharp edges, tools for cutting out the center of fruit, slicing eggs, nozzles and molds, and a brush can be useful. Today there are special kits for beginning carving masters. They contain everything necessary tools, which may be useful at the learning stage. In the process, each craftswoman will decide for herself whether she wants to continue carving, and then make a decision about purchasing a complete set.
If you want to create something beautiful and unusual dish, which will stand out on the holiday table, you will have to make a lot of effort and spend some time. The more hours spent practicing cutting fruits and vegetables, the faster and better the process will be.
Another important factor that every beginning carving master will need is a good detailed master class. Today, finding carving lessons for beginners is quite easy. After watching several specialized videos, each beginner will determine for himself the complexity of this art and the degree of his desire to master the basics of carving.
Educational fruits and vegetables
Even a novice carving master understands that not all fruits and vegetables are equally amenable to carving: some are easier to work with, others are complex materials. Experts name several vegetables and fruits that are easiest to learn how to cut out patterns and figures. These include:
- cucumber or zucchini;
- carrot;
- apple;
- watermelon.
Most often, novice carving masters train on apples. This fruit is quite common; if you fail, you can safely eat it and take the next apple for further training. However, it is best to use pumpkin for the first time. Pumpkin carving for beginners is a large surface, soft body and ease of working with pumpkin pulp, which will allow you to practice several important and basic techniques of this technique. 
The vegetable for the first carving lesson should be moderately ripe, cleanly washed and without any bumps or unevenness. After this, you need to cut off a small cap (or bottom) of the pumpkin and use a spoon to scoop out the pulp, seeds and liquid. The vegetable should remain hollow. While the pumpkin is drying from the inside, you need to think about the pattern that you want to carve on its surface. To begin with, it should be something simple, for example, an ordinary flower or a funny face that even a novice master can do. The thick skin of the pumpkin allows you to “fill your hand” and practice carving skills.
Even if you didn’t succeed in cutting out the desired picture the first time, you can turn the pumpkin on the other side. And continue studying. The main thing is not to give up and not to despair.
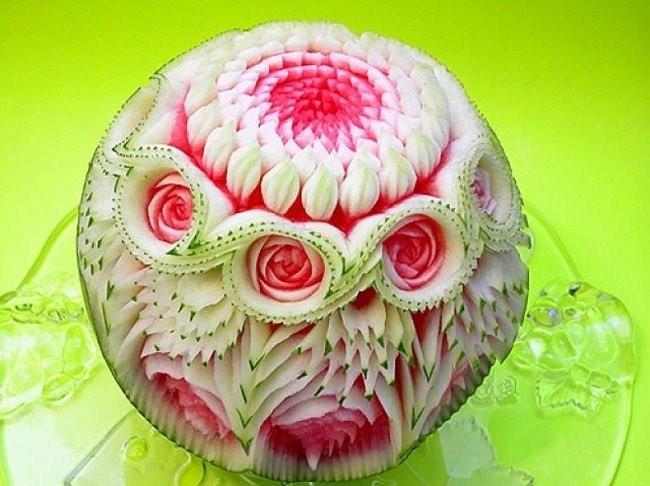
Watermelon carving for beginners can be just as fun, albeit challenging. But if you use step-by-step master classes, you can learn everything.
Step-by-step master class. Chinese cabbage chrysanthemum

White chrysanthemum looks rich, unusual and attractive. And making it is not as difficult as it might seem at first glance. To make it you need one Chinese cabbage, a special sharp knife and a spatula for carving. If you do everything carefully and consistently, you will be able to cut out the chrysanthemum the first time, since this is an easy task for beginners.
- First of all, the cabbage is cut in half. What remains is a root piece of the same length as the petals the future chrysanthemum should have. Almost the entire green part will be cut off, leaving only thin white stripes.

A sharp spatula is used to cut out chrysanthemum petals. If you don’t have one yet, you can try to do this with an ordinary thin knife, but for a beginner it will be a difficult task. You need to have skill and confidence in your hands so as not to spoil a single petal, otherwise there will be empty spaces inside the chrysanthemum, and it itself will not have a lush three-dimensional appearance.

Excess parts of the green leaf can be carefully cut off with scissors. It is important to hold the base of each cabbage leaf so as not to turn it the other way.

Similarly, you need to trim each cabbage leaf, moving towards the center of the head of cabbage and removing excess. Cabbage carving for beginners is considered one of the simplest and most educational.

The first cabbage leaves will be the easiest to produce. The closer to the center of the head of cabbage, the more difficult it is to hold the entire structure and maintain accuracy in work. But you will have to make an effort to make the flower beautiful. Slowly and consistently cutting out all the petals is the key to obtaining the desired result.

The chrysanthemum is ready. To make such a flower smaller, you can first remove the top sheets. And three or four chrysanthemums located on green lettuce leaves make a beautiful flower arrangement.
For your first chrysanthemum cutting practice, you can use the instructional video.
Step-by-step master class. Water lily
Decorate some dishes festive table you can use lilies made using the carving technique with your own hands, which will be easy to make from carrots even for novice craftsmen. To make them, it is enough to have a basic carving set for beginners with basic knives and blades. The basis for cutting out a lily will be a carrot, preferably a large one, so that you don’t have to worry about poor quality work and make a large, voluminous flower.

1. The first step to create a lily using the carving technique with your own hands is to make a polygonal one from a round carrot geometric figure. Using a sharp small knife, carefully cut off the vegetable on five sides. Even beginners will find this easy to do.

2. The next parts of the carrot are cut parallel to these sides, but not all the way. These will be the lily's petals, which should be secured at its base, so you need to cut the sides slowly and carefully.

3. The next step is to make a beautiful pointed shape for the petals. They are cut using well-sharpened scissors. In this case, the entire figurine must be held carefully so as not to tear off the petals. And although this may seem difficult for a novice master, with a certain amount of effort everything will work out in the best possible way.

4. When the outer layer of the petals of the future lily is ready, you can proceed to the next one. Using thin sharp knife An incision is also carefully made to obtain the second layer of the lily using the carving technique.

5. Other layers of the petals of the future lily are cut out in a similar way. Each next one will be smaller than the previous one, so the work will become a little harder than at first. However, the skill acquired during cutting will be the key to accurate cutting and obtaining identical petals even for a novice master.

6. Lastly, the middle of the flower is shaped. This is done using a special tool, the use of which allows you to create a beautiful and complete look for a real lily.

You can decorate a salad with one lily, made by yourself using the carving technique, and arrange several flowers in a beautiful composition, which will become the main decoration of the festive table.
Thus, carving for beginners will become an exciting process and will give you unforgettable moments of painstaking work with vegetables and fruits. And the finished result will not only allow you to be proud of yourself, but will also delight the master and everyone who can see this magic, unusual and attractive appearance. The main thing is not to be afraid to experiment and make every effort to learn how to make truly beautiful works of culinary art.
Related articles
 The best amulets against the evil eye and damage Amulet against the evil eye with hands for children
 How to read the Psalter correctly
 Delicious dishes with sausages
 A glimpse of Bella. Romantic chronicle. A glimpse of genius. Messerer about Akhmadulina Boris Messerer glimpse of Bella romantic chronicle
 I dreamed that I was sailing on a boat on the river
 How to cook beef entrecote in a frying pan
 About the company Foreign language courses at Moscow State University
 Which city and why became the main one in Ancient Mesopotamia?
 Why Bukhsoft Online is better than a regular accounting program!
 Which year is a leap year and how to calculate it