
Making collapsible bows at home. Onions at home - step by step instructions
Wood and its preparation
For a simple onion, almost any tree growing in middle lane Russia. Recommended:
Juniper
Hazel
Birch
Ash
Oak
Elm
Blank: cut down the proposed workpiece in winter, in frost (approx. 10-15 degrees).
The workpiece should not have large knots (growths, mechanical and thermal damage.
Length of the workpiece = onion length + 30 cm (15 cm on each side for cracks during drying, the occurrence of which is not excluded).
DO NOT REMOVE the bark from the resulting “log”!
Cover the ends of the workpiece oil paint. The wood should dry evenly to avoid the appearance of internal defects in the material. If this is not done, the bow will not last long.
Dry the processed workpiece in a vertical position at room temperature. The air should not be too dry, otherwise the tree will dry out and the work will be in vain. Drying time 2-5 months, depending on conditions.
Advice: look for a preparation before winter if you don’t want to climb through snowdrifts for several hours.
Primary processing
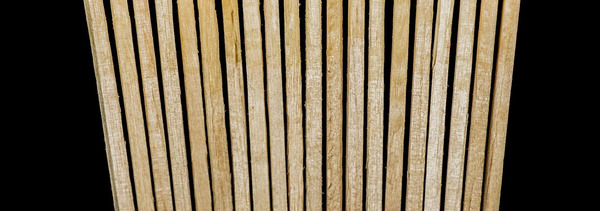
The resulting workpiece is a log (Fig. 1).
Our task is to get a board from this log (Fig. 2).
How to achieve this? There are several options, each of which is quite historical.
Processing with an ax
Using a saw
By splitting using wedges (from harder wood).
The thickness of the board is equal to the width of the bow being made in the handle (for a Slavic bow about 3 cm).
After receiving the board we need, we need to mark it.
Visually check it for cross-layers and other defects. Based on the inspection results, make adjustments to the thickness of the bow at the location of the material defect (increase it).
Figure 3 shows the marking diagram.
Please note that we did not remove the bark from the workpiece. Don't damage the outside of your future bow!
The excess part is separated from the bow using an ax (rough work), and then a knife and plane (finishing work). With this treatment you get the side profile of the bow.
After separating the onion, begin forming its frontal profile (Fig. 4).
The ratio of the width of the handle to the width of the end of the shoulder is approximately 3/2. Be extremely careful during these stages of work. It depends on the precision and accuracy of your work whether the arms of the bow will work equally evenly or one will be more elastic than the other. At these stages, the bow cannot be bent - this can lead to splitting of the workpiece and its damage.
The cross section of your bow will depend on the thickness of the log you have prepared. It can vary from lentil-shaped to almost rectangular.

Fig.5 (sections of bows)
Steaming onions (final stage)
At this stage, the bend of the bow is formed. Some manufacturers resort to soaking the workpiece in various infusions and solutions. Wood treated with water vapor has all the properties we need.
Why, exactly, steam onions?
I'll give you a few reasons to be aware production process:
If the wood dries out during the drying process (therefore, it is not recommended to bend the onion before steaming).
In the case where your initial blank was not straight (which is not uncommon, and what you should not be afraid of. The front profile of your weapon does not have to be straight at all. This will not affect the shooting efficiency in any way, except that it will be inconvenient for another person to use your weapon. The main thing is - convenient for you!)
If you are making a relatively short weapon (Slavic version 1 - 1.3 m).
If you intend to make a bow with a reverse arch.
In the case when you are making a “light” (for example, a gaming) bow.
In order to give an aesthetic appearance.
At the beginning of the stage, your workpiece represents the following
For example, you need to get a bend like this:
To do this, you need to steam the onion limbs (the steamed element becomes plastic and easily accepts the bend that you set. Steam the onion limb until you can easily bend it for captivity).
The following parts are steamed (shown in white).
It is best to steam at the same time, so that the onion shoulders dry simultaneously and evenly.
After steaming the shoulders, the bow is forced into a special slipway prepared in advance specifically for this bow.

The wooden blocks between which the “hot” bow is trapped are shown in black. The number, shape and location of the clamping bars depends on the bow shape you want.
In such a slipway, the onions dry for up to 1 week. After this, it is removed from the stocks, the ends of the bow are shaped for subsequent putting on of the bowstring (a place is prepared for the horn/bone tips or a “step” is simply cut out for the loop of the bowstring).
Please note that we did not remove the bark from the “back” of the onion! When steaming and capping in a slipway, part of the bark will peel off from the back of the onion. Separate it with your fingernail or a wooden knife. ATTENTION! Do not damage the fibers on the back of the bow! If part of the bark remains, do not be upset, carefully sand it with sandpaper until smooth and your bow will acquire a decent quality appearance.
The onion is almost ready. For the longevity of the onion, it must be protected from drying out or moisture. If you adhere to the historical-reconstructive direction in your work, then I recommend soaking the onion with hot wax or melted fat (do not overdo it! Impregnation should be no more than 3 mm deep, otherwise the onion will lose its elasticity), otherwise you can use varnish or modern paints or mastics.
Put the string on shortly before shooting and remove immediately after.Sew a case for the bow to prevent damage to it during transportation and storage.
Store onions in an upright position at room temperature and moderate humidity.
Shoot your bow at least once a month to keep it from getting out of the habit of shooting.
Treat your bow with care, and it will respond to you with faithful and long service!
How to make an arrow blank at home
The existing examples of creativity from military history clubs are made on an intuitive level and do not meet the requirements for historical bows and equipment (arrows, tips, etc.), both in terms of the materials used and in terms of the results of shooting from them . This state of affairs seems unacceptable to us. With all our respect for hardware and the people who are seriously involved in it, we cannot understand such a disdainful attitude towards what is historically accurate and suitable for practical shooting equipment.The lack of information on historical small arms (throwing) weapons leads to the fact that archery competitions at various tournaments turn into a comedy worthy of prime time on leading TV channels. Armed with hybrids of slingshots and fishing rods or products made from car springs that fit the same cars and pull, masters of accurate shooting try to hit a half-meter target from a mind-boggling distance of 20-25 steps (15-18 meters). As a rule, they fail to do this. At least from the first shot. The assumption that with such weapons English archers could send thousands of Frenchmen to the next world in the battles of Crecy, Poitiers and Agincourt causes mocking giggles even from an inexperienced person. Of course, practice is necessary to achieve acceptable shooting. However, practice alone is not enough. We need reliable information about the methods of correct and accurate shooting from a historical bow, as well as the technologies for making bows and equipment. Therefore, we are preparing a series of materials devoted to the manufacture of historical throwing weapons, arrows and other equipment in the hope that this will partly alleviate the lack of information on this topic and inspire our colleagues, as well as simply interested readers, to make their own bows, arrows, etc. as well as searches, research and exchange of information on this topic. The first of the articles brought to your attention is devoted to the manufacture of arrows.
The majority of people perceive arrows as a stick with feathers and a tip. This is not entirely true. The “stick” has a very definite length and shape, the appearance and size of the plumage can be very diverse, and arrowheads have so many varieties that it is difficult to list. In this article we will try to tell you in a popular way how to start at home without going into tricky technical details that very “stick” that will not only fly competently, but also hit the target, obeying your skill. So, let's proceed to the first stage of making our arrow: finding material for the shaft (from now on it will be called a “stick”). To begin with, forget from your mind that you can go into the forest and cut young shoots of hazel or other shrubs. Everything is much more complicated. The minimum we can offer you is to take a walk through the building materials stores and find a product called glazing bead (wooden slats of rectangular cross-section), but at most, get ready for a little warm-up in the form of purchasing and further processing the board. Now about the secret, about the type of wood that we will use. There is a very wide choice in types of wood for making arrows. Each variety has its own pros and cons when choosing. The main varieties that are used for arrows: oak, ash, beech, elm, birch, pine and the list goes on. Some varieties have good strength, but are rigid and heavy, others are fragile, light and ductile. Well, perhaps one of the most important factors in this list it is the availability and price of these wood species. In our case, we will take pine, as it is the most common in our area (Moscow), as well as the cheapest. This type of tree satisfies our needs. Pine is a fairly light and durable tree. Its abundance on sale and in a “free” state (at construction sites, dachas and in forests) allows for a fairly picky choice. The criteria for choosing a board or bead for our workpiece are as follows:
It must be sustained. Not dry, like poorly dried fish, but seasoned. If the tree has simply been dried, it is more sensitive to moisture (with further use, it may “lead”).
Thickness (should be at least 2 cm for the board and 1.5 cm for the glazing bead; by the way, it doesn’t make sense to take it thicker, since in this case “the reserve will pull in the pocket” in terms of processing).
Texture (the material for the workpiece should not have knots, the fibers should run parallel along the length of the workpiece).


So let's assume that you find such material. Amazing. Then we move on to the next stage of our process - the selection of tools. In our work we will need four items: a saw, a plane, a rasp or hog file, a file and sandpaper with a grit of 60-80 (Euro marking). If you have a glazing bead as the starting material, then you won’t need a plane; if you have a board, then get ready for a little warm-up. It will have to be hidden. We'll explain how and where to use these tools later in the process. Let's start with lyrical digression. No two people are the same. Therefore, our blanks in the future will have a strictly individual length. Let's explain. This is due to different arm lengths. How to determine your arrow stock length. Elementary. For this you will need a meter ruler. The method is simple. Stand up straight and hold the ruler at zero with your right hand. Next, pinch it between your index finger and thumb. right hand ruler at the 1 cm mark. Why this will be said below. Next, take left hand to the side at an angle of 90 degrees to the body and clench your hand into a fist. Turn your head towards your left hand and at the same time place the ruler on the fist of your left hand. Now, if you know or have seen how a bow string is pulled, pull your hand with a ruler to your chin. Lock this position. Next, look under the index finger of your left hand and you will be able to see your desired length of the future workpiece. Add another 2 cm to the result (we need our 1 cm to make a cut for the bowstring in the future). The author of this article has a tension length of 76 cm, taking into account our 3 cm. For example, we will assume that yours is the same length as mine. Now we can proceed directly to making a wooden base for our future arrow.
Step 1. Take a board or glazing bead and measure our 76 cm. Saw it off. If you have a board, then use a plane to sharpen it to a thickness of 1-1.5 cm. Next, mark the board widthwise into parts according to the dimensions obtained as a result of turning so that you get parts of a square section (the same glazing bead). Saw it. If everything is done correctly, then you should get a smooth source material as if you bought it in a store. By the way, there is nothing terrible, if it turns out a little crooked, it can be fixed.
![]()
Step 2. Take what you got and use a rasp or hog file to give the workpiece a hexagonal shape. The main thing is to do everything carefully.
Step 3. Repeat everything as in step 2 with the only difference that you need to make an octagon from a hexagon, applying maximum attention and accuracy. Next, take a small piece of sandpaper and wrap it around what can now be called a blank for the arrow and holding it in your hand, using reciprocating movements, give it a round cross-section. Once you have an arrow shaft that is round and smooth to the touch, you can consider the work finished.
There is one thing left, and perhaps the most important thing to consider your work ready for further production of the arrow, this is measuring the thickness. The thickness should be 8-9 mm along the entire length. In general, it depends on a lot of factors and is one of the most important parameters of the arrow. In the future, we will talk about how to choose the right arrows depending on the bow you are using. In the following articles we will tell you how to select and install the fletching on an arrow, how to make a tip and how to select it for an arrow, as well as how to make a simple machine for quickly making arrow blanks.
Making arrow fletching
We think that everyone more or less understands what feathers on an arrow are needed for - to stabilize the flight, i.e. so that during the flight the arrow flies exactly at the target, and not to the side, while also tumbling. Here we will talk in detail about how the feathering on the arrow is made and installed...Feathers from a variety of birds can be used to feather an arrow. Goose, turkey, turkey feathers, grouse, capercaillie, etc. It is important that the feather is strong enough, long (approx. 10 cm) and has a width of at least 3 cm. In European bows, the flight feathers of the left and right wings were used for arrows (in the East, tail feathers were also used). There is no fundamental difference between the feathers of the right and left wings. However, it is important that one arrow has feathers from one wing (i.e. only from the right or only from the left wing). Goose feathers satisfy all our requirements (long, stiff and wide enough). In general, the choice of feathers for an arrow largely depends on what is easier to get in a particular region.

Based on our experience, we can say that we would not recommend using crow feathers, since they are very fragile (after several shots they will become frayed and the pile will break off, as a result of which the flight of the arrow will become difficult to predict), although it is worth noting that there are a lot of these feathers and they can be used for game arrows, since the lifespan of “toys” is short. So, let's assume that you have goose or any other suitable feathers, then we proceed directly to the process of making plumage.
You will need: a sharp knife, glue ("Super Moment", PVA, etc.), thread and a needle.
In our case, the plumage will consist of three feathers, standing at an angle of 120 degrees to each other. The lead feather (one of three) should be parallel to the layers of wood on the shaft, so that the cut under the bowstring (perpendicular to the leading feather) is subsequently positioned perpendicular to the layers (this is done so that the loads arising during the shot are distributed throughout the shaft, and did not fall on a separate layer of wood).

There are other plumage options (one-, two-, four-feather).
Look at the feather. He has a core. On one side of the feather there is a pronounced groove in the center of the shaft. Place the pen in front of you with the groove facing up. Next, using a knife, carefully cut the feather along this groove.

You should have two parts. We will use a wider one. For the arrow we need three feathers.. If you are done, then continue further. With all three parts of the plumage, we do the following: we cut the shaft of the feather so that about 1 cm remains before the beginning of the pile (generally it is called differently). Next, we move to the end of the feather and find the place where the thickness of the shaft becomes less than 0.5-1 mm, and We also trim it there (we make sure that all our feathers are the same length). Then use scissors to cut approximately 0.5 cm from the end of the feather. pile (leaving the rod intact) - then there will be a rewind of the feathers.

We did it. Now we move on to installing the feathers on the shaft of our arrow. Take the feathers and place them on the shaft so that the thin ends of the feathers do not reach the end of the shaft by about 1 cm. We install the feathers so that we get 120 degree angles between the feathers. The next step is winding. To do this, holding the feathers with one hand, take the thread with the other hand and pass it under one of the feathers so that after you do this, the length of the missing end is approximately 10 cm. Now, without cutting the thread, turn to turn, wind the rods feathers (the missing end of the thread will be useful to you in order to tie a knot later, so winding is done over this “tail”). It’s not scary if the angles between the feathers (120 degrees) get lost during winding; they can be easily corrected, say, in the middle of the rewinding process. After rewinding, we move on to the process of “sewing” the plumage to the shaft. To do this, take a thread about 40 cm long and not very thick.
Let's insert the thread into the needle, but do not tie a knot, but sew "in one thread." Next, tie one end of the thread to any feather at the base, where the rewind ends. We begin to sew the feathers along the entire length in increments of about 1 cm, but so as not to disturb the texture of the feather if possible (do not break the fibers). Keep in mind that the term "feathering" refers to the process of attaching the feathers by passing a needle and thread through the feather's nap at the shaft.

When the process is completed, we use the remaining thread to secure the feathers at the far (thin) end of the feather in a “pile” (i.e., without trying to put the turn to the turn). Using the type of our first rewind, we secure the feather at the back (when the feathers are sewn on, you can straighten them, because during the sewing process they will bend into a spiral, but do not try to give the feathers a perfectly straight shape, this is useless and unnecessary). Now everything that happened (feathers, windings) needs to be lightly glued with glue to the shaft (try not to get glue on the pile itself, otherwise it will simply break when shooting in these places). We did it. Then the last phase is shaping the plumage.

Keep in mind that large dimensions of the tail (length, width) allow the arrow to be better stabilized in flight, but they dampen its flight speed more, correspondingly reducing the firing range. A feather that is too wide will fray more on the bow and can injure the shooter's hand.
Due to its structure, the pile of the flight feather bends along the edge. So, find the place where this bend begins - this will be the maximum height of your pen. Based on this, shape your plumage. There are many varieties of plumage forms, but within the scope of this article
there is no opportunity to consider them in detail. We recommend starting with a simple conical shape of the feather, expanding in the direction from the tip to the heel of the arrow, like rocket stabilizers. You did everything right and you like it. This is great, but if not, don’t be discouraged, everything will come with experience. Now make a cut in the “heel” of the arrow (this is the name of the place where the arrow is inserted into the bowstring), first lightly with a metal file, and then with a rectangular file. The cut should go perpendicular to the leading feather (see above). The depth of the cut should be within 8-10mm. and width 2.5-3 mm. We recommend rounding the bottom of the cut (grinding off corners and burrs) in order to reduce the risk of the arrow splitting.
How to make a cut in the heel of an arrow
 I recommend making a cut of the following shape (see figure). This design snaps onto the bowstring, preventing the arrow from slipping. The narrowest point of the cut (shown by the arrow) should be slightly smaller than the diameter of the bowstring. Do not make the cut too narrow, otherwise, when the arrow jumps off the string, additional loads will appear on the heel of the arrow, which will affect its flight path. At the same time, a cut that is too wide will quickly spread and lose its holding properties.
 You can make a cut of the specified shape as follows:
Drill a hole with a diameter equal to the diameter of the bowstring at a distance of 1 - 2 cm from the heel of the arrow.
Using a thin hacksaw, cut a cut from the heel to the hole.
Use a file to give the cut the required shape.
A hunting bow is the most affordable weapon that is not so difficult to make with your own hands. Its advantage over the purchased one is in cost, and also in the fact that it can be made “for yourself”, taking into account individual characteristics. The only thing that needs to be taken into account when making a bow for shooting with your own hands is that the maximum tension force of the string, established by law, is no more than 40 kg/s. You can learn more about how to make a hunting bow with your own hands.
Homemade bow
Before you make a bow with your own hands, you need to prepare the material. Wood for making archery weapons must have such characteristics as strength, flexibility, and elasticity. The material for the workpiece must be straight, even, without knots or any damage. In principle, any tree is suitable for making a bow: birch, oak, apple, juniper, maple, hazel, ash, elm, yew or teak.
The branch for harvesting must be cut down in winter, at sub-zero temperatures, so that the tree sap is preserved inside. The length of the workpiece should be the required length of the future onion, plus 30 cm for cracks during drying at each end, the occurrence of which is very likely. The bark is not removed from a cut branch. Its ends are coated with oil paint to avoid internal defects in the wood when it dries, which should occur evenly.
After this, the workpiece is left to dry for up to five months in an upright position at room temperature. In this case, the surrounding air should not be too dry, otherwise the workpiece will be deformed.
How to make a hunting bow with your own hands
After making the initial blank, you need to determine the natural bend of the wooden bow. This is necessary in order to make it convenient to use the weapon in the future. To determine this bend, you need to press one end to the ground while holding the other end with your hand. The frame will turn to its natural side.
 Make a bow with your own hands, diagram
 It is necessary to make a future hunting bow from a round blank. The width of the bow frame is usually 3 cm. It is better to cut off excess wood with a knife, while simultaneously checking for knots and other defects.
Since a simple bow consists of a solid frame, it is worth shaping its bends while processing it with a knife. Using a knife and a plane, its side and front parts are formed. The ratio of the width of the frame and the width of the shoulders should be 3/2. The size of the shoulders should be the same so that they are not inferior in elasticity to each other. At this stage of work, do not bend the bow to prevent its deformation.
Next you need to form the bend of the bow. For this, the water steaming method is used. In particular, the arms of the bow are steamed to give them the desired bend shape. To do this, the bow is fixed with special stocks (wooden blocks) in in the right position shoulders, treated with hot water steam. In this fixed position, the weapon dries for about one week. After this, the stocks are removed, and places for the bowstring are cut out at the ends of the arms.
It should be noted that all this time the bark was not removed from the onion. After steaming it begins to peel off. It must be carefully removed without damaging the wood fibers. The remaining bark is removed with sandpaper, and the surface is covered with fat, hot wax, varnish or paint.
There is another option for how to bend a bow:
- It is necessary to make a special board with cuts, which is attached perpendicular to the center of the frame.
- Both ends of the bow are connected with a thread.
- The thread clings to one of the cuts on the board to bend it according to the required radius.
Manipulations should be carried out slowly, because sharp bending may damage the wood fibers.
Making a bowstring
It is better to make a bowstring from multi-layered rope. The bowstring for hunting must be durable, made from several threads of Kevlar, nylon, lavsan, fishing cord in reels, and other artificial threads. A thin strip of rawhide, 3mm thick, will also work. The main requirement for a bowstring thread is strength, resistance to abrasion and stretching. It should be shorter than the length between the limbs of the bow in order to remain in a tight position at all times. First, it is attached to one notch of the shoulder, tightened with a knot to the bow, then stretched to the other end and tightened there. A correctly tensioned bowstring should be 15 cm from the middle of the frame of the hunting bow.
Making arrows
Arrows should be of such length that it is proportional to the length of the bow and the maximum tension of the bowstring. In practice, this means that when the bowstring is taut, the arrow tip should protrude several centimeters beyond the frame of the weapon. The diameter of the arrow should be approximately 6mm, the shaft should be perfectly straight. The materials for making arrows are spruce, pine, birch - for hunting small game and birds, as well as ash, hornbeam, oak, and other heavy and dense species for hunting beast of prey. You can chop them from logs, use boards, glazing beads, or wooden square slats. Then they need to be shaped into cylinders and sanded so that the surface is smooth. The smoother the surface of the arrow, the more accurate its flight will be. In the end part you need to make a small slot for the bowstring in accordance with its diameter.
The shape of the arrowhead is made depending on the type of prey. If hunting is intended for a bird, the tip is made pointed. If you plan to hunt larger game, the tip is made of stone or triangular metal.
The arrow will also need to be fletched. The simplest one is from bird feathers, but it can be made from other materials - plastic, paper, etc.
Compound bow

A hunting bow may have a composite design, i.e. consist of two or three parts. It is easier to find material for such a workpiece than for a simple one. Typically, a composite structure consists of a central frame to which are attached two arms (“horns”) that end in string mounts. For normal shooting, they are made the same size, but for shooting from the knee, the lower shoulder should be made shorter than the upper one.
To make the arms of a composite bow, you should choose bird cherry that grows near a pond. The blanks are cleaned of bark and dried in a dark place, or even better, in the fresh air. After cutting out the main parts, the workpiece can be dried in the sun.
The component parts are glued together; in camping conditions this can be done using fish glue (made from crushed fish bones). The frame is impregnated with resin and fat, and the joints with the shoulders are tightened with animal tendons (you can use fishing line, strong rope), and once again soaked in fat. When all the parts are glued into a single structure, the onion is processed with a sharp knife. To give even greater strength and durability, the surface of the onion is covered with boiled birch bark, glued along the fibers.
Archery can be classified as one of those activities that almost every person can master. This is a very unusual, yet accessible hobby, but at the same time it is a prestigious and fashionable hobby all over the world.
For many centuries, people have continued to practice archery. Once necessary for hunting, today it is also used for sports and entertainment. But few people thought, looking at this weapon, that it has practically not changed since our ancestors invented it. This is the same bowstring stretched on an elastic rod and pointed arrows.
Buying a sporting bow can be quite expensive, and not everyone who wants to buy one is an athletes or hunter. Perhaps this is your hobby in your free time from work, you want to pick up arrows and try to hit the target, or maybe you want to get a bow for your child and play Indians with him. In that case the best solution will make your own bow and arrows. This is a truly exciting and creative process, no less interesting than the shooting itself. In addition, an undeniable advantage of a homemade bow will be the ability to save your budget from a serious blow. So, let's figure out how to make a bow and arrow with your own hands.
Materials for making your own bow
The bow itself can be made from various available materials:
- Tree. The most popular and, perhaps, reliable option for self-production. A bow made from wood will be strong and durable. The best species are considered to be ash and white acacia; you can also use maple, oak or poplar. At the same time, the stick should not have knots, shoots, cracks or other defects. Coniferous trees cannot be used.
- PVC pipe. Another material that can be used to realize your idea.
- An unusual, but quite suitable material can be ordinary skis. To be more precise, the upper sections of the bow arms are made from skis.
- Plywood, just like skis, can be an option for bow limbs.
- Even an old car spring can be used for shooting.
- For a small toy, you can use, oddly enough, ordinary paper.
The next element of the bow is the string. It is important to understand that the choice should be on a durable, elastic material that can withstand high pressure. Suitable options for her:
- Polypropylene rope
- Nylon thread or cord
- Nylon thread
- Twine or regular thin fishing line
- Thin climbing sling
Of course, we can’t forget about the arrow! The best choice of material for its manufacture would be wood. As a rule, these are birch and pine branches, slats or boards. Processing birch is somewhat more difficult, but the result is better.
The arrowhead must be made sharp so that it can pierce the target. For simple option A nail wrapped in wire may work. For a more serious approach, use a thin steel tip.
Don't forget to glue feathers or make grooves for your fingers at the end of the arrow.
What do you need to know before you start?
Even if you are making a bow and arrow for fun or as a gift for a child, there are certain dimensions that you should consider:
The classic version of the bow consists of:
- The main part, i.e. the handle
- Shoulders
- Bowstring
After production, the bow must be provided proper care. Don’t be alarmed, maintenance is simple and won’t take much time:
- Onions should be stored upright.
- The bowstring is put on only when shooting, and then immediately removed. Before shooting, you need to “spring” the bow and string in order to develop it.
- The bow cannot be overstretched.
- Store only in a dry place, preferably with a case.
DIY bow and arrows made of wood
Wood is perhaps the best and most affordable option for making a bow. To do this you will need:
- Drill
- Axe
- Jigsaw
- Metal scissors
- Sandpaper
- Regular file and file for working with wood and metal
- Slipway
- Plane
To make a bow you will need time and patience.
- First we need to find a branch that matches the parameters. This is best done on a frosty day. It is important that the selected branch has as few growths and small shoots as possible, and the length is at least 180 cm.
- There is no need to touch the bark. And the sawn ends need to be coated with oil impregnation for wood or a special varnish.
- Leave the base of the future onion to dry for a couple of months, placing it vertically in a room with a temperature of 20 to 28 degrees.
- It is necessary to give the workpiece a rectangular shape; this can be done using a well-sharpened knife and a sharp ax.
- Steam both sides of the onion at the same time over boiling water.
- To give it a bend, we place the freshly steamed workpiece in a slipway for two weeks.
- When placed in the slipway, the bark should come off, but if this does not happen, then at this stage, carefully peel it off with a knife.
- Cover the product with wax.
- We make notches for the bowstring only after drying.

We need to pull the string onto our future bow. It's not at all difficult to make. You will need the following materials:
- Silk or nylon (No. 10) thread
- PVA glue
- Rubber glue
- Moisture protection, e.g. wax
- Board
- Thick nails
You need to take two short round pegs with a thickness of 20 mm or more. On a board whose dimensions are 200*40*40, in accordance with the distance of the bowstring, we drill two holes and install pegs. Next step you need to wind the thread on the spool for the future bowstring. Wrap a thread around the pegs, which will be used as a base. 3 turns are enough. Tie the ends of the thread tightly and coat with PVA.
Spread rubber glue directly onto the nylon thread, coat with PVA when winding. Make the winding as tight as possible. Make loops at the ends to pull the string over the shoulders of the bow.
Before you pull the string directly onto the shoulders of the bow, bend it slightly 15 times. This will allow the product to get used to the movement.
You can't do without arrows either. Since we are making onions with our own hands, let’s look at how they are made. At a minimum, we need 4 arrows.
You will need for the future arrow:
- Slats or boards about 3 cm wide and 85 cm long
Manufacturing process:
- Using a plane, narrow the workpiece (slat or board) to 1.5 cm.
- Saw it into 1.5 cm squares on each side.
- Using sandpaper or a grinding machine, give it a round shape with a diameter of no more than 8 mm.
- We can also attach feathers. Crows are best suited for this. Cut the feather in half and tie it to the end of the arrow using thread.
- It is better to buy a tip in special store. You can make it yourself by cutting it out of a thin sheet of iron or by attaching a sharp nail with strong fishing line.

Homemade bow from PVC pipe
Despite the fact that wood is the most suitable and affordable material option for a bow, it can also be made from PVC pipe. Making a wooden bow takes a long time, but working with a pipe will require much less.
You will need:
- PVC pipe
- Construction hair dryer
- Metal knife
- Whetstones
- Molding board
- Slipway
Manufacturing process:
- First, you need to select a pipe.
Please note that we require PVC pipe, not PP or PE.
- Mark the center in the middle of the future onion and set aside 6 cm from it in each direction. This will be the handle.
- Also, you need two blocks as high as a pipe.

- Now you need to heat one limb of the bow using a heat gun until it becomes evenly soft.
- Lay the molding board and secure with clamps.
It is important to remember that the board rests on blocks near the handle.
- The board is removed after the pipe has cooled.
- The same thing is repeated with the other shoulder.
- Next you should move on to forming the handle. It also heats up and forms in a plane perpendicular to the compressed shoulders.
The handle should be shaped to fit the palm so that it is comfortable to hold.
- You can't do without a bowstring. Therefore, the next step is to attach the bowstring. From the very edge at the end of the shoulder, retreat about 8 cm. Heat and bend at an angle of 60 degrees.
- After cooling, cut out the “holder” for the bowstring.
- We do the same with the second shoulder.
- For the bowstring, you can use polypropylene rope.
It is still better to choose wood as a material for arrows. To make them, you will need planks or slats with a diameter of up to 15 mm. The making of arrows is discussed in detail in the previous version of the wooden bow. *****Instead of bird feathers, you can use reinforced tape***** !FIGURE 43 - “Arrow feathering”!

DIY bow from old skis
Skis- an excellent material for making onions. They have their undeniable advantages: already prepared curved ends, while the bend of the shoulders is the same.
To work you need:
- Bolts, nuts
- Thick wooden block
- Thread made of nylon or some poorly stretchable material
- Drill
- Scarring
- Hacksaw
- Hammer
- Chisel
- File
- Sandpaper
- You may need a band saw and plane
Work process:
- First you need to make a handle template. It is important to understand that it is necessary to take into account the place for gripping with your hand and the presence of flat surfaces at a slight angle for attaching skis.
- Ready template transfer it to a block and carefully cut out the future handle.
- Skis can be very long and not the right size for the bow. Therefore, according to the parameters given at the beginning of the article, the length of the bow is calculated, and the excess piece from the length of the skis is cut off.
- The shoulders made from skis are attached using bolts.
- Next, you need to cut out the recesses for the bowstring. The edges must be rounded, otherwise the bowstring may rub against them.
- If the selected thread is too thin, it is advisable to intertwine it. This will give it additional density and extend its service life.
- Arrows are made similarly to previous versions of the bow.
That's all, the bow from old skis is ready for shooting.

DIY bow and arrows from rebar
To do this you need the following:
- Fiberglass reinforcement with a diameter of 8 mm and length
- Profile pipe 20 cm long, with a cross section of 20*25 mm
- Plywood, 40 mm thick
- Steel cable for bowstring, diameter 1 mm
- Furniture bolts
- Clamps
- Thick thread
- Heat shrink tubes for decoration, you can do without them
Manufacturing process:
- For each arm, it is necessary to prepare two pieces of reinforcement 50 cm long and one 70 cm long.
- Fold the reinforcement together so that there is a long piece in the middle and wrap tightly with synthetic thread.
It is important to do this along the entire length so that the pieces of reinforcement become a single whole.

- Then you need to saturate the shoulders of the future bow with epoxy resin.
- For beauty, you can prepare a heat shrink tube. Put it on your shoulder and blow it with a hairdryer. Do the same with the second shoulder. It is possible that this may cause a slight decrease in the elasticity of the shoulders, and this procedure does not provide anything other than a decorative function.
- Then you need to cut the profile pipe lengthwise. Measure the middle, and after making cuts, fold it in half. Next, you need to drill holes and, using bolts, compress the resulting boxes. The picture shows what should happen in the end.
- Without delaying your shoulders, you can immediately make holders for the bowstring. To do this, just step back 1 cm from the edge of the shoulders, wrap the wire and reinforce it with electrical tape. You will get a kind of tubercle for fastening.
- It is better to make the handle from wood.
Do not use softwood as it will not withstand the load. Oak will do. Or you can get by with plywood at least 4 cm thick.
- Cut out a handle blank according to the template you selected on the Internet. Sand and paint.
- Using furniture bolts, connect the arms and handle of the future bow.
Then you need to move on to making the bowstring. It can be made from a steel cable with a diameter of 1 mm. Secure the loops using crimps, and stretch the shrink film over the entire length of the cable.

Arrows can be made from window beads and tape. Using a plane, plan the glazing bead and use tape to make feathering. Instead of a tip, it will be enough to sharpen the arrow and dip it in paint. This bow cannot be used for hunting or professional shooting. But it's perfect for outdoor fun!
Homemade bow from a car spring
If a car spring is suitable for creating a crossbow, then why not try using it as a material for a homemade bow? Anything can be at hand, and you shouldn’t neglect it.
To work, you will need a car spring, for example, from an old Lada or Muscovite, and a sharpening machine.
- The spring needs to be ground off. The narrower it is, the more pliable the bow will be. At the same time, it is necessary to ensure that the arms of the bow are the same.
- The handle can be made of paralon. To do this, you need to cut a piece of foam and tape it to the spring using electrical tape.
- Toward the ends, the arms of the future bow need to be narrowed even more using a sharpening machine, and shallow notches for the bowstring must be made.

Now let's move on to making arrows. This requires thin reinforcement. It must be ground down, but in such a way that it does not lose its elasticity and does not bend. On one side the arrow is sharpened a little sharper, and on the other side a plastic feather is attached. A linen cord is suitable for the bowstring.
A bow made from a car spring is very tight and may not be suitable for everyone. But it will be an excellent tool for developing arm strength.
When using this version of a homemade bow, do not forget to wear thick gloves so as not to injure your hands.
Homemade paper bow
This option also has a right to exist if you have paper at hand and a desire to shoot. Of course, it is not suitable for hunting, but it is suitable for fun.
You will need:
- Sheet of paper
- Scissors
- Pen refills
- Scotch
- Rope
- Cocktail straws
How to make a paper bow:
- Cut a square shape from a piece of paper.
- Take 2 identical pen rods.
- Wrap one of the rods in square paper. Then, twisting the workpiece from the corner, make sure that the paper fits tightly. Secure with tape. Do the same with the second rod.
- Gently wrap the paper not all the way. There should be a couple of cm left free. It is necessary to squeeze these ends so that they become flat.
- Place them on top of each other and secure tightly with electrical tape.
- For the bowstring we attach an elastic rope.
For arrows, you can use cocktail tubes, wrapping them in the same way with electrical tape.
That's all. Paper bow and shells are ready!

It doesn't matter what kind of bow you want to make. Whether it's Elvish, Asian, short or whatever, it's important to stick to the basic rules and then everything will work out!
You will need
- wooden blank (hazel, pine, oak, ash, etc.);
- strong thread (cord);
- plane;
- file;
- sandpaper;
- insulating tape;
- copper wire;
- strip of tin;
- bird feathers.
Instructions
It is better to cut down the onion preparation in winter. It is even advisable to choose a frosty day, and in order not to look for a suitable tree, shivering from the cold, you can look for it in advance. The criteria for selecting a workpiece are as follows: it should not have growths, large knots, or mechanical damage. The workpiece should be 30 cm longer than the future onion. It does not need to be processed immediately or the bark removed.
The ends of the workpiece must be coated with oil paint. To avoid internal defects, make sure that it dries evenly. It is most effective to dry it vertically at room temperature. It takes enough long time, but after 2 months the base should dry completely.
Now you can proceed directly to the process of creating a bow. With an ax and sharp knife you need to give the desired cross-section (lentil or rectangular, depending on the thickness of the workpiece) to the onion along its entire length. You can first soak the workpiece in special infusions and decoctions to make it easier to give the onion the desired shape. However, wood treated simply with water vapor will acquire the necessary flexibility and pliability. The onion arms will become pliable and easily take the desired shape if you steam them first (it is better to steam both arms at the same time).
Then the bow must be placed in a curved slipway. This way, when dry, the onion will take the desired shape. This drying process will last about a week, after which the bow is removed and its ends are shaped in such a way that it is convenient to strengthen the bowstring on them.
The bark should separate from the base of the onion when steamed. If necessary, separate it with a wooden knife, being careful not to damage the wood fibers. To protect the product from negative influences environment, soak it with wax or melted fat.
The string should be put on the bow immediately before using it and removed immediately after. For better preservation of the onion, store it in a special container, maintaining its vertical position, at room temperature.
Now all that remains is to make the arrows. It is better to use pine boards to make them. The wood base must be seasoned and at least 2 cm thick. Make sure that there are no knots or damage on the workpiece. Get everything ready necessary tools: file, plane, saw and sandpaper. The length of the arrow depends on the bow's draw weight and physical characteristics. Usually it is 70-80 cm. Measure the required length on the board and saw off the workpiece. Using a plane, bring the thickness of the workpiece to 1.5 cm. The width of the board should be marked into square sections and sawed lengthwise. Use a file to give the workpiece a hexagonal shape and use sandpaper to round off the cross section.
For the feathers you will need three crow feathers. They must be cut lengthwise, along the groove, and the core must be trimmed to the beginning of the pile. Using scissors, a pile of about 0.5 cm is cut from the tip of the feather. The feathers are set with arrows at an angle of 120 degrees to each other. They need to be secured with thread, placing its turn to turn.
The tip is made of a triangular metal plate. To do this, in the front part of the shaft you need to make a recess for the shank and insert the tip there with the tail part into the recess. Secure one turn to another with a thick nylon thread.
Another way to make a bow involves using a large rod. When choosing a rod, look for one that is dry and free of cracks. Deciduous ones are well suited, namely oak, yew, teak, and white acacia. The length of the rod should be about 1.8 m. A good base for a bow should not have twigs, branches, or damage. It must be flexible. It is not recommended to use young, green twigs; they are less reliable and durable, like dry ones.
It is equally important to choose the right bowstring. Suitable materials would be rawhide, thin nylon cord, rope, fishing line, or regular twine. Before you pull the bowstring, you need to make secure knots on both sides. The string should be shorter than the bow so that it is pulled tight.
To stretch the bow, you need to hang it upside down. Check the bend by slowly pulling down and adjusting if necessary. The string should be pulled at a distance equal to the distance between the fully extended arm and the jaw.
Now you can start making arrows. As a base you need to take straight, dry branches. The length of the arrow must be at least half the length of the bow. Green branches can also be used as arrows, but you will need to wait until they dry out. A good option there will be branches of goldenrod, which can be found in the fields. To shape the arrows, scrape the branch until it is completely smooth. Make notches at one end of the arrow so that it will cling to the bowstring. You can sharpen the tip of the arrow with a knife, and then you need to lightly burn it on warm coals (this will give the arrow rigidity).
If desired and possible, make arrowheads from metal or glass. To strengthen the tip, split the tip of the arrow; you can additionally secure it with rope.
It is not necessary to fletch the arrows, but it will contribute to stable flight. The feathers are glued to the back of the arrow. Another way to secure the fletching is to split the back of the arrow and insert the fletching into the groove, securing it with tightly wrapped thread.
What boy didn’t dream of learning archery as a child? It’s good when you have the opportunity to enroll in the shooting section and pick up a sports bow. And if such a sport is not available, all you have to do is roll up your sleeves and become Robin Hood yourself. First you need to make real onion and arrows to him.
You will need
- - wooden blank (hazel, pine, oak, ash, etc.);
- - strong thread (cord);
- - plane;
- - knife;
- - file;
- - sandpaper;
- - insulating tape;
- - copper wire;
- - strip of tin;
- - bird feathers.
Instructions
Prepare the materials needed to make a bow. You will need a piece of wood that matches the length of the future bow. Maple, ash, yew or hazel are best suited for this purpose. A juniper trunk will also work, from which you will need to first peel the bark. If you decide to make a compound bow, use oak and birch.
For the bowstring, select a strong mylar thread or nylon cord. The main requirement for a bowstring is not to stretch in length. You can also use twisted linen thread, but it will not last very long.
Cut the bow body into an arc from the blank. Using a plane and a sharp knife, shape the bow into the desired shape, making sure that the top and bottom limbs of the bow are the same thickness. Achieve a smooth surface of the bow, if necessary, additionally sand it with sandpaper. At the ends of the arc, make indentations in the form of ring-shaped grooves. Grooves will be required to secure the bowstring. After production, the bow body should rest for about two to three weeks.
When the wood from which you made the base of the bow is dry, attach the bowstring. The length of the string should be 4-6 cm less than the size of the bow, but a more accurate size will have to be selected experimentally. First make loops at the ends of the bowstring, securing them with knots. Place one of the loops on the lower end of the bow, then bend the base and place the other end of the bowstring. Straighten the string so that the loops are in the grooves provided for them.
Make a handle in the middle part of the bow base to make it easier to hold the weapon in your hand. The easiest way is to wrap colored insulating tape around the middle of the bow.
Cut arrows from a flat pine board of suitable length. First, spread the board lengthwise into several square pieces. Using a plane and knife, give the arrow a rounded profile. Make the tip from a strip of tin or an ordinary nail, screwing it to the front end of the arrow with a strong thread or thin copper wire. For plumage, use small feathers, which, if desired, can be found in every park. The bow is ready for battle.
Sources:
- How to make a bow at home in 2019
Popular single-player game, which is the fifth in the line of games in The Elder Scrolls V as soon as possible has won the recognition of millions of users around the world. Players are given a huge number of opportunities to develop their character, complete storyline and creating unique items, including arrows.

Instructions
Exploring the world of Skyrim while playing as an archer seems like a best choice, considering that a well-trained archer in the game is able to simply prevent enemies from approaching him at a dangerous distance, destroying them from afar. In addition, the bow helps to hunt dragons soaring in the sky. The choice of bows in the game is quite large, but sometimes it’s not enough. This is especially true for the most expensive types arrows: elven, glass and daedric. Even if you buy them from all the merchants you meet, at the decisive moment they may run out.
Thanks to the official ability to create various custom modifications of the game, many game flaws and problems were solved, including the ability to make your own various types arrow You can find fan sites on the Internet Skyrim games and download the corresponding modification. The most popular for making arrows is Arrowsmith, which allows you to create any of the corresponding materials.
As a rule, the skill of creating arrows in such modifications depends on the degree of development of the blacksmithing skill. Since players most often choose one of two branches of leveling up blacksmithing skills (light or), there are several versions of the same mod. Choose one in which your character will not need to spend additional points in Blacksmithing to make the required arrows. Also remember that the most expensive arrows will require fairly rare ingredients. The process of producing arrows is similar to producing any other item in a forge; you just need to select the appropriate interface line.
Finally, the official Skyrim expansion Dawnguard also introduced the ability to craft arrows. The addition was released in 2012, and now you can provide yourself with ammunition without installing third-party modifications. However, the requirements for blacksmithing skills and ingredients in the add-on are practically no different from those in the modifications.
Video on the topic
Useful advice
If you intend to produce arrows in large quantities, it is worth taking care of the supply of wood, which can be obtained using sawmills.
Arrows of Pythagoras are a numerological concept. Using numbers from a person’s date of birth, numerologists draw up a map that identifies weak and strengths personality. Arrows on the map are formed as a result of the alignment of numbers and voids vertically, horizontally and diagonally. Filled cells form strong arrows, empty cells form weak arrows.

Arrows of Power
Arrows of power are squares filled with numbers, lined up in any direction: horizontal, vertical or diagonal. A decisive person is characterized by the numbers 1-5-9. A person whose fate develops in this direction is patient, decisive and prudent. He never rushes things and waits for the right moment. When the moment comes, such a person acts quickly, clearly following the intended goal.
2-5-8 – arrow of compassion and emotional sensitivity. This arrow appears in the numerology of caring, emotionally sensitive people. A person whose fate is marked by compassion often chooses a profession that involves helping other people. Understanding the problems of loved ones and willingness to help are the main features that characterize the owner of this arrow.
3-5-7 is a powerful arrow, denoting a rich spiritual world. In youth, the high spirituality of the owner of this arrow may not manifest itself, but closer to the middle of life, a person begins to strive to achieve high goals. The main features of the arrow are deep emotionality, strength of feelings, inner peace, and clearly defined life values.
3-6-9 – intelligence. If a combination of these three numbers is found in a person’s chart, then this is a sure sign of the presence of remarkable intellectual abilities. The owner of the 3-6-9 arrow can boast of excellent memory and developed logic. The presence of high intelligence has reverse side- superficial and condescending attitude towards other people.
Arrows of Weakness
The presence of voids in a numerological chart means the presence of certain weaknesses in a person’s character. Knowing about your weaknesses, you can prepare in advance to combat them. If the arrow of weakness with the designation 8-5-2 appears in your chart, then you probably have a tendency to frustration and depression. In order not to subject your psyche to unnecessary tests, you should carefully think through your options for dealing with difficult situations.
Arrow 3-5-7 characterizes someone who strives too hard to achieve his goal. So much so that it leaves behind
A composite bow is an improved version of a regular bow. Man has used it for hunting and fighting since ancient times. Initially, bows were made from solid wood, but the strength and tension of the string were insufficient. In addition, large bows were inconvenient, and small ones could not provide sufficient arrow range.
It was then that some people came up with the idea of making a bow from several components. This was done in different ways - in some places it was simply additionally glued with horn or harder layers of wood, in others the handle and shoulders were made separately, and sometimes both of these methods were combined. To glue the components of the onion, a special fish glue was used, which was made from bones boiled for a long time.
Such weapons first appeared in Asia, and in Europe they continued to use ordinary solid weapons for a long time. Nowadays they are made only for fun, and almost all modern ones have long since become composite.
Advantages of Composite Bows
They have a number of significant advantages. The first advantage is that it provides a similar combat power at a much smaller size. This makes it more comfortable to wear, when hunting and in combat conditions, compared to bulky conventional devices. This bow makes it easy to shoot from a horse and cart.

Another advantage is much greater power. A composite bow can shoot arrows much further and they penetrate armor more easily.
Disadvantages of Composite Bows
If you are planning to buy a bow, then you will not experience any particular disadvantages of a composite bow. However, ancient people constantly had problems with them, because it took a very long time to make such complex weapons, and this process was extremely complex. In addition, traditionally such bows were glued, which in conditions of high humidity lost their adhesive properties and durability. Because of this, the onions needed to be constantly dried.
Now these disadvantages are not very relevant, since purchasing a composite bow in a store will not be at all difficult.
Asian bows
The composite bow, the photo of which is below, was especially widespread in Asia. There they were worn by foot archers. Such bows had a length of no more than 150 centimeters. Most often in Asia they shot light arrows - either with a canopy at a distance of about 150 meters, or aimed no further than 50-70 meters. Heavy arrows were rarely used, but with them the bow was dangerous already at a distance of about 225 meters, which was a very serious distance for those times.

Scythian bows
The composite Scythian bow deserves special attention. You can see his photo below. Many people have heard about the existence of Scythian bows. Opponents were afraid of the Scythians with such powerful weapon. Historians accurately claim that in those ancient times there was no weapon that could compare with the Scythian bow in power. At the same time, now, at the first glance at him, it is even difficult for many to understand how he could shoot at all.
The design of this type of bow is amazingly interesting, but at the same time very complex. So it will be very difficult to make a Scythian one - it consists of many parts and is made from quite rare materials. In general, if you are not directly interested in reconstruction, then you are unlikely to need Scythian weapons specifically, and a traditional composite bow will completely replace it.

The length of the Scythian bow was only about 70-80 centimeters, and its arrows weighed only 15-25 grams. Due to the small size and light arrows, he could only shoot at three to four dozen meters, although in principle the arrows flew at 100-120 meters, but less accurately and very weakly. It was pointless to shoot from such a bow without aiming, so before firing the Scythians always slowed down or even stopped completely in order to take better aim.
Modern bows
The construction of a composite bow today is actually not all that different from its construction in ancient times. Today, the romance of antiquity and the Middle Ages is very strong in people, and they are increasingly paying attention to swords and bows. However, the first exercises necessarily require a partner, special equipment, etc., while with a bow you can have fun alone, having only it, arrows and a set of targets.
Almost all modern bows have a composite design. This is due to the fact that solid ones are significantly weaker, so making them simply does not make sense. Modern bows are made from various metals and plastics, that is, modern materials that are resistant to moisture and external irritants.

Of course, some craftsmen now make bows from wood, although usually using modern adhesive materials rather than fish glue. Such devices are more interesting not to athletes, but to true lovers of antiquity. Olympic bows, of course, are not made of wood.
Compound bows have also become popular recently, but they are not composite bows and should be discussed separately. Such bows have no analogues in ancient times.
Olympic, as the Olympic bow is also called, is a sports equipment whose design is as close as possible to the traditional one. They are made from modern materials, and interesting modern elements are added to their design - stabilizers, and sometimes even sights. A modern Olympic bow is always completely disassembled. Its design is simple - a handle, shoulders, a bowstring, a stabilizer and a sight. Everything can be easily put together and get
Olympic is used in Olympic Games, as well as in such popular sports as archery biathlon and field shooting. It is worth noting that the skills required here from the athlete are somewhat different than when shooting from a conventional bow, without a stabilizer and sight, but the accuracy of Olympic bows is significantly higher.

How to make your own compound bow
A finished composite bow is quite expensive, and not everyone can afford it. In addition, doing something with your own hands is always very pleasant, and a bow made by yourself will be ideal for you in all respects, from size to string tension.
In general, if you know at least a little how to work with wood, or at least work with your hands, then making a composite bow is quite within your capabilities, and there is no need to resort to the services of craftsmen and weapons stores.
Historical bow
If you want to make a bow similar to what some ancient tribes used, then you will have to try hard. The fact is that such a bow should be as close as possible to the original, that is, it should be made from wood, preferably the one that grew in those places, and from horn. For braiding, it is recommended to use birch bark, animal veins and skins. Well, the onions will have to be glued together with the same fish glue - and it needs to be slowly boiled from fish bones all day long. The glue, by the way, smells terrible during cooking.
In addition, the bow will have to be made either from drawings from the Internet, or even from images reconstructed by historians based on ancient descriptions. In general, the matter is quite long and troublesome, but the result will be amazing.
Instructions for making a bow
Making a composite bow yourself is much more difficult than making a regular solid wood bow. For a regular one, it is enough to simply choose a suitable board and branch, while a composite bow will require the manufacture of three parts and their strong connection.
A composite bow should be made in several stages:
- First of all, you will need to cut out the handle of the bow - its middle part, which you will hold with your hand and where the arrow will rest. This part is cut out from a single piece very durable wood with straight fibers. It is extremely important that it is resistant to bending. For additional strength, this part can also be made of several layers of durable wood, having previously glued them together. Sometimes the handle is additionally reinforced with metal plates. The part must be cut from strictly dry material.
- Then you will need to make the arms of the bow - two absolutely identical parts that will bend when the bowstring is pulled. To make shoulders, many people recommend using old skis - they bend well and are made from durable wood. However, you can cut out the shoulders separately, giving them the desired shape. They can also be glued together from several layers of wood and reinforced with metal plates. You will need to drill grooves in the shoulders to attach the bowstring.
- Then you will need to connect the handle and shoulders together. This can be done with very strong glue, or with bolts, if the appearance finished product you care less than its functionality.
- At the end you will need to tighten the bowstring. You can weave it yourself, or take a ready-made rope - a Kevlar climbing sling with a thickness of 3.5 millimeters will do.
- Finally, the onion should be sanded again, soaked in oils, coated with wax or varnish - in general, to give it a beautiful look and protect it from external influences.

How to Shoot a Composite Bow
The shape of the bow must be correct, this is important, but you also need to be able to shoot from it. Instructions for right-handed people (left-handed people should simply switch their hands):
- Take the bow with your left hand.
- Grab the string with your thumb and secure it with your index finger, with your palm facing outward. At this moment you are already holding the arrow
- Raise the bow above your head and bring it down sharply with both hands. This way you will overcome the strong tension on the bowstring.
- Aim for a second and a half and open your index finger, loosening your thumb. The arrow will fly an amazing distance.
Related articles
 The best amulets against the evil eye and damage Amulet against the evil eye with hands for children
 How to read the Psalter correctly
 Delicious dishes with sausages
 A glimpse of Bella. Romantic chronicle. A glimpse of genius. Messerer about Akhmadulina Boris Messerer glimpse of Bella romantic chronicle
 I dreamed that I was sailing on a boat on the river
 How to cook beef entrecote in a frying pan
 About the company Foreign language courses at Moscow State University
 Which city and why became the main one in Ancient Mesopotamia?
 Why Bukhsoft Online is better than a regular accounting program!
 Which year is a leap year and how to calculate it