
Paracord weaving diagrams and instructions. Weaving a lanyard, its features and history of origin, master class and video - lessons on this topic, weaving patterns and features of products
Weaving a lanyard for a knife is a fairly ancient activity that people mastered in ancient times. Initially, they began to weave lanyards so that the knife could be attached to a hand or quickly found in a pocket. A lanyard is something like a modern keychain; it can be hung on any object, be it a knife, an axe, a flashlight, keys or a flash drive. Weaving a lanyard is a very simple activity that anyone can master. Despite this, the activity is quite interesting and useful. You can weave a lanyard for a knife for yourself, your loved ones, or even for sale, and this will bring a good profit. Today there is large number various lanyard weaving techniques. From all possible types, you can choose the most suitable option and weave a unique handmade accessory.
The process of weaving a lanyard can be divided into two stages. The first step is to select required material and preparing it for weaving. Before choosing a material, you need to decide what the lanyard will be and its purpose. For example, you can weave a lanyard for a knife in the form of a case or a keychain. The second stage will be the weaving of the product itself. The material you can use is various laces, cords, rope or paracord. IN modern world I use paracord for weaving lanyards, since this material is quite durable and it is easy to weave even the most complex patterns.
Weaving paracord lanyards
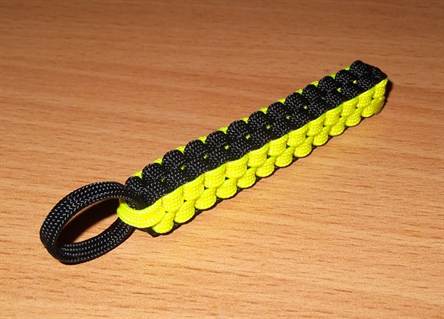
Weaving a lanyard from paracord is quite simple even for a beginner in this matter. That is why it is better to learn to weave with this material. Let's consider the simplest type of weaving called “Snake”. For this pattern you will need paracord of two colors, for example, it could be yellow and green. The length of both cords should be 90 centimeters. The first thing you need to do is pull out the core, several threads, from one cord, so that you can stretch another bundle into it. After this, we thread the second strand into the hole formed and burn the edges with a match or lighter in order to solder the two strands. After this action, one solid bundle is formed. One end of this tourniquet must be placed on the other, and then the resulting loop must be wound. Using the same principle, you need to wrap the second end of the bundle, after which two loops are formed. These loops must be tightened so that a knot is formed. The next step is to pass the end of the harness of one through the loop of the other and tighten it. After this, you need to turn the product on the other side and repeat the same action, only with a rope of a different color. After all the manipulations, you should get an original lanyard 14 centimeters long. This product is well suited for attaching to a knife handle. Snake weaving is one of the simplest patterns; in total there are more than two hundred names. Having mastered this type of weaving, you can move on to more complex options.
Take a closer look at various techniques You can watch a series of videos to learn how to weave lanyards, including those with the “Snake” pattern.
Video “Weaving lanyards”
1.Knife lanyard:
2. Lanyard weaving "Cobra":
3. Lanyard weaving "Snake":
4. Paracord lanyard:
5. Paracord lanyard for knife:
The type of weaving that is done with a cord is called a lanyard. In other words, a lanyard is a loop of cable or rope that is located at the end of a knife, saber, checker or other bladed weapon. Weaving a lanyard is a simple, useful, interesting and exciting activity that even novice needlewomen can master!
Weaving a lanyard for a knife is a rather ancient activity. Initially, lanyards were woven for the convenience of attaching a knife to a hand or to quickly find it in a pocket. Nowadays, a lanyard can be called a modern keychain, which is hung on a flash drive, flashlight, or keys. Therefore, the initial function is considered to be convenience for humans.

The secondary function is beauty and aesthetics. It was made as decoration. The presence of a lanyard on a Russian soldier was considered a badge of honor and meant that he had special services to his homeland. It was used to decorate weapons of any kind. Gun owner in free time made all kinds of lanyards from a variety of materials. Knowing the patterns and methods of weaving a lanyard, for example, from leather, the master could decorate his weapon.
Popular types
You can weave a lanyard for a knife with your own hands, either for yourself, as a gift to your family, or for sale, which will bring a good profit. Having mastered various patterns and types of weaving knots, you can quickly and easily make a decoration in the form of a lanyard, even for a checker. Let's look at some of them.
- Simple knot;
Almost everyone has used this knot at least once in their life. That's why it's called that. A simple knot is made by first knitting a knot upward and then inward to the first knot.
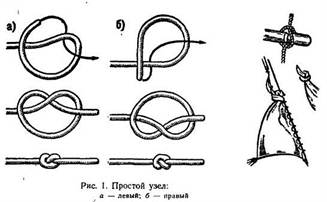
- Straight knot.
This node is performed as follows. When connecting the ends in a simple knot weaving pattern, do it twice for both sides.

The first stage in making a lanyard is selecting the necessary material and preparing it for weaving. You can choose a variety of materials, depending on the purpose of the product. The second stage is the weaving itself. For example, decorative laces, cords, rope, leather or paracord are used as materials. Today, paracord is most often used to weave lanyards. That's enough durable material, from which it is very easy to weave even the most complex patterns.


Methods of execution
There are various ways to weave lanyards. For example:
- Snake;
- Hunting knot;
- Cobra;
- Square weave;
- Round weaving (ball);
- Diamond weave.


On the eve of the men's holiday, we invite you to weave a keychain from paracord using the technique of weaving a simple knot. This material is one of the most optimal for weaving a lanyard, so we will use it in practice.
Please note. To make it two-color, first connect the ends of the paracord.
So let's get started.
How to do:
- To weave a keychain we will need: paracord (1.5 m) or two multi-colored cords (1 m and 0.5 m), a lobster clasp, a ruler, scissors, matches or a lighter, tweezers or tweezers.

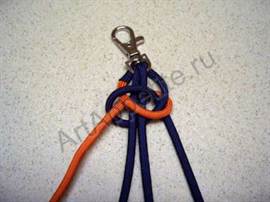
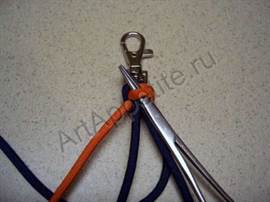
- The cord needs to be folded in half and threaded through the carabiner clasp. Then we measure the length of the product.

- We fix the clasp by tying the first two knots.

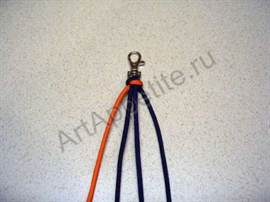
- Then turn the keychain reverse side. Now, when weaving, we will use tweezers, which we insert through the resulting blue loop and pull the orange cord through it. Tighten tightly.


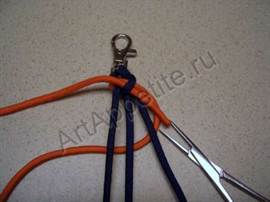
- We turn the keychain again and now pull the blue cord through the orange loop. Do the same as with the orange cord.

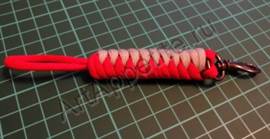
- We weave the keychain to the length you need. We cut the ends and carefully melt them using a lighter or matches. A stylish and original DIY paracord lanyard is ready! Having mastered this type of weaving, you can proceed to more complex options. We will be glad if this master class is useful for you.
Who would have thought that extraordinarily beautiful and practical things could be woven from a thin nylon cord? For those who want to try the paracord weaving technique, weaving patterns will be very useful. Their detailed description can be seen in this article.
About the material
Paracord is a thin nylon cord that can withstand a load of up to 250 kg. This stability is provided by the structure of the cable. It consists of a fibrous core wrapped in a smooth braid. But sometimes, under the guise of paracord, they can sell you an ordinary polyester cord. To prevent this from happening, you need to know that A good parkord has the following properties:
- It is soft;
- It burns, emitting a characteristic plastic smell and emitting a large amount of black smoke;
- The braid burns much faster than the core of the cord;
- Meets quality standards.
If you want to make a quality product, then use real paracord to create it.
To bring the weaving process to perfection, the craftsmen came up with a special machine. It greatly facilitates the process due to the fact that the product is tightly attached to the body of the machine. It also has a built-in ruler that will allow you to weave a bracelet to exactly the specified size without removing it from the loom. You can buy such an invention in craft stores. Or you can do it yourself. You will spend a minimum of materials, and the weaving process will become much easier. We bring to your attention a video with a master class on making a homemade machine for weaving paracord products.
Army bracelets
Typically paracord is used for cables that hold parachute lines. However, US Army soldiers found other uses for it. No military operation is complete without a simple rope. She can save a person’s life and get him out of any trouble. To travel light, the soldiers came up with a little trick, creating a real survival kit out of parachute cord. To do this, they began to weave bracelets, inside which they placed the necessary little things - knife blades, army dog tags, and the carabiner used for fastening could also be used if necessary. Well, a little symbolism was introduced into this matter: each soldier wove such a bracelet with his own hands for a comrade and gave it with wishes to return from a combat operation. Before departure from the base, the bracelets were put on, and upon returning home they were removed. They were called survival bracelets.
We suggest you make such a bracelet with your own hands. It is woven with a snake pattern. To make a classic survival bracelet, take:
- A piece of paracord 2 meters long;
- Scissors;
- Fastening.
Please note. A plastic clip is ideal for fastening the product.
Pass the rope through it and insert the ends into the loop, tighten.
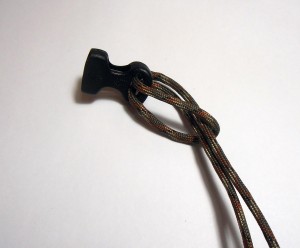

Place the second part of the clasp on the ropes and try it on your wrist. The bracelet should not fit your hand too tightly.


Continue weaving knots to the bottom fastener.

Pull the remaining ends through the hole in the mount, cut and melt, carefully pressing the hot tails to the clip. They must be soldered. The survival bracelet is ready.

With this simple weaving you can create an interesting bookmark.
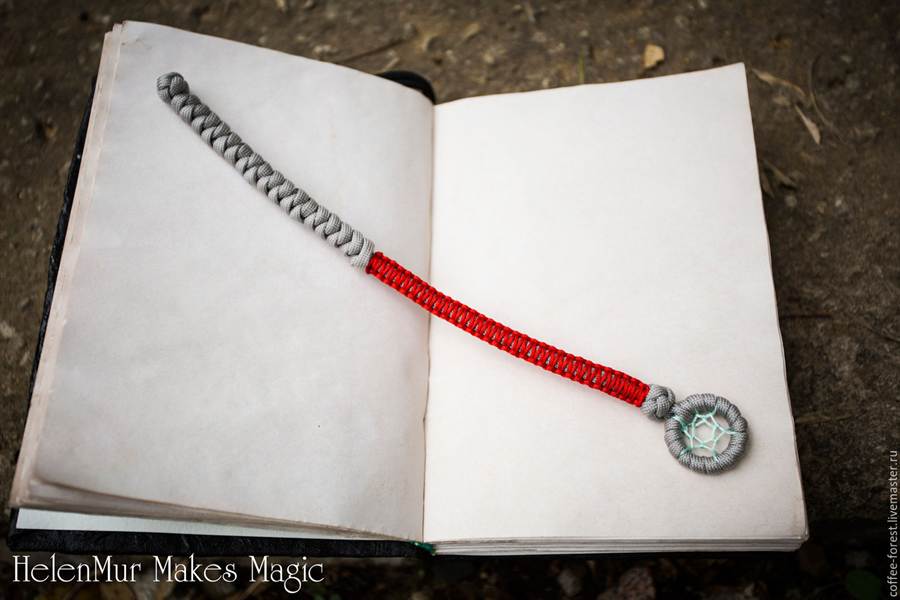
Its upper part is made of “snake”, and the lower part is made of “cobra” weaving, which will be discussed later.
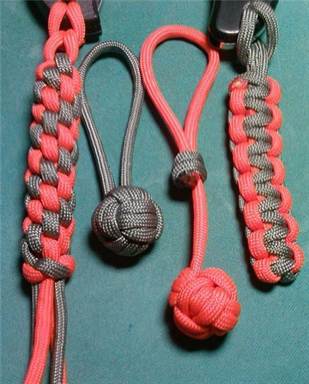
Unusual keychain
This accessory is perfect for lovers of extreme recreation. It is made with a “cobra” pattern. To complete the keychain, take:
- Paracord;
- Scissors;
- Matches;
- Carbine.
Fold the cord in half. The inner section in the form of a loop should be left the size you want the keychain to be. Weave a starting knot following the pattern.

Braid the middle section, leaving a small loop for attaching a carabiner. Turn the product over and braid it with the second row, following the instructions. You can decorate your work with a small metal accessory. As a rule, they have several eyes for fastening, through which you need to pass the cord and pull the decoration to the weave.

To complete the work, the free ends of the cord are tightened and melted with a lighter.
The stylish keychain is ready!

It also has another purpose. The fact is that previously such ropes were attached to the handle of bladed weapons. This thing is called a lanyard. It helped to easily handle the weapon and not lose it in battle. In addition, the hunters made a braid on the handle of the bladed weapon itself. In case of an emergency, this weave could also be used as a survival bracelet. A rope is simply necessary in the forest; you can use it to hang things out to dry, make a shelter or hut, set a snare for small animals, and use it as a tourniquet when injured.
They call it a lanyard special kind weaving, which is made with cord and is used to decorate handles of various kinds. To this day, they are used to decorate weapons of any kind, especially if they are edged weapons. In simple words, lanyard - a loop of cable or rope located at the end of a saber or other weapon. In the Russian army, the presence of such a lanyard on a soldier spoke of his special services to the fatherland and showed that this was a badge of distinction. Even novice needlewomen can weave a lanyard!
Lanyards were used for convenience and as decoration for the knife, attached to its handle. All objects that riders used before had lanyards at their ends. Therefore, the initial function of weaving a lanyard is considered to be convenience for the person who uses this or that thing.

The secondary function is beauty. It was made as decoration. When the owner of the weapon had free time, he could construct with his own hands all kinds of lanyards from various materials. Knowing the patterns and methods of weaving a lanyard, for example, from leather, the craftsman could advantageously decorate his bladed weapon.

Knowing some patterns and types of weaving knots, a person is able to profitably and without problems make a decoration in the form of a lanyard, even for a checker. Let's look at some of them.
Learning the technique of weaving a lanyard with an analysis of the main types
Simple knot.It’s not for nothing that the node is called that way. Therefore, almost everyone, at least once in their life, resorted to using it. It is performed by first knitting a knot upward, and then inward to the first knot.
Straight knot.When connecting the ends in a simple knot weaving pattern, do it twice for both sides.
Simple and straight knots, adjacent to the weaving technology, so it is not surprising that people who know how to perform the first know the basics of the second.
It is fashionable to perform lanyards in the following ways:- Snake
- Hunting knot
- Cobra
- Square weave
- Round weaving - ball
- Diamond weave.
In this article, you will see how to make a paracord lanyard using the technique of weaving a simple knot.
Since paracord is one of the optimal materials for weaving a lanyard, we will use it in practice.
You will need:- Paracord or strong cord.
Yes, only this material will be needed to complete the craft. Start making the lanyard by weaving a simple paracord knot.
Step-by-step master class on how to make crafts:- Find the middle of the rope.
- Make a loop on this section of paracord.
- Thread the end of the rope through the loop. A simple node is ready.
- Thus, perform simple knots according to the required quantity for you.
- Attach to the desired weapon through the hole on the handle.
- Check the ease of holding this structure.
If you are satisfied with everything, then the craft is ready. We will be glad if this master class turns out to be useful for you.
The lanyard allows you to visually lengthen the handle, even with a short knife to deliver chopping blows. This ability was convincingly demonstrated by participants in the rope cutting competition. This device can make the handle longer, even replace it. Using a lanyard, you can move and extend the accessibility zone of the knife beyond its contour.

The lanyard can not only protect the tool from falling out, but also free your hand, while at the same time allowing you to maintain quick access to the knife. This mount is especially convenient when working at heights, in a boat, in hard-to-reach places and during manipulations that require frequently putting the knife down and quickly picking it up.
However, it should be noted that each specific lanyard cannot perform all functions at once. Most often, it is intended only to perform one specific task.

There are different methods for attaching lanyards. It is attached to the handle, hilt, through a hole in the handle itself, or through a ring, bow - swivel. Each method has its positive and negative aspects. For example, fastening through a ring is more compact and movable, but fastening through a hole is simpler and more reliable; fastening through a shackle, especially if it moves tightly along the axis, allows you to stably orient the lanyard and quickly find it by touch. You can attach the lanyard freely, with a knot, with a clip, on a loop, or secure it with a through clip or a winding of thin wire. In short, everyone chooses the method of fastening according to their taste and needs.
Lanyards are knitted from a wide variety of materials, from decorative cord to chains and birch bark, but it is believed that the best material is leather.
Therefore, when making crafts and choosing material for them, be careful and study its characteristics. After all, working with weapons is not only fascinating, but also fraught with danger.
Video on this topic of the article
Not many people in our world are familiar with the concept of a lanyard. Many have seen this interesting decoration, but generally know nothing about its types and functions. But lovers of edged weapons often use a lanyard in their everyday life; moreover, many of them know how to weave this accessory themselves.
Lanyard - original look weaving, which is used to decorate the handles of various weapons - pocket and hunting knives, checkers, sabers, as well as tools. Weaving is done with a leather cord or synthetic cable, which is also called paracord.
 The history of this interesting device goes back several centuries.. And if now the lanyard often serves only a decorative function, then initially it served to prevent the weapon from being lost and slipping out of the hand. This term was first mentioned during the times of chivalry, that is, in the 14th–15th centuries. In the Russian army this accessory was a mandatory part military uniform, as well as an insignia on an award weapon. The presence of a lanyard on a weapon spoke of the soldier’s special services to the fatherland.
Types and functions
The lanyard, although it is a simple loop of cable and looks like an ordinary modern keychain, makes it much easier to carry a weapon and work with hand tools. Depending on its “responsibilities”, this woven bracelet comes in two main types:
- with a loop that is put on the hand - this option is more functional;
- with cord or tail - more suitable for decoration and ease of use.

Both types of this accessory are successfully used in our time to achieve the following goals:
- the ability to visually lengthen the handle of a weapon or tool;
- the ability to quickly free your hand without losing the tool;
- protecting your hand from cuts when it slips onto the blade;
- distribution of the load on the hand during work or impact.
- comfort when fastening, quick access to the knife in your pocket.
Along with this list, the main purpose of a lanyard is ease of use of a weapon or tool, because this factor can be the key to a successful battle and quality work done.
Weaving tools
Weaving a lanyard for a knife is not difficult even for a novice craftsman. This is a simple and fun activity that does not require special skills or serious expenses.
To create a lanyard with your own hands, you will need:

When all the materials and tools are at hand, you can look for suitable patterns for weaving a paracord lanyard.
Most often, the weaving pattern is alternate knitting of straight and simple knots. The result of combining these knots is such fashionable patterns today as cobra, ball, square, snake, diamond.
Manufacturing instructions
It is better for a beginner to become familiar with lanyard weaving using the example of the easiest technique of a simple knot. So, in order to make a lanyard for a knife, you need:

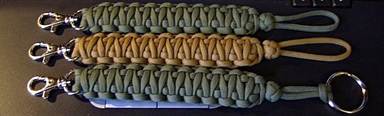
Having mastered the most basic technique, you can proceed to a more complex craft and weave a lanyard from paracord in two colors:
- take 2 cords different colors approximately 25 cm long each. Tie the ends of the cords together so that the accessory is bright and clearly visible;
- fold the cord in half, put on a carabiner and use it to measure the length of the future keychain;
- after folding in half, two free ends of the cord are formed next to the carabiner. One of the cords (for example, blue) needs to be braided with the rest. To do this, place the blue cord under the bottom and then put it on top, forming a loop;
- The free end of a cord of a different color (for example, yellow) is inserted into this loop. Tie a knot, thereby securing the carabiner clasp;
- The keychain turns the other way. Using tweezers, the yellow cord is pulled through the finished blue loop. This stage is repeated until the length of the key fob reaches the required mark. The two-color lanyard is ready to use!
Mounting methods
Before you start creating this unique accessory, you need to think about methods for attaching the lanyard to a knife or other tool.
For example, you can attach the decoration to the handle through a special hole. This is the simplest and most reliable fastening option.

It is also possible to mount it through a ring or shackle; this method is compact, movable and allows you to quickly find pocket weapon to the touch. You can attach the lanyard using different techniques: with a knot or a clip, a loop or a special clip. Each method is good in its own way and depends on the tastes and wishes of the owner. The main thing in this matter is to secure the accessory in such a way as to ensure maximum comfort and safety for the future owner.
Related articles
 The best amulets against the evil eye and damage Amulet against the evil eye with hands for children
 How to read the Psalter correctly
 Delicious dishes with sausages
 A glimpse of Bella. Romantic chronicle. A glimpse of genius. Messerer about Akhmadulina Boris Messerer glimpse of Bella romantic chronicle
 I dreamed that I was sailing on a boat on the river
 How to cook beef entrecote in a frying pan
 About the company Foreign language courses at Moscow State University
 Which city and why became the main one in Ancient Mesopotamia?
 Why Bukhsoft Online is better than a regular accounting program!
 Which year is a leap year and how to calculate it