
DIY abstract paintings for the interior. How to make paintings on the wall with your own hands: a master class for beginners
It is very noteworthy that today more and more owners prefer to decorate the interior of their homes with paintings self made. And this is wonderful, because the variety of modern materials allows you to make handicrafts using all kinds of techniques. It’s great that such handwritten creations can not only be hung on the walls of your home, but also presented as a gift to loved ones, colleagues or even children.
It is a common mistake to think that a picture is something drawn on a piece of paper. But in our modern times it is a design element that is performed using completely unusual techniques.

Today you can find large number photos of homemade paintings on the Internet, they will help you decide on the direction and design of future products.

In the article we will describe several of the most interesting master classes on how to make beautiful and, most importantly, unique paintings. It is important that the following techniques for the manufacture of such decorative elements will not require exorbitant sums. And a list necessary materials will not be prohibitive.

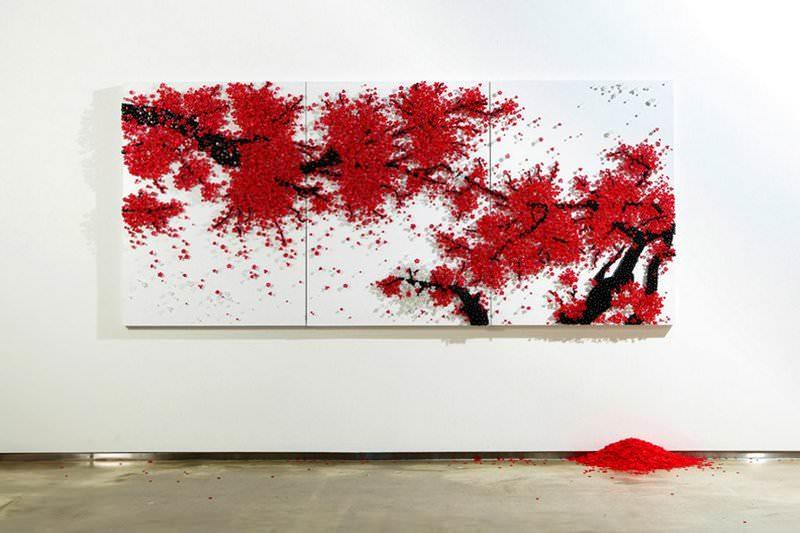
Paintings using beads
Surely you know a lot of materials from which you can make a beautiful picture. In addition to the painted products that are familiar to us, there is a very remarkable technique using beads that will sparkle bright colors on the walls of your kitchen or bedroom.

Depending on the chosen theme, the product can be hung in a child’s room or in the living room.


Note that this type creativity requires considerable physical effort and time, but the result will exceed all your expectations and will certainly attract the attention of household members and guests.

To make it you will not need many materials, half of which can always be found in any home:
- frame on a strong frame;
- finished painting (pre-printed);
- small size beads (1-2 mm);
- superglue;
- dental stick.

The process of doing the work is simple. To begin, take the base (frame) of our future painting and glue the selected drawing onto it. Next, carefully begin gluing the beads, distributing them evenly on the canvas.

Do not allow the formation of empty “holes”; for this you should use a toothpick, with which it is easier to reach the smallest corners of the picture.

Carry out this procedure separately, that is, visually divide the canvas into several elements and gradually fill these parts with beads. When finished, let the painting dry completely by placing it in a vertical position.


If necessary, you can arrange a beaded masterpiece in a beautiful frame and then select the most suitable place for the product.

Custom fabric paintings
Here is another interesting idea with which it is easy to make a picture. In this manufacturing method, you do not need to come up with patterns, composition and select paints or pencils. Here the only useful idea is how to choose the right fabric for the interior according to color and shape.

It is not at all important that intricate plots are depicted on the fabric - the choice of elegant abstractions is quite suitable, which can be played on canvases of different sizes to create overall harmony.


It’s very easy to make such modular paintings at home, the main thing is to find suitable fabrics and choose the perfect stretcher. One large pattern or drawing looks harmonious, smoothly stretching across two or three paintings.

"Golden" paintings
Sounds expensive, doesn't it? But in the production of paintings from gold you will not need large expenses, but on the contrary, necessary materials easy to find in simple stores with building materials or household goods. And the technique itself is extremely simple, and even a schoolboy can handle it.


So, for work you will need:
- thick cardboard or a piece of unnecessary flat plywood;
- plain fabric;
- acrylic paint;
- glue in stick;
- brush;
- a twig from any nearby growing tree;
- aerosol with gold paint.

Work process
We cover our base with fabric, carefully smoothing all the edges to avoid the appearance of bends or excess glue. After waiting for it to dry completely, we begin painting the fabric. To do this, very carefully apply an even layer of the paint you like and wait for it to dry. This stage can be avoided if you select ready-made colored fabric for our composition in advance.

Now comes the fun part - creating the golden branch. We take a twig and apply it to the dried canvas, and apply aerosol paint on top in a generous, even layer at a distance of 25-30 cm from the painting

Wait for it to dry again. The homemade drawing is ready! If you want to add some zest, you can manually draw in the missing elements: a bird, leaves or berries; You can add rhinestones and beads for more pomp.

Conclusions
As we found out, each of us can create a truly unique masterpiece in a single copy for the interior. Not only a mother on maternity leave or an art student can make paintings. Creating such paintings brings people together, so working on them is perfect for a young couple or a mother with a child.


On the Internet you can easily find many ways and instructions on how to make a picture. It is worth noting that sometimes the cost of materials and tools will cost a little more than a ready-made purchased product, but the result own work pushes this drawback into the background.


Develop your imagination and creative skills, and you will certainly be able to please your family and friends, because a handmade painting is an ideal housewarming gift, for your boss, or just good friend for your birthday.

Photos of paintings made by yourself


Tsugunov Anton Valerievich
Reading time: 6 minutes
Paintings are one of the components of the warm and unique atmosphere. And if the paintings are made independently, the emotional “response” from them can be an order of magnitude higher than that of purchased ones. created with your own hands - you will see photos of examples below - thoughtfully thought out and lovingly brought to life, they will give you a good mood for a long time.
Let you not have the talent of an artist, do not shine with creative flair and doubt your taste. Cast aside your doubts. Having a desire to create original paintings for the interior, you can learn some techniques on your own and after a while admire the creation of your own hands.
Looking for an idea for a painting
Inspiration is a fickle and timid thing. Let's not wait for inspiration from above, but let's get busy active search ideas for future paintings for the interior.
Advice. At the very beginning, it will be useful not to look on the Internet in search of ideas. Trust your inner instinct: what exactly do I need, how would I like my painting to look, what mood should it bring into my life and into the interior of my home? Write down all the thoughts that come to your mind.
Information, having gained a critical mass, will definitely “shoot” original idea. And having the main features of what you are looking for, you can choose suitable technique to create paintings with your own hands for the interior and see photos.
Anything can serve as an impulse for creativity: from sewing accessories and beads to family photos and letters from the home archive.
Advice. For any mother, a touching option for interior decor will be a panel collage of children's drawings, appliqués, the first cute doodles and other priceless creations of little hands.
Choosing ways to create a picture for your interior
Painting with paints
Even if the talent of a painter has passed you by, you are quite capable of creating abstract paintings for the interior at the “cute and soulful” level. You will need:
- oil, acrylic or watercolor paints;
- tablet or easel;
- canvas;
- brushes;
- palette and palette knife;
- scotch;
- solvent.
Making a sketch
The future of the painting that will decorate the interior of your apartment is first drawn with a pencil on the canvas: a composition is built, small elements and main lines are outlined. The space around the main object is “overgrown” with details, the lines of objects intersect with each other and overlap. This gives the picture depth and volume.
Determining the light source
To make the image more realistic, draw in dark and illuminated areas. Mark where and at what angle the light will fall on the objects, where the shadow, penumbra and highlights will be located.
Choosing colors
In order to choose the right colors for a painting, you need to know that:
- to obtain the desired shade, the paints are mixed on a palette and only then applied to the canvas;
- on a sunny day, the color of the object has golden shades, on a cloudy day – grayish;
- if the subject of the painting is night, the objects will be richer and darker than during the day.
Let's create
Multi-volume works and 6 years of study at the institute are devoted to the art of drawing. At the everyday level, we can give several guidelines in this process:
- draw simple objects first;
- dilute and mix the paints for your painting with a reserve, because you won’t be able to achieve exactly the same shade again;
- Before applying the next layer, the previous one must dry well;
- try different techniques, but focus on two or three that you can handle;
- within three days the image completed oil paints, you can correct, correct failed details or completely erase them.
Advice. If, when starting the picture, you planned a plot in the style of realism, and by the middle of the process you are surprised by abstractionism, it doesn’t matter. Urgently pretend that this is what you intended from the very beginning. Abstract creations are merciful to the mistakes of beginners, and in the interior they look impressive and mysterious.
Bead paintings
We begin to create a masterpiece for the interior.
- Free the frame from the glass.
- Draw the outlines of the frame on the base.
- Paste the pattern on which you will lay out the beads.
- Use thread or wire to mark the contours of the design, gluing them to the base.
- Glue the beads, distributing them tightly, without voids. If this is uncomfortable to do with your fingers, use a toothpick. Apply glue to small fragments, not allowing it to dry.
- Let the painting dry completely by placing it vertically for a while. If somewhere the beads are not glued well, they will fall off and you can re-attach them.
- Frame your beaded item, hang it on the wall and admire the transformed interior.
Painting for the interior from scrap materials
To make the work of your hands, intended for the interior of your home, interesting, do not limit your imagination to any specific techniques. Combine, break the rules, create your own recipes.
Various decorative and natural materials can be used: leather, fabric, buttons, sequins, quilling elements, wallpaper, dried flowers, sea pebbles, shells and even wool. The painting for the interior made of wool is worth considering in more detail.
Painting with wool
Wool painting is a whole art from an unexpected perspective. This is where you don’t have to worry about your artistic abilities: a sketch of a drawing can also be applied under a stencil. Warmth, depth, volume are just a few of the epithets for such a work. A painting made of wool breathes, lives its own life and brings special warmth to the interior.
You will need:
- clamping frame;
- non-woven or flannel backing;
- scissors, tweezers;
- wool of different colors.
Now we begin to paint a picture with wool.
- Draw a sketch on the base.
- Start laying out the wool with the main background color, and then lay out the wool of other colors in layers. You can apply the wool by pulling it into a strand, plucking it into a “cloud”, or tearing it off. Each method creates a different effect: delicate color transitions, transparency or richness of texture, light haze or dense fluffy balls of fur.
- Give wool objects the desired shape: convexity, texture, layering.
Important! Sometimes apply glass to the wool composition. This way you will evaluate the intermediate result and be able to eliminate shortcomings in a timely manner.
- Clean the glass with alcohol, press it against the painting with clamps and trim off any protruding hair.
- Secure the frame and enjoy the result.
Homemade posters for the interior
An original painting for the interior of the kitchen with your own hands will be posters made with handwritten recipes from your mother’s culinary notebook, for example. Handwritten text, inscriptions and quotes on a culinary topic, and simply useful information for the housewife can be arranged in a meaningful composition and decorated with it in the kitchen interior.
Stylish posters can be created from collages of family photos. The main photo is located in the middle of the collage, and it is framed by photos that are in tune with the common theme. The collage is mounted in a frame under glass.
Not every person decides to hang beautiful paintings in their own kitchen. And this despite the fact that designers highly recommend decorating the kitchen with your own hands. After all, they will be able to bring something new and unusual to this room. DIY kitchen paintings are considered a new trend in transforming rooms.
If you want to decorate your kitchen with paintings, then first of all you will need inspiration. But how to find it?
The search for new ideas for inspiration should be drawn from everywhere. Don’t discard even those that initially seem too simple and banal. They may end up being exactly what you need.
Also save up vivid impressions. Find some nice box and put in it all those interesting things that you hope to later decorate your kitchen with.
Realize your potential in new genres. To create something interesting, you need to try new ideas.
Coffee and seasonings for paintings for the kitchen
Make a canvas with my own hands quite simple. For this you only need certain tools and materials:
- various cereals;
- cardboard;
- glue;
- beans;
- bay leaf;
- coffee beans;
- thick fabric;
- cinnamon bark.


Making canvas for a painting
First you need to prepare the cardboard. You will need to cut a rectangle or square from it. It depends on how you want the picture to look.
After this, the resulting blank is traced over the fabric, an allowance of five centimeters is made and cut out.
Next, you need to place cardboard on the fabric, cut off the corners of the fabric and glue it to the cardboard. To prevent the fabric from unraveling, its corners will need to be glued with special care. You pull the burlap onto the cardboard very tightly with your own hands.

Drawing for a painting
If you did everything written above with your own hands, then you should have a canvas. Now you need to make a drawing by laying out coffee beans and cereals on the canvas. What the picture for the kitchen will be like depends solely on personal imagination. The material can be laid out either loosely or tightly.
After you have designed the pattern, you need to glue all the elements of the picture. You can use regular glue, but it’s best to find a silicone gun with your own hands, as with its help gluing occurs much faster.
At this point, the process of making this painting can be considered complete.
Paintings from cereals and seeds (video)
Crafts from cutlery for the kitchen
In this case we will not talk about standard paintings for kitchens, but more about the panel.
Paintings from buttons and plates
The more buttons, the much better. They will be the basis for the paintings. They will need to be sewn onto thick fabric. After that, they are inserted into the frame and glued with glue. Interesting plates are hung in the center and on the sides and painted with acrylic paints. The masterpiece is ready!
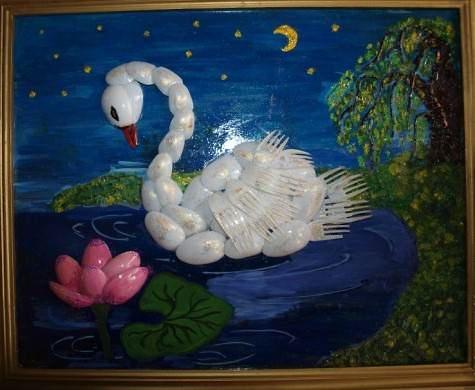
Pictures of spoons and forks
You can also sew forks and metal spoons onto thick fabric. They will need to be painted with enamel, after which you will get a wonderful still life.
Their plastic materials You can make more interesting pictures for the kitchen. Plastic forks and spoons are easy to paint and can be glued to any surface.


Cross stitch
With cross stitch you can achieve incredible beautiful paintings for the kitchen. Such paintings are considered simply stunning decor for this room. All drawings and pictures can be made from:
- various products;
- flowers;
- dishes.
You may not have paid attention to many items before. Now, thanks to the paintings, you will be able to feel all their beauty and charm. In order to make such a picture with your own hands, needed following materials and tools:
- fabric (canvas is best);
- two scissors (large and small);
- threads (preferably floss);
- marker for marking;
- special warmed needle;
- hoop (suitable various forms, sizes and from any materials).
All these materials are most often included in a general embroidery kit.
Available materials
Mosaic
Mosaic opens up great scope for the implementation of creative ideas for the kitchen. You can make paintings in the form of a mosaic from the following materials:
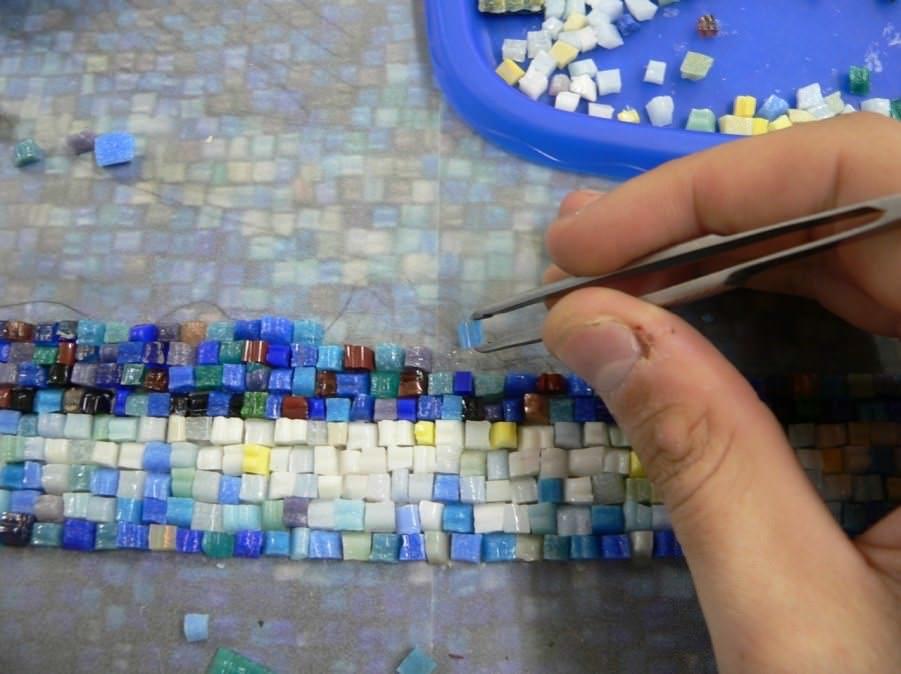
- glass;
- eggshells;
- broken tiles;
- rhinestone
Using the instructions below, you can easily do mosaic painting:
- cardboard of the required size is taken as a basis;
- glue is applied to it;
- put all the necessary elements on it;
- to fix small details, the product is varnished.
Installations
In making paintings with your own hands in the kitchen you can use completely non-standard methods. The most incredible paintings are created using ordinary household items. For example, using ordinary knives and other objects you can create an incredible composition. Therefore for this you need materials such as:
- A4 photo frame;
- glue;
- ruler;
- pencil;
- scissors;
- cutlery in the form of a knife and other utensils;
- pieces of fabric.
DIY flower painting
The essence of this picture is to collect dried flowers. It's absolutely easy to make. Such flowers can be bought at any specialized store.
We take the base and glue the flowers with glue. Leaves and petals are drawn using pencils and felt-tip pens. If desired, you can even glue dried grass.

Leather painting for the kitchen
In this case, both suede and real leather are suitable. Its pieces are combined with paints, fabric and other materials. The most important thing is that with any such combination the picture will look amazing.
Paper painting
Unfortunately, this picture will not last long. But very beautiful. You can make both origami and quilling. Basically, such masterpieces are made by children, for whom the manufacturing process brings a lot of pleasure.
Paper painting (video)
Decorating with posters
Posters are large images that can convey someone's image or idea. Black and white posters are considered the ancestor of posters.
Exists several types of posters:
- depicted on canvas;
- printed on paper that imitates canvas;
- printed on photo paper
Making them for the kitchen is absolutely easy. All you have to do is find the image you need.

Foam painting for the kitchen
A lot of foam blocks remain after purchasing various household appliances. Many people throw it away, and do it completely in vain. After all, if you get creative, you can use it to make a kind of picture for the kitchen.
Initially, you will need to prepare some image. It will need to be glued to the surface of the foam. The sides of the block are also covered with paper of the desired color. To hang the resulting picture in the kitchen, all you need to do is attach a small loop to the back of it.
Master class on making a picture frame (video)
Conclusion
You read in this article about the main types of paintings that you can make with your own hands. As you may have noticed, there is nothing complicated in creating them. So feel free to start experimenting!
Paintings for the kitchen (photo)


Decorate your home with hand-painted paintings, which, of course, do not have to be works of art. The secret lies in correct selection colors that will match the interior. Read on and you will find 14 cool and simple ideas DIY paintings from scrap materials.
DIY painting for beginners
Find a color that fits perfectly with your decor. Think about where you could place your painting and buy the required number of canvases.

Ideally, you should focus on 1-2 colors that are already present in the interior: monochrome paintings look very harmonious in any setting. However, maybe you think the room is lacking color? Then bright shades will become a magnificent decor for the room.

In the pointillism technique, when the brush does not make strokes, but simply makes dots, unusual and eye-catching paintings appear. Fill your hand with preliminary training on a piece of paper, and then transfer your idea to canvas.
READ ALSO: Wall decor ideas, 68 photos
DIY abstract paintings

Contemporary art, striving for abstraction, can easily be imitated (or even created :)). A harmonious combination of selected shades that repeat the color scheme of furniture and accessories in the room is the key to the ideal picture for your room. Be inspired by artists' paintings, the combination of colors in nature and don't forget that sometimes it's better to stop in time. And, most importantly, create your picture with pleasure!
DIY abstract paintings for beginners using a spatula and paints

DIY painting for the interior in pastel colors

DIY painting with marble effect

DIY geometric paintings for beginners


DIY paper paintings


Having decided on the style, you can begin to select materials for the future work:
- Paint and canvas.
- Cardboard, designer paper, magazine clippings, old photos.
- Textiles, leather, ribbons, braid.
- Glass or crystals.
- Buttons.
- Dried flowers, shells.
Advice! Don't throw away old children's drawings, scraps of fabric, magazines, decorations– all this can become part of the picture. Store them in a separate box, periodically reviewing and arranging them together.
Painting with paints
The easiest way to create an original painting for your interior with your own hands is to paint it. The subject is limited only by the imagination of the creator. Even if you have no artistic skills, you can create a masterpiece: use abstract techniques, study master classes and photos of finished works.
Oil, watercolor, acrylic paints will become faithful assistants in creating paintings for the interior. As a base, you can use either professional canvas or regular thick paper or a primed board.
Advice! You can draw inspiration from nature if there are picturesque places near your home. If you are unlucky with either the location or the weather, feel free to draw your household, pets, fruit compositions - whatever. The accuracy of the reproduction of reality does not play any role, the main thing is to approach the process with soul.
Modular paintings are suitable for almost any room: from kitchens to living room, but it is important to select appropriate images. If you don’t have time at all to create a masterpiece with your own hands, then we have for you good news- today you can buy them in any specialized store!
Photo printing
The technical side of the issue is taken care of by a photo workshop, which can print a suitable image on almost any basis: canvas, paper, ceramics, etc. These can be ordinary posters with image interesting places, people, ornaments.
Advice! A poster is not just a picture, it must convey a certain idea, correspond to the interior, the theme of the room and the character of the owners of the house. IN lately Pin-up and retro style posters have gained particular popularity.
If the poster is large-format, you can divide the image into several segments and, when combined into a single canvas, play with the joints, making it look like a modular picture.
If there is a child in the house, then you can scan his drawings and select the ones that match the color, shape, etc. Such a poster can be complemented by a photo of the artist himself. All that remains is to print the poster and place it in a frame that matches the color and style.
Collage of old and new family photos You can hang it as a picture in the bedroom or living room, and posters depicting the corresponding paraphernalia and fruits are suitable for the kitchen. Finally, it is worth noting that it is recommended to choose posters and panels for the kitchen in rich and bright colors. color ranges however, no one forbids you to go against the rules and create stylish ones.
Textile
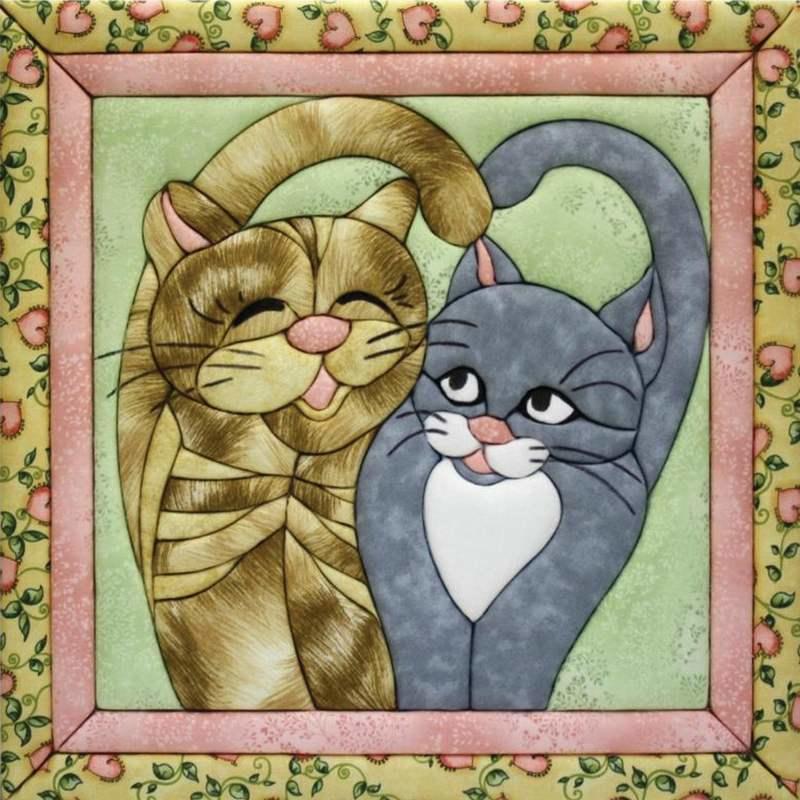
From all kinds of scraps, fabric with beautiful patterns, ribbons, braid or lace, you can create real masterpieces in patchwork style with your own hands. Fabric paintings are most often made using the appliqué technique. The basis is taken of dense textiles with discreet and inconspicuous patterns (stripes, polka dots, etc.), and the main elements are cut out from bright shreds.
Most often, kitchens and children's rooms are decorated with textile works, since these rooms are characterized by a certain simplicity present in the appliqué.
Advice! From felt, flannel and other fabrics that hold their shape well, you can cut out fruits, animals, cars, and houses. You can safely combine different textures and patterns on fabrics, use braid, decorative cord, and buttons for decoration. For the living room, you can make a textile picture from crinkled silk with abstract patterns.
From buttons
With their help, you can create original things by sewing or appliqué. This type of fittings is often used to depict leaves on trees. Buttons can be glued in an original way inside any contour, for example, a silhouette butterflies or cats. In sewing stores you can select parts of various shapes, colors and materials and lay them out, like a mosaic, according to a pre-prepared pattern. Such button creations will fit perfectly into the kitchen, however, they can also be used for the living room and bedroom.
Advice! Buttons can be glued around the perimeter of the picture frame, giving it individuality.
Wallpaper and panels
Often, after renovation, large pieces of beautiful wallpaper remain, which are useful for making unusual interior paintings.
- Wallpaper in a frame is the easiest option to create something like this panel. A piece is cut from the roll the desired shape and is placed in the frame. Moreover, the ornament may coincide with the pattern on the walls or differ from it. Such elements can come in a row of 2-3 pieces.
- Golden paint and a stencil or small ones will help to revive a boring canvas in a frame. black and white photos, stylized in antique style. Similar wallpaper pictures will fit perfectly into
Related articles
 The best amulets against the evil eye and damage Amulet against the evil eye with hands for children
 How to read the Psalter correctly
 Delicious dishes with sausages
 A glimpse of Bella. Romantic chronicle. A glimpse of genius. Messerer about Akhmadulina Boris Messerer glimpse of Bella romantic chronicle
 I dreamed that I was sailing on a boat on the river
 How to cook beef entrecote in a frying pan
 About the company Foreign language courses at Moscow State University
 Which city and why became the main one in Ancient Mesopotamia?
 Why Bukhsoft Online is better than a regular accounting program!
 Which year is a leap year and how to calculate it