
Install wired internet. How to connect wired Internet
As a rule, most problems arise when connecting to the router via a wireless network. Connecting via a network cable should not cause any difficulties. But, I have already encountered similar questions several times, and I decided to write a short instruction with a photo, in which I will tell you how to connect a computer (or laptop) to a router using a LAN cable.
And what exactly is there to write about here? We took the cable, connected it to the router, then to the computer, and everything was ready. But still, maybe it will be useful to someone.
As a rule, modern routers have 4 LAN connectors. This means that you can connect 4 devices using a network cable. And they will all receive Internet from the router, or work in local network. By the way, read the article on setting up a local network.We will need:
- Router with a free LAN connector (yellow).
- Network cable. A small cable is included with the router. But, if you need a cable longer, then you can make it yourself. I wrote how to do this in the article. Or just go to a computer store and ask to crimp the network cable to the length you need.
- Computer with network card (usually it is integrated into the motherboard). Well, or a laptop, netbook with an RJ-45 network connector.
Let's get started :)
Take our network cable, it looks like this (yours may be slightly different, I will enter a different length):

We connect one end of the cable to the yellow connector (LAN) of our router.

It doesn't matter which of the four connectors you connect the cable to.
Now we connect the other end of the cable to our computer or laptop.
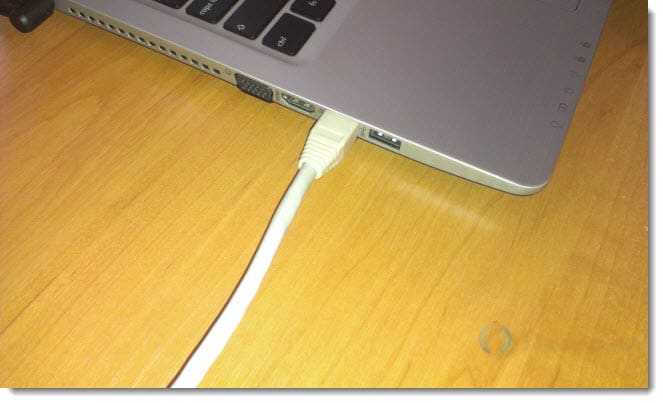
This is what the network connector looks like on a computer:

After connecting the network cable, one of the four indicators on the router should light up, indicating a connection to the LAN connector.

Now look at the computer screen. If in the notification panel (bottom, right) you see this connection status (as in the screenshot below), then everything is fine. The Internet is already working.

But, in this way, it would seem in a simple way, problems may also arise. Now we will look at some of the most popular ones.
Problems connecting your computer to the router via a network cable
After connecting, the status on the notification panel may not change; you will see the computer crossed out with a red cross.

In this case, first of all you need to check the cable with which you connected the computer to the router. How to do this? You can, for example, take another cable, or a cable that carries the Internet directly to your computer. If this connection status changes (even if a yellow triangle appears), then the problem is in the cable. Perhaps something has come loose there. Just change it.
It is possible that the network card is simply disabled. Let's check it out. Go to and find there Local network connection. If there is a status next to it Disabled, then right-click on this connection and select Turn on.

If such a connection as There is no local network connection at all, then most likely the driver is simply not installed on your network card. Download and install the driver. If there was a disk included with your computer (laptop), then most likely it has this driver.
Connected the cable, but the connection does not have access to the Internet
And this can happen. The problem looks like this:

First, you need to determine what the problem is. This may occur due to problems on the router side. See the article on this issue.
But I'll tell you in a simple way. If other devices work normally from this router, and there is Internet on them, then most likely the problem is on the computer itself. This is understandable :).
And as a rule, there is only one problem.
Go to again Control Panel\Network and Internet\Network Connections and right-click on Local Area Connection. Select properties. Then highlight "Internet Protocol Version 4 (TCP/IPv4)" and press the button again Properties.
Set to receive IP and DNS automatically and click OK.
Updated: November 11, 2013 by: admin
Read how to connect your computer to the Internet through everything possible ways and connections for: router, modem, phone, USB, Wi-Fi. Very simple!
Today, all computer users experience inconvenience if the device does not have access to the Internet. Connection to the global network allows you to perform any search task necessary information, communicate with people from every corner of the earth and work with a huge number of sites.
Let's look at how to connect the Internet to a computer via a router or an Ethernet cable, as well as all the advantages and disadvantages of each method. Before performing any of the methods, you must first ensure that a twisted pair cable or fiber optic cable is installed in your home. It allows you to connect to the Internet provider's network and gain access to the global network. Only after this you need to choose a connection method.
How to bring Internet into your home?
- First you need to choose a provider. Find out which companies in your city provide Internet services. Check out the available rates and reviews from other consumers;
- After choosing a provider, contact the company's support service and order an Internet connection service. Within a few days, the organization’s employees will come to your home and install a twisted pair cable;
- After connecting the required cable, you can choose exactly how to connect your computer to the network - using wireless router or direct cable connection to the device.
How to connect your computer to the Internet via a Wi-Fi router
A router (or router) is a special device whose purpose is to send data packets between the global network and devices connected to the router. Externally, any one is a small block with one or several antennas.
On the back of the router there are ports for connecting the patch cord (Internet cable) and LAN ports, which are used to connect the device to the network wired. The number of antennas determines the Wi-Fi coverage and signal strength.
A standard router has one or two antennas and a coverage radius of up to 150-200 meters. This indicator is quite sufficient for use in an apartment or house. If there is a need to create a wireless Internet network for an office or other large premises, routers with 4 antennas or special extenders are used - small gadgets that expand the existing coverage area of the router.
There are several ways to connect to the Internet using a wireless router:
- Creating a single access point. As a result, you will be able to connect any home gadget that supports Wi-Fi technology (laptops, computers, smartphones, tablets, Smart TV and others) to the network;
- Wired connection to a router to create a home network. You can not only create an access point, but also connect your computer to the router at any time using a patch cord and LAN ports. Before connecting two or more computers to the Internet, make sure that the main Ethernet network cable is also connected to the router. Otherwise, you will simply create a home network without Internet access.
Connecting a Windows computer to an already configured Wi-Fi network
The easiest way to gain access to the global network is to use an already turned on and configured router. If you are in an establishment with Wi-Fi access, you can easily connect your laptop or any other gadget to the Internet.
- You need to open the Wi-Fi network management window on your device and look at the list of available connections;
- Each access point has its own name. Find the name you need and click on it. Next, enter (if the network is open, you will not need to enter a password).
- The device will automatically connect to the hotspot and you can start using the Internet.

Please note that at the stage of establishing a wireless connection with the router, your device shows the signal quality. If the network has poor reception, this may cause a sudden Internet shutdown or the inability to connect even with the correct password. We recommend that you move closer to the router and try setting up the connection again.
It is important to remember about the security of personal data when using public open Wi-Fi networks. With the help of such connections, an attacker can easily gain access to personal data stored on your device. This could be payment card data, passwords, access to email, cloud services.
When connecting to public Wi-Fi in crowded places, we do not recommend paying for purchases on the Internet or accessing online banking sites. This may lead to theft of confidential information. Using open networks for regular surfing will not harm either you or your computer.
Setting up a new router
If you purchased new router and want to configure it for further connection to the Internet, you can do this in 10 minutes. All routers are configured according to the same scheme, so no difficulties will arise. The only thing you need to consider is the presence of an Internet cable in your home. Make sure to connect to this service from your provider.
Follow the instructions for self-creation Wi-Fi hotspots:
- Unpack the router. In its package you will find the device itself, a patch cord for connecting other devices and a power cable. Also, most devices come with initial setup dials, and some models' antennas may be removable;
- Connect the antennas to the router if they are disconnected. Then expand the router. There are two types of connectors on the rear panel - WAN (for connecting an Internet cable) and LAN (for creating switching devices within the same network). Also, some models may have USB ports that can be used to connect flash drives;

- Connect to the WAN port the Internet wire that the provider brought into the room (also, this port can simply be designated by the word Internet and be colored yellow);
- Then connect the power cable, the connector for which is round in shape and is also located on the back panel of the router;
- Plug in the device and press the power button on the same back panel. One or more LED indicators on the router body should start working.

Ready. You have connected the router to the Internet and activated its operation. Now you need to perform basic setup of the router so that other computers and mobile gadgets can connect to it.
To do this, follow these steps:
- Turn on your computer and activate the Wi-Fi option. In Windows OS, just click on the network icon in the tray and activate the service;

- When the router is turned on, it will appear as an active Wi-Fi network. Typically, the network name matches the device model name. When you connect for the first time, the network will be open, that is, you will not need to enter a password;
- After connecting the router to a computer via a wireless network, you need to carry out basic configuration of the router - set a password, network name, provider data and other options. To do this you need to go to settings. This can be done using the disk that came with the package or using the web settings;
- If you have a disk, insert it into your computer's disk drive and follow any instructions that appear in the program. As a rule, you will need to connect to an access point and immediately set a password, security level and network name;
- To configure using the web interface, make sure that the connection is established and the router is connected to the power supply. Then open any browser and enter the address 192.168.0.0 or 192.168.0.1 in the address bar. A window for entering the administrator login and password should appear. By default these are admin and admin. Also, login information is indicated on the bottom cover of the router itself.

- In the window that opens, go to the quick settings tab and follow all the instructions - set a password, encryption type, connection name and provider information. If you don't know how to enter your ISP address or the right company not listed, contact your internet service provider to obtain this information.

Close the router's web interface. Now you can connect any computer and gadget to a wireless network. Use the previously set password to gain access to the Internet. As for the router menu, depending on the model and firmware of the router, it may have different type or be English speaking. All instructions for using the menu can be found in the instructions for the router or on the website of the gadget manufacturer.
How to Connect a Computer to the Internet Using an Ethernet Cable
Let's look at how to connect the Internet to a computer via cable. If you already have a router with an active connection to the global network, just take a patch cord and connect it to the LAN port on the router, and on the computer to the Ethernet port. The final design looks like this:

You can also connect your Ethernet provider directly to your computer. This is done if there is no need to connect other gadgets to the network or when the computer does not support WiFi technology. One of the advantages of directly connecting an Internet cable to a computer is faster Internet operation.
How to connect your computer to the Internet using a USB cable

There are times when the fastest and convenient ways Internet connection. Then a smartphone or USB modem with a SIM card comes to the rescue. Connecting the Internet to a computer in this case is very simple!
Instructions for connecting to the Internet using:
- You must have a cable with which you charge your smartphone. One end of it, as always, is plugged into the Smartphone, and the other end, instead of charging, is plugged into the USB port on the computer.
- In your smartphone settings go to: Additional features– USB modem. Check the “enable” box
- Within a few seconds, your WIndows will detect the new device and show you that a wired connection has been established.
Important! In order to use the Internet from your phone to your computer or laptop, you must have a tariff plan that supports Internet access. Carefully monitor the traffic consumption on your phone!
When connecting a USB modem with a SIM card to a computer or laptop, follow the instructions given to you when concluding a contract for Internet provision with a mobile operator. As a rule, you just need to insert the modem into the USB port of your computer and wait for the application and drivers to install. Everything happens automatically.
How to connect your computer to the Internet using Bluetooth
If you forgot to take a USB cable for your phone with you, but really want to connect your laptop to the Internet, that’s also not a problem. You can connect the Internet to your computer from your phone via Bluetooth. To do this, several conditions must be met:
- Your laptop must support Bluetooth connection,
- The smartphone should be no further than 1-3 meters from the laptop (the closer the better),
- Your phone must have a data plan that supports data transfer
Instructions for connecting the Internet via Bluetooth
- First you need to establish a connection (pairing) between your computer and smartphone. To do this, in the computer tray (where the clock is in the Windows panel), click on the Bluetooth icon.
- Next, click Settings. And there select “Allow other devices to discover this computer.” Save the new settings by clicking on the “Apply” button.
- On your phone, go to Settings - Bluetooth - turn on the device.
- Next, on the phone, go to Settings - Additional functions - Bluetooth modem. Let's turn it on.
- Now on the computer, click on the Bluetooth icon in the tray again. Only now with the right mouse button! Select “Add device” from the pop-up menu.
- If you previously completed step 3 on your smartphone, the computer will detect your phone. Click on its name and select the “Next” button.
- A window with a PIN code will appear. The numbers must match on both the smartphone and the computer. If everything is ok, click on the “Yes” button. The computer will connect the smartphone and spend some time on automatic installation drivers.
- You will have to click on the Blueeooth icon on your computer again and select “Show devices”. Select the connected phone and right-click on it.
- A window with a menu will appear there, in which you need to select “Connect via”. Windows will make the connection on its own. All! Now you can use the Internet without much high speed. Of course, you won’t watch the movies, but it’s easy to surf the news.
Bottom line
After familiarizing yourself with all the advantages and disadvantages, choose the type of connection to the global network that suits you. Before connecting your Windows computer to the Internet, make sure that your provider has activated the service for your subscriber number. Otherwise. Even after successfully creating a home network, the Internet may not work.
How do you connect to the Internet? Below in the comments you can ask a question of interest that arose during the connection stage.
A computer has long ceased to be a luxury. And almost everyone also has the Internet. Sooner or later, another device appears in the house, be it a laptop or a cool smartphone, which can also be connected to the Internet. Then the problem arises how to connect to the internet to all these devices.
Let's consider the most common case. There is a cable that comes from the Internet provider, and two computers that need to be connected to the Internet. So, there are two possible options that you can use connect 2 computers to the Internet. The first is the cheapest, but not very convenient, and the second is more expensive, but has a lot of advantages. This article will look at a cheap connection method. All settings will be made under Windows 7.
The cheapest way connect two computers to the Internet, is to buy an additional network card for the main computer, and a piece of cable of the required length. We insert the network card into a computer that is already connected to the Internet and connect two computers through it with a cable.
All that's left is connect internet to two computers. We need connect internet via computer, where the Internet is already available. To do this, on this main computer, go to settings "Network Connections". To get to them we take the following path “Start / Control Panel / Network and Internet / View network status and tasks / Change adapter settings”.


In the window that opens, find the network connection of the board to which the Internet is connected and go to properties by right-clicking on this connection and selecting "Properties" in the menu that appears. In the window that appears, go to the tab "Access" and put a check mark next to the text "Allow other network users to use this computer's Internet connection". If everything goes well, then Windows will report that the second network card to which the second computer will connect is: 192.168.137.1.
Now it is necessary set up an Internet connection for a second computer. In the same way as for the first one, go to the network card settings and in the window that appears on the tab "Net" select a protocol IPv4 and go to its properties. In a new window we will configure our network card.
Enter the following settings:
IP address: 192.168.137.2
Subnet mask: 255.255.255.0
Default gateway: 192.168.137.1 (IP address of our distribution network card)
Preferred DNS Server: 192.168.137.1
After pressing the button "OK" The Internet should appear on the second computer.
Connecting to the Internet via a computer done, but there is one big drawback: the second computer will have Internet as long as the main computer distributing the Internet is turned on. It's possible connect internet to 2 computers and more. The cost of connecting two computers in this way is approximately $15.


Significantly more knowledge will be needed to automate a business based on 1C. 1C programmer http://www.1c-biz.ru will solve your problems in setting up and finalizing 1C:Enterprise, which will significantly increase labor productivity in your company.
If you have two computers at home or in the office, one of which is connected to the Internet, then you can easily connect the Internet to the other computer. In this case, the “main” computer will act as a server for the “additional” one, that is, it will be necessary for it to always be on when you want to connect to the Internet on the second computer. To do this, you will need a special cable (for organizing a home network), as well as performing a number of actions in the Internet connection settings of both computers.
Often this need arises when there is desktop computer and a laptop. First of all, you need both computers to be equipped network cards Ethernet. It is with the help of this that the wired connection will be made.
See if your computer (laptop) has the appropriate port; desktop PCs usually have it. So, when you have verified the presence of such a port, we purchase a crimped network cable of the length we need (“crimped” means that there will be special patch cords with latches (“plugs”) at both ends).
Now let's start setting up the Internet on your computer. In this instruction we will connect Windows 7 (laptop) to Windows XP on the main computer. But the settings will be similar for other versions of Windows.
Go to network settings on computers
a) on a desktop PC:
Go to the “Control Panel” folder and find the “Network Neighborhood” shortcut. There are two connections in the Network Connections window.
b) on a laptop:
In the same folder “Control Panel” - “Network and Internet”. On the screen we also see two connections: there will be a local network connection with the house, with the globe– connection to the Internet. Click “Change adapter settings” in the menu on the left.
It is necessary to “share” access to the Internet with other users through the “main” computer
So all users who will be connected via cable (if there is more than one, you will need another additional device - a switch, which will distribute the connection from the main computer to all additional ones connected to it).
In the menu on the left in the open folder, go to properties (right-click on “Display network connections" - "Properties"). We find the “Advanced” tab and check the “Allow access...” item, and uncheck the “Allow other users to manage...” item.
Setting it up
Right-click on our Internet connection - “Properties”. In the “Components used by this connection” list, select TCP/IP Internet Protocol and click the “Properties” button just below. It is necessary to fill in the fields as follows:
IP address: 192. 168. 0 . 1
Note: the last digit of the IP address can be anything from 2 to 254, since “1” will be occupied by the main computer. When you connect another additional computer, you can use another one (for example, 6, 7, and so on).
Let's go to the settings on the laptop
In the TCP/IP protocol properties window, fill in all the fields as follows:
IP address: 192. 168. 0 . 5
Subnet mask: 255. 255. 255. 0
Main gateway: 192. 168. 0 . 1
Preferred DNS server: 192. 168. 0. 1
Now we connect the cable and check. Everything should work.
Wired Internet helps you access the network at a relatively high speed and is quite stable. But when used for the first time, the Internet connection requires certain settings in order for the connection to become available.
Checking drivers
As soon as you connect the Internet cable, the system will recognize it as a new device. Each device requires drivers to ensure compatibility of the connected equipment, OS and computer components. If drivers are missing or outdated, the Internet may not work correctly.
Typically, drivers download themselves or are installed on the system by default. But it happens that they are on a separate disk, have fallen off, or are missing for one reason or another. Whatever the case, it is recommended to update your drivers before setting up your network.
If you have a driver disk, run the program on it and it will install the necessary components. Otherwise, follow these steps:
- Expand the device manager, you can find it through the system search bar.
Open the device manager
- The window that appears displays a list of devices recognized by the computer. Find the item “Network adapters”, right-click on it and expand properties.

Find the network adapter and open its properties
- Going to the “Details” block, specify the line “Equipment ID” in the expandable list. A list of network adapter IDs will appear. Copy one of them. Then open your browser and search for “Network adapter drivers.” Add the copied number to the end of your request to find and download drivers for your device.

Open the “Details” tab and look at the equipment ID
- After the download is complete, return to the manager and begin the update procedure. Right-click on the adapter and select Update Drivers.

Using the “Driver Update” function
- A window will open to select the update method: automatic or manual. Of course, you can use the first option, but it is not always possible to find necessary drivers. So start searching for files on your computer.

Select the option that allows you to find drivers for this device
- Specify the location to save the already downloaded drivers. Click on the “Next” button and wait until the process completes.

We indicate where the drivers are located
- If you have problems with the installation, go back to Device Manager and remove the network adapter. Unplug the cord, restart your computer, and plug the cord back in. Repeat the driver installation process.

If the drivers are not installed, remove the device
Connection types - L2TP and PPPoE
L2TP and PPPoE are two tunneled protocols that ensure the security of user personal data and regulate Internet connection parameters.
L2TP (Layer 2 Tunneling Protocol) is a channel or tunneled layer 2 protocol. Allows you to create a VPN with specified access priorities and is safe to use and transfer data. This type of connection is available in modern operating systems and is easy to set up, but it may require reconfiguring your router to use it.
The PPPoE (Point to point protocol over Ethernet) protocol operates based on a built-in authentication procedure that tracks the time of delivery and payment of network services. When concluding an agreement, the provider opens an account for the new subscriber and enters it into the database.
Both protocols require a login and password for authorization on the network. This data is provided by the provider providing wired Internet.
You can find out what type of connection is used in your case from the provider itself. Call technical support company, provide the necessary data to the operator and find out what type of connection the company uses.
If the computer recognizes the network, you can view the adapter settings yourself:

Creating an L2TP connection
Once you are sure which type of connection is being used in your case, follow these steps:
- Open the control panel and find the “Network and Internet” item.

Open the “Network and Internet” section
- Open the network management tab.

Open the network management section
- Start creating a new connection.

Click on the “Set up a new connection or network” function
- In the window that appears, click on the fourth line “Connect to a workplace”.

Select the “Connect to a workplace” mode
- In the second step, indicate that it is worth using your network connection.

We indicate that you should select the current connection
- In the “Internet address” line, enter the value provided by the operator. In the Destination Name field, enter any value that will be used as the name of the network. Check the box next to “Don’t connect now, just set up to connect in the future.”

Specify the Internet address and network name
- Enter your login information.

- Connect or close the window.

Connect to the network or close the window
- Returning to the control center, click on the “Change adapter settings” block.

Open the block “Change adapter parameters”
- Select the adapter that appeared after completing the previous steps and open its properties.

Open adapter properties
- IN general properties Enter the address provided by the operator. In the settings, deactivate the “Include Windows login domain” feature. In the “Security” tab, select the L2TP IPsec VPN mode, disable data encryption and activate the CHAP and Microsoft CHAP password verification protocol. In the “Network” tab, check if protocol version 4 is active, not version 6.

Set the parameters necessary for the L2TP connection to work
- Done, now when you try to access the network, you enter your username and password to gain access to the created connection.

Enter your username and password to connect to the Internet
Video: Creating L2TP in Windows 7
Setting up a PPPoE connection
After making sure that the PPPoE protocol is used in your case, go through the following steps:

Video: setting up PPPoE in Windows 7
Possible problems
If you still have difficulty after completing the previous steps, try one of the following solutions:

The connection type used on your computer will depend on the operator you select. A connection via the L2TP protocol is configured through the “Connection to a workstation” mode, and via PPPoE through the “Internet Connection” mode. To log into the network using any protocol, you will need the login and password provided by the operator.
Related articles
 The best amulets against the evil eye and damage Amulet against the evil eye with hands for children
 How to read the Psalter correctly
 Delicious dishes with sausages
 A glimpse of Bella. Romantic chronicle. A glimpse of genius. Messerer about Akhmadulina Boris Messerer glimpse of Bella romantic chronicle
 I dreamed that I was sailing on a boat on the river
 How to cook beef entrecote in a frying pan
 About the company Foreign language courses at Moscow State University
 Which city and why became the main one in Ancient Mesopotamia?
 Why Bukhsoft Online is better than a regular accounting program!
 Which year is a leap year and how to calculate it