
How to make a directional IR emitter. Making your own infrared heater
Among the range of modern heating devices, devices operating on infrared radiation stand out. The principle of their operation is based on long-wave radiation, which, when exposed to a surface, leads to its heating.
The cost of factory ones is relatively high. This is due to their design, manufacturability of the process and the use of expensive materials. If price is a fundamental factor and you want to try your hand as a designer, you can make such a heater with your own hands.
The operating principle of an infrared heater is to transfer heat from a heated source to surrounding objects using a reflector. The main feature is the material used to make the reflector. These are mainly aluminum alloys, which have the property of reflecting only long-wave radiation (thermal). The heater can be of any type - electric (incandescent coil) or gas.
So, to make an infrared heater you will need:
- Heating element
- Reflective aluminum surface.
Design No. 1
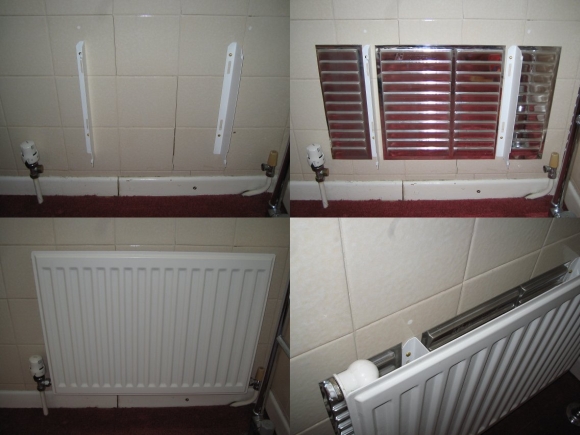
The simplest and at the same time effective design of a long-wave heater is a modification of standard heating radiators. To focus the heat coming from the radiator, simply install a sheet of aluminum-coated foil.
It is mounted on the wall where the radiator is installed and reflects heat into the room.
Design No. 2
Any portable heating element can be used as a heating element - oil, electric, etc. The reflective surface is installed on a specially made frame. The design of the frame directly depends on the shape of the heater. In this case, the main thing is to take into account the range of propagation of long-wave radiation. The larger the reflective surface, the larger the additional heating zone will be.
The designs of these models are based on the use of standard heaters with a small addition - an aluminum reflector.
Design No. 3
For a completely homemade model you will need:
- 2 sheets of laminated plastic
- Epoxy glue
- Graphite
- Electrical cable with plug
Zigzag lines using a mixture of epoxy glue with the addition of graphite must be applied to plastic sheets. These lines will serve as a conductor and heating element. Next, the 2 sheets are connected to each other so that the lines overlap each other. The electric wire is connected from different ends to the plates on copper terminals.

Using a voltage regulator, you can change the heating power of a homemade device.
Before you begin designing and manufacturing an infrared heater, the following conditions must be met:
- Safety. Creating a heating element, especially one powered by electricity, poses health risks. All conductive parts must be insulated.
- Expediency. If the cost of a homemade heater is close to the factory one, then it is best to purchase an industrial model. It will be more reliable and efficient.
If you want to make a heater yourself, remember that without practical skills and knowledge of a theoretical basis, you may end up with not only an ineffective, but also an unsafe device.
To work comfortably in a garage or workshop during the cold season, it is not necessary to buy expensive oil or infrared heaters.
You can easily get by and replace them with regular incandescent or halogen bulbs. Moreover, when using simple lamps, you will also receive a lamp as a bonus.
Halogen lamp heater
The simplest stove is assembled using just one 1 kW halogen lamp. 
To do this you will need three things:


Place this lamp inside the container on a brick and close it, so to speak, “the blower.” 
The heating temperature of the surface of the walls with a container size of 400*400*600mm will reach up to 80 degrees. The maximum temperature of heated floors does not exceed 30C.
Eighty is definitely a bit much, so it’s better to take one 500W halogen or connect two in series at 1kW each. The heating of the stove walls will be optimal - 60 degrees. 
To fix the lamp, use a special ceramic socket holder. 
It's ceramic. The brick on which this “beast” lies heats up to 300 degrees!
As you understand, the wires for connection must be thermal. 
If you open the “vent” of such a heater, the picture from the inside will resemble a miniature nuclear reactor, with one single fuel element - a halogen element lying on a brick. 
Moreover, due to the low power, it is all connected through a regular socket with a plug. You will be shocked how much heat this design can generate.
By the way, it is very convenient to dry clothes and shoes on it. 
There is just one big BUT. This is the lifespan of such a light bulb in a confined space without normal cooling conditions. I can assure you that he will greatly disappoint you.
How much light and heat does a light bulb provide?
Therefore, we will consider another more efficient and durable design, assembled on the basis of simple incandescent lamps.
An ordinary light bulb with an incandescent filament is the most accessible source of not only light, but also heat. Of its entire radiation spectrum, we see only a small part. 
Everything else is hidden from us in the infrared region. 
As an efficient light source with its efficiency of 3%, the light bulb is no good. 
But if we consider it from the point of view of heat, then the efficiency is already approaching 100%. 
How to increase the efficiency of the light? For example, you can increase the voltage.
However, at the same time, its lifespan will sharply decrease. She will live with you for literally a few hours. 
But if you do the opposite, that is, reduce U=220V by half, this will sharply reduce the light output by five times. But at the same time, almost all the useful energy will go into the IR spectrum. 
Of course, it will not increase, and its overall level will fall from its original values. However, the level of the visible spectrum will drop even more. The whole point here is that your assembly should primarily heat, not shine.
The most important and significant advantage of this is the increase in the life of the lamp to almost 1 million. hours (over a hundred years). 
That is, you buy it once and you can use it for the rest of your life! How can you reduce the voltage at home without any regulating devices, like LATR?
Serial connection of light bulbs
Very easy. Simply connect two light bulbs of the same wattage in series and the voltage across each will be cut in half. 
They will of course shine dimmer.
How will the power consumption of such a combination of light sources change? Measurements can be taken with a multimeter.
Let, for example, at a constant voltage of 240V, for two 100-watt light bulbs the current is 290mA. 
Based on the formula for calculating power, we find that:
P=I*U=0.29A*240V=69.6W
As you can see, consumption has fallen. But at the same time, the heat dissipated per watt of power has increased.
Optimal heating power
To assemble a lamp heater, it is best to use 150W models. Just note that after the introduction of a law prohibiting the production of conventional incandescent lamps of more than 100W, they began to be sold under the name “heat emitters”.
With their sequential connection scheme, even two copies, you can immediately feel the radiated heat. At the same time, they do not blind the eyes. 
The current in such a circuit at the same voltage will be 420mA. This means that two lamps consume about 100 W in total, and most of them are used for heating. 
You can compare what power infrared heaters are sold for and what area they are designed for. The ratio for conventional models is 100W per 1m2. 
Oil radiators have almost the same indicators. 
That is, in any case, watts turn into heat. Only specialized infrared models will have more directed radiation to a specific point or area, while your homemade product will have a wider angle.
By the way, these 100 W/m2 are taken from SNiP for premises insulated according to all standards. This is the optimal power for all heaters in central Russia.
For northern latitudes, including cold, uninsulated garages, the values will be higher. If, for example, the heat loss in a garage is 1000 W/hour, and you heat it at 300 W, then your temperature will never rise.
But if the ideal heat loss is close to zero, then 100 W will be enough to create a bathhouse inside. 
This power also depends on the height of the ceilings (the average calculated one is up to 3 m).
Assembling a homemade infrared heater
Based on all this, we need to assemble our heater from light bulbs. Let's move on to practice.
If your work area that needs to be heated is 3-4m2, then assemble a 300W heater. 
This will require 6 lamps with a power of 150W. That is, three serial pairs that will produce 100W each.
They are assembled on a frame made of metal or aluminum corner. 
Sources of light and heat in the frame should be placed according to the diagram below. 
In this case, select the distance between adjacent bulbs such that you can easily replace a burnt-out bulb with a new one. Even after a hundred years.
A gap of 1 cm between the flasks will be enough for this. The frame parts are connected to each other with bolts or rivets. 
Next, you will need to fasten two aluminum strips inside it, on which the reflector or reflector will sit. These strips will add rigidity to the entire structure. 
Now the most important thing is to make the reflector correctly. The usual parabola shape is not very effective. 
Models in the form of a biparabola cope much better with their responsibilities.
Here the whole difference is in the reflection of the rays, which in the second case for the most part do not bounce back into the lamp, but go out. 
Aluminum cans are ideal as a material for manufacturing. Cut off the bottom and top of the jar. 
And you unfold the walls and bend them in the middle. At the same time, leave a margin of 1 cm on one edge for another bend. You somehow need to connect the halves of two cans together.
1 of 2


You fasten them together with rivets. To avoid tearing the thin aluminum in this process, first place washers on both sides. 
As a result, you should have a one-piece reflector made of 4 cans. 
Well, don’t forget about the two stripes in the middle of the frame. 
Now you need to insert the light bulbs themselves into this structure. At the same time, do not allow them to touch the reflector. There should be a minimum distance of 1.5-2 cm from it. 
Here again aluminum will come to the rescue. Namely, thin strips nine centimeters long.
Do not make a mistake when marking the places where the cartridge is attached to the strip, otherwise you will not be able to bring the power wires inside. 
Do not forget that each pair must be connected in series. Here is a wiring diagram for such an infrared lamp for six lamps. 
Wires must have at least two insulations and be three-core. 
The third vein is the earth, which is planted on the body. 
The connection occurs via a two-key switch. Thus, the heater can have three powers. 
When all the lights are on (both keys are on) or only part of them (middle or extreme).
For example, when you press the first key, the outer lamps light up. 
The power dissipation will be 200W. When you press only the second one, the central ones are launched. 
Here the power will be only 100W.
Well, if everything is together, then you will feel the full 300W heating immediately after switching on. It will feel like coming from a fireplace. At the same time, the light will not be too bright to blind your eyes. 
Even through thin clothing, heat will penetrate to the body. If a miniature fan, like those used in power supplies, is directed at such a lamp from top to bottom, the effect of heat will be even stronger.
This will have virtually no effect on infrared radiation, but will greatly increase convection heat transfer indoors. It will also reduce the local heating of the spotlight heating pad.
Such a lamp can be hung by punched tape and can be used to adjust the required angle of inclination. 
What is the advantage of such heaters? Firstly, they heat up almost instantly after switching on. Secondly, they warm up exactly the place where they are directed, and not the entire cubic capacity of the room.
Four of these 500W floodlights are enough to keep you warm in the garage in winter. 
Such heating will be quite expensive, about 10 rubles per hour. But you can turn them on only when necessary and do not heat the room in advance. You went inside, turned it on, and you immediately felt the warmth, instead of shivering for an hour, chattering your teeth.
Thanks to the development of production technologies, new materials are constantly appearing on the construction market. The choice is expanding all the time, and the same problem can sometimes be solved in several ways. So, for example, when there is a need to insulate a room, heated floor technologies will come to the rescue. Among them, infrared flooring is gaining increasing popularity. How to make such a floor will be discussed further.
General description
First, let's define what it is and what its main operational characteristics are. An infrared floor is a type of electric floor, which is heated by applying an electric current to carbon radiating elements. On the modern building materials market you can find several varieties of such floors.
- Film. Perhaps the most common option is a film inside which the active elements are located. The heating intensity is monitored and controlled using a special thermostat included in the system.
- Rod. Another type of heated floors, which is supplied to the market in the form of rod elements, inside of which there is a heating part.

Infrared floors do not have any fundamental differences in functioning, but their installation technologies and some operational characteristics will differ to some extent. By the way, let us note the most important characteristic qualities:
- First of all, it is necessary to note the extreme ease of installation of the system. With basic skills and a minimum set of tools, almost anyone can handle the job.
- Cost-effectiveness of the system. Thanks to the use of advanced technologies, the efficiency of the entire system is very high and allows you to get maximum results with minimal energy consumption.
- Another quality that can be noted is the versatility of application. In general, infrared heating elements are intended for installation under floor coverings, but can also be used as additional measures for heating a room, in the form of mounting them on walls or even ceilings.
- Reliability also characterizes the system on the positive side. If installed correctly, such a floor will perform its functions for many years.
- Among other things, the system is devoid of open heating elements and, even in the event of failure, remains as safe as possible for humans.

But, as mentioned above, in order for the listed qualities to fully manifest themselves, the installation of the system must be carried out to the highest possible quality.

It’s probably impossible to say unequivocally which infrared floor is better. Both the rod and roll versions have their pros and cons.
Laying the strip type in a room with a lot of heavy furniture, such as cabinets, beds, etc., is undesirable, since a large mechanical load can damage the heaters.
Installation technology

Speaking about the technology for installing infrared floors, it is worth noting that regardless of the manufacturing option, the main stages of work will differ minimally, so below we will consider the question of how to lay the strip manufacturing option. It should be said right away that it is better to divide the work into several stages and carry them out sequentially.
Preparation
As in all other cases, work should begin with preparation. Here, special attention should be paid to the quality of the base. The fact is that, in accordance with the rules for installing film (and rod, too) floors, the maximum difference in height of the base should be no more than 3-5 mm per m 2. If necessary, it is necessary to level the surface using a leveling mixture or concrete screed in particularly critical cases. Among other things, the base must be clean.
Thermal insulation

After the base is ready, you need to lay a layer of thermal insulation. It is best to use foil rolled material. Strips of the required length are laid on the surface and fixed with a stapler.
It is necessary to constantly ensure that there are no gaps between the sheets of insulation, and the joints should be taped.
Film floor installation

The film floor itself can be laid on top of the thermal insulation layer. To do this, strips of the required length are cut from a roll of material and laid in the same way as insulation. The task is not difficult, but damage to the contacts or the active element must not be allowed, so all work must be carried out in strict accordance with the attached instructions.

After laying the heating film itself on the surface, you need to make the initial connection of the system, that is, connect the wires to the terminals on the film. For this purpose, the design provides special clamps. It is worth adding that in order to ensure that, following the results of the work, the wires do not protrude above the general surface of the floor, before laying them in the insulation, special grooves are cut out, along which the wires are laid.
All connection points must be insulated.

The heating floor must be connected through a special thermostat.
As a rule, the work does not cause any difficulties. It is necessary to connect the wires to the contact points on the regulator in accordance with the instructions. If everything is done correctly, the heating will be smooth and uniform.

Laying the finishing coating
The final stage of work is the installation of the finishing floor covering. In this case, you should be careful not to damage the connection points or active heating elements. At this point, the work will be completed, and the film heated floor can be considered ready.

In conclusion, we can add that installing an infrared warm floor system will make staying in the house more comfortable and safe, which is especially important if there are small children in the house who spend a lot of time on the floor. And adults will also enjoy the comfort.
Video
This video shows how to install an infrared film floor:
And these are detailed instructions for laying an infrared rod floor:
From the author: Hello, dear friends! As a rule, central heating is turned on in late autumn, and given the natural climatic conditions in many regions, cold weather occurs much earlier. The best solution is to install additional heat sources. Today we will talk about how to make an infrared heater with your own hands.
Main elements and principle of operation
To create an infrared heater at home, you must first study the principle of its operation.As you know, electromagnetic waves emanate from heat sources, directly heating all the bodies surrounding them, in this case, in an apartment - pieces of furniture and people. In this case, the air in the room does not heat up, and all the heat comes only from already heated objects. Infrared heaters, which include several basic elements, also work according to this principle:
- source of heat radiation. In infrared industrial heaters, the sources are thin metal filaments, which are heated by an electric current passing through them, or various lamps, for example, halogen or incandescent;
- reflector with increased reflectivity, the main function of which is to dissipate heat or create independent heated zones by reflecting infrared rays;
- controller It is also one of the main parts of industrial infrared heaters. It regulates the heating degree of the emitter. It may not be present in homemade heaters, but its installation is recommended for setting a suitable temperature range and for automatically heating the device when the temperature drops below normal limits, as well as for cooling at elevated temperatures.
This diagram shows the main advantage of infrared coolants: the heat that warms physical bodies and is absorbed by them remains inside. That's why they are warmer than the ceiling. When providing heat using the convective method, the floors always remain cold, since the material itself is not heated. Heated air rises, displacing cold air down.
Making your own inexpensive heater
The basis of the emitter is usually lamps or filaments that are heated by electric current. But there is a more productive option - using . The battery emits radiation that spreads in all directions.
Advice: It is worth noting that an alternative to foil can be heat-insulating reflective screens made of penofol, covered with foil on one or both sides.
Using devices available in the home
If you still have an old Soviet reflector, you can safely use it to make an infrared heater. In addition to it, you will need:- steel rod;
- nichrome thread;
- dielectric made of refractory material (for example, a ceramic plate)
- Remove dirt from the surface of the reflector.
- Measure the length of the spiral wrapping around the reflector cone.
- Check the cord, coil activation terminals and plug for damage.
- Cut the steel rod to a length equal to the length of the spiral.
- Wind a nichrome thread onto the rod, marking 5 turns for every centimeter.
- Slowly remove the rod from the wound thread.
- Place the spiral on a dielectric (for example, a plate) so that the turns do not touch.
- Connect the ends of the spiral to an electrical source.
- The heated spiral is compactly placed in the grooves of the reflex cone.
- Connect the contacts to the spiral ends.
Using foil and glass
To do this you will need:- paraffin candle;
- device for installing a candle;
- EDP glue (Boxidka);
- aluminum foil;
- two glasses of the same size;
- sealed material;
- wire with a tip in the form of a plug;
- cotton napkin;
- cotton swabs.
- Remove dirt, paint and dust from the glass surface.
- Light the candle and place it in the tray.
- Holding the glasses in your hand, pass them over the flame so that they smoke evenly. To do this, it is recommended to cool them a little in advance. The resulting dark soot will become a conductive element.
- Draw straight lines around the perimeter of each glass using cotton swabs. The result should be a frame of clean strips 0.5 centimeters thick.
- Measure the width of the dark soot rectangles.
- Cut out two similar rectangles from foil, which will serve as electrode strips.
- Place the first glass so that the smoked side is on top.
- Apply glue to its surface and distribute the edges of the foil so that they extend slightly beyond the glass.
- Place the second glass on top with the smoked side inward so that it fits tightly to the adhesive surface and press carefully to secure the effect.
- Apply a little sealant to the glass joints.
- Check the design for power level. Not exceeding 100 W per sq.m. The heater can be safely connected to the electrical network using a plug with a wire.
- To connect to the network, take a block of wood with two metal plates, which are reinforced at both ends. A 12 volt plug must be soldered to one of them. Place the block on the glass so that the foil extending beyond the edges of the glass is pressed tightly against the metal contacts. Your efficient and powerful electric heater is ready.
Advice: To correctly calculate the power of a device, you need to use a multimeter to measure the resistance level of the layer that conducts electric current. Considering the dependence of the current on the load, it is better to use stable parameters - a constant voltage of 220 V and the formulaN=
U*
U/
R, WhereN– the required power indicator,U- electrical voltage andR- resistance. For example, with a resistance of 24 Ohms according to the formulaN=220*220/24 turns out to be 2016 W. This power is enough to normally heat a room with an area of approximately 20 square meters. m.
When obtaining a higher indicator, it is necessary to increase the resistance, and at low power, increase it.
What to do if the power of the manufactured heater does not meet the required parameters? It is necessary to calculate this indicator, taking into account the area of the room (for example, 15 meters) at the rate of 100 W per square meter. m. It turns out 15*100=1500 W.
With a constant resistance of 220V, derive the required indicator using the same formula: R=220*220/1500=32 Om. Considering that you previously got 24 ohms, the resistance should be increased. This means that it is necessary to reduce the width of the sooty strip on the glass and calculate it using the formula R=I*p/S, where R is the resistance, I is the length of the current-conducting layer (constant value), p is the resistivity (constant value), S - cross-sectional area of the layer (directly depends on the width, a wide layer has a smaller area, a narrow layer has a larger area).
Thus, to calculate the required resistance value, it is necessary to select the desired width of the smoked strip, but for this you will have to disassemble the glass device.
Manufacturing from laminated plastic
To make your own infrared heater, you will need:- 2 pieces of laminated paper plastic, each 1 sq.m.;
- box glue;
- copper plates;
- graphite powder;
- plug and cord;
- wood.
A frame is made from wood into which the device must be inserted, which then must be thoroughly dried. Next, you need to measure the resistance and calculate the power in the same way as in the previous version, except that here the resistance depends on the amount of graphite powder in the glue - the more of it, the higher the resistance, and vice versa. After you have reached the required power, you need to connect the structure to the network, first connecting it to the plug.
Making from infrared film
One of the most modern and effective materials for a heater is infrared film, usually three-layer.
Until relatively recently, an infrared heater was classified as a “miracle of technology.” Today it is a common device that is used in residential and public buildings, as well as in open areas. It even gets to the point where home-grown craftsmen, completely chilled in the garage, try to construct an infrared heater with their own hands. As they say, “from what happened.” Is this really possible? Let's find out in this article.
Operating principle
Unlike a conventional heater, an infrared heater does not heat the air in the room. It heats objects caught in the path of infrared rays. And they, in turn, share their heat with the air.
The main components of an infrared heater are:
- Heating element-emitter.
- Reflector (reflective part).
What to assemble an IR heater from?
- To make your own reflector, use polished steel or aluminum. The reflector is designed to direct the radiation flow to the desired area.
- The heating elements in an infrared heating device are lamps: quartz, carbon or halogen.
Differences between heater lamps, or which ones to choose
To understand for yourself personally which lamps are best to take to make an infrared heater with your own hands, let’s look at some of their features:
- The cost of devices with halogen lamps is lower than carbon and quartz lamps.
- There is a myth that a quartz heater has a beneficial effect on people's health. This statement has nothing to do with the truth.
- Despite all its cheapness, a halogen device has a significant drawback: when it operates, the lamp glows. Naturally, it is not suitable for either a child’s room or a bedroom.
Important! In addition to the reflector with the emitter, the infrared heater is equipped with a thermostat and a fire hazard sensor. The thermostat is designed to maintain the set temperature, and the sensor automatically turns off an overheated device.
Now, armed with basic knowledge about the operation of an infrared heating device, let’s move on to making it ourselves.
DIY IR heater - instructions
To work you will need:
- Reflector (made in the USSR in 19..some year).
- Nichrome thread.
- Dielectric made of fire-resistant material.
- Steel rod.
Important! A plate made of glazed ceramic can serve as a dielectric.
Procedure:
- Clean the old reflector from dust and dirt.
- Check that the power cord, plug, and terminal connections for connecting the spiral are intact.
- Measure the length of the spiral that fits onto the cone of the device.
- Cut the rod to the same length and thread a nichrome thread onto it. In this case, the winding pitch is 2 mm.
- As a result of the last simple manipulation, you have a spiral. Remove it from the rod.
- Place the spiral loosely, so that its turns do not touch, on the dielectric.
- Connect the current from the network to the ends of the spiral.
- Disconnect the heated spiral and place it in the groove from the ceramic reflector cone.
- Connect the coil to the power terminals.
DIY infrared lamp made of glass and foil
Another option is how to make such a device yourself. And it is also not something overwhelming or difficult for the average home craftsman.
You will need:

The algorithm for assembling an infrared lamp with your own hands is as follows:
- Clean the surface of the glass from dirt.
- Light a candle and, moving the glass plates over the flame, smoke them evenly.
Important! The soot layer in the heater will act as a conductor. The layer of soot lies more evenly on cooled glass.
- Using cotton swabs, make a “frame” about 0.5 cm wide around the perimeter of the glass.
- Cut out 2 rectangles from aluminum foil the width of the conductive layer (the same soot). Foil rectangles will serve as electrodes in the future device.
- Place the glass plate soot side up and apply epoxy to the surface.
- Place foil over the edges of the plate so that the ends of the foil extend beyond the glass.
- Cover the resulting “sandwich” with a second piece of glass, the smoked surface facing inward.
- Glue the layers together, pressing them tightly together.
- Seal the structure around the perimeter.
- Measure the resistance of the conductive layer.
Important! The power of the device is calculated using the formula N = R x I x I, where:
- N — device power, W.
- R is the resistance value of the conductive layer, Ohm.
- I - current strength, A.
If the resulting power value does not exceed the standard value, you can connect the structure to an outlet. Otherwise, you will have to disassemble everything and start all over again.
Infrared device made of laminated plastic
To make your own IR heater, you will need:
- 2 pieces of laminated paper (1 square meter).
- Epoxy glue.
- Graphite. It can be removed from batteries that have expired.
- Copper busbar for terminals.
- Network cord.
- Wood for the frame.
The procedure is as follows:
- Mix graphite and epoxy into a thick mass. This is a future conductive layer with high resistance.
- Place the plastic piece on a flat surface (rough side up).
- Apply a mixture of epoxy glue and graphite to the plastic using zigzag strokes.
- Prepare the second piece in the same way.
- By placing the plates together with the treated sides, glue the structure.
- Make a wooden frame around the perimeter of the product.
- Wait for the glue to dry.
- As in the previous version, measure the resistance of the conductive layer and calculate the power.
Important! If the calculation turns out that the conductive layer has too low a resistance, make a new graphite-epoxy mixture with a large amount of graphite. If, on the contrary, the resistance is increased, the amount of graphite in the mixture must be reduced.
- After obtaining the optimal result, you can connect the cord to the terminals and turn on the device.
- If desired, you can equip the device with a small thermostat.
Easy and simple...
And, as they say, “for dessert,” a simple do-it-yourself heater made from an incandescent light bulb. Take a powerful incandescent lamp and place it in a case made of metal.
Important! The lamp, releasing heat, heats the metal, which, in turn, gives off its heat to the air and thus heats the room. Of course, such a primitive device is only suitable for a small room as an additional source of heat.
Video material
These are just four simple ways to create an infrared heater with your own hands. In fact, there are much more of them. The question involuntarily arises: do you need it? There’s a lot of fuss, and it’s not a fact that everything will work out as it should. But:
- Firstly, knowledge is never superfluous.
- Secondly, you kill two birds with one stone. You get a useful device and get rid of a bunch of unnecessary junk.
Maybe it's worth a try?
Related articles
 The best amulets against the evil eye and damage Amulet against the evil eye with hands for children
 How to read the Psalter correctly
 Delicious dishes with sausages
 A glimpse of Bella. Romantic chronicle. A glimpse of genius. Messerer about Akhmadulina Boris Messerer glimpse of Bella romantic chronicle
 I dreamed that I was sailing on a boat on the river
 How to cook beef entrecote in a frying pan
 About the company Foreign language courses at Moscow State University
 Which city and why became the main one in Ancient Mesopotamia?
 Why Bukhsoft Online is better than a regular accounting program!
 Which year is a leap year and how to calculate it