
How to send a printer from a laptop for printing. Rules for using the printer
What does a USB cable look like (click to enlarge)
The first thing you need to do is connect the printer to your computer. The most simple option is a USB connection. See the picture on the right for what the USB cord looks like (it may not be included in the kit - you will have to buy it at a nearby store). The connectors for connecting to the printer and to the computer are different, but it is impossible to confuse them since there is only one type of USB connector on the computer.
The advantage of connecting via USB is automatic installation drivers. (a driver is a program with which the operating system (read: computer) interacts with the device (read: printer)). Without a driver, you won't be able to print anything.
Automatic driver installation works even more efficiently if the computer is connected to the Internet. In this case, if the operating system (OS) does not have a pre-installed driver for your printer, the OS will contact the Update Center. There, the driver for your device will be found, downloaded and installed with a probability of 95-99%.
How do you know that the driver is installed and you can print? The OS will issue a warning or notification that the device is installed and ready to use. The connected printer can be found at
In my case, this is the first icon - Epson L800. You can get to the “Control Panel” by right-clicking on the START button on the taskbar or by pressing on the keyboard WINDOWS+X.
It happens that the operating system cannot automatically install the driver. In this case, please use the articles below:
- How to install a printer from a disk - (recommended as, most likely, you have a disk included with the device).
The most the hard part behind.
Printer settings
After the driver for the printing device is installed, you need to go in and check its settings. It is advisable to do this so as not to be surprised by the printed result. We go to an already familiar address
Right-click on the icon of the installed printer and select “Printing Settings”.
For Epson L800, duplex printing can be enabled on the tab
Do you want to print photos or a text document? Of course, it’s good to purchase a printer and connect it to a computer. But this is not the end yet.
It is necessary to complete all the settings, do not forget to install the driver for this printing device, as well as additional programs for the correct operation of the device.
The combination of these actions will lead to the desired result - the ability to print. It is from these steps that we will begin to move towards the goal.
Connecting a printer
Older models of printing devices required a lot of attention to connect them to the computer.
It required connecting to a special port and waiting for the operating system to complete everything. Much has been simplified now.
There are two ways:
- installing it as a network one;
- or print from a smartphone or tablet.
We will look at two main types of connection:
- locally
- as a network

First you need to install the driver.
When installing locally, make sure the device is turned off, then connect it to your computer, and then turn on the power. Standard Plug and Play makes the task easier - the operating system independently installs the necessary driver.
If this technology is not supported, you will have to install the driver manually.
In the first option, your actions:

If Plug and Play technology is not supported, then your actions are as follows:

When the installation is complete, in the folder Printers and faxes the corresponding icon will appear.
To use network type:

Note: The printing device may be the default one. Then all documents will be automatically sent to this device.
Driver installation
To install the driver, make sure the hardware is connected.
Then follow these steps:
- on the menu Start choose Settings, Then Printers. You will see a settings window;

- launch Installation Wizard;
- then select Local;
- then we select printing equipment.
- move the mouse pointer to the lower right corner of the screen, then up and click Search;
- enter in this field devices and printers, then click on it;
- equipment you will use, right-click, then select Use as default.
If your device is in the drop-down list, then run the driver from the operating system during installation. This is not always good, as many functions will not be available. In this case, it is better to choose installation from disk.

This completes the work with the driver.
Setting up the printer
To configure or change the default settings:

Using a laptop, mobile device or tablet, you can make settings for each network. The operating system remembers all these settings.
You can also choose to default to different models on different networks:

Comment! If you want the settings not to change when moving from one location to another, follow steps 1-3, and select Always use the same default printer. Then click OK.
Basic Printer Settings
Before purchasing a printing device, you should familiarize yourself with the parameters that affect its performance: 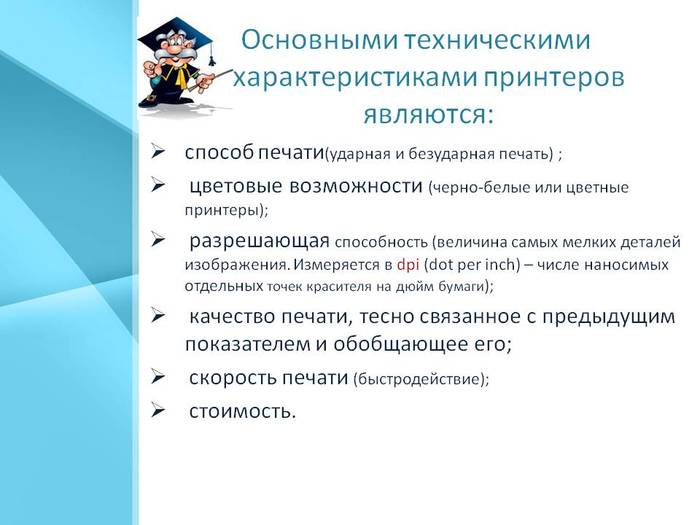

- containing dye;
- pigmented;
- quick-drying.
Everyone is good in their own way. But dye ink, for example, has the disadvantage of bleeding and short-lived color brightness. Pigment ink is more durable, however, it also has a disadvantage - it clogs the cartridges, which makes them unusable faster.
The most important thing is to refill each cartridge with the type of ink that suits it, otherwise problems with them cannot be avoided.
Video: typing on a computer
Print text
Let's consider how to print text from a computer to a printer using print options.
The first thing you need to do is select the text or part of it and copy it from any document or web page.
If you want to print part of the text, check the box. Selected fragment.
If you are typing Word document(eg Word 2007) first check for readability, grammatical and punctuation errors.
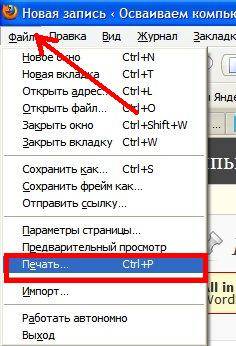
On the menu File click Preview(preferably), then Seal.
In the window that opens, you can select the necessary parameters:

- even
- odd;
- scale – you can specify how many pages to place on a sheet, and all pictures and diagrams are also scaled;
- by page size – specify the required page format;
- Effects tab – allows you to set background images;
- Paper/Quality tab – Set the print quality and paper size. This saves ink;
- Finishing tab - you can specify how many pages per sheet you want to get, as well as set the text orientation.
In general, there is nothing complicated.
Black and white
You probably know about two modes: color and black and white.
To install the second one you need:

So, the current document will be printed in black and white.
Color print
Walking through the window Color management You will see that you can view and change the default color printing values used.
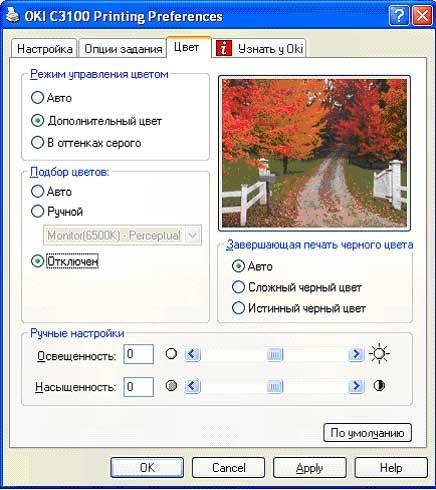
- click on Device Center, go to Color Settings, then, Color management. Here you can select the default settings;
- if you want more advanced options, click Professional settings;
- a window will open Advanced editing. Go to the option that displays the desired print option. Then click on the required value, then OK.
How to print photos from a computer to a printer
If you want to print Pictures,photos, this is where photo paper can come in handy.
To print an image:

You don't need to be a genius to type text or graphics. First you need to connect the device to your PC or laptop and make sure it is working properly. After identifying the printer in Windows, the device will require installation of a program (driver). Why is this necessary? It's very simple, the printer will not work without installing the program that controls it. The drivers contain all the necessary functions and operations for printing.
To install drivers, you need to insert the disk that comes with the device. The operating system launches the startup menu of the disk and provides a choice of installing programs and additional programs for the printer. Having installed necessary programs, a notification appears in the Windows taskbar indicating that the printer is ready for use.
Before you start printing, you need to go to the printer settings by double-clicking on the device icon on the taskbar. This operation can be performed through Start - Control Panel - Printers and Faxes and select the printer brand. In new operating systems Printer settings are called devices and printers.
You can check the printer parameters, the presence of ink or toner, the performance of the print head and other parameters in driver programs and through the Start menu - programs and find the name of your printer.
When you need to print a photo on an inkjet printer, it is better to first check whether the printer head is clogged. The device drivers include cleaning the printing device. This feature is useful if you notice inaccuracies or streaks in your photo when printing.
Printing documents in the Microsoft Word text editor
First, you need to make sure there are sheets of paper in the printer tray, and see how many sheets are required to print the entire document. If there is not enough paper in the printer, add it immediately so that later there are no notifications about a lack of paper, and printing does not stop.
By the way, if you stop printing, there may be a problem with printing the document after loading paper into the tray. Sometimes printer drivers crash and print out of order or print the same sheet many times.
I do not recommend putting documents in a print queue. From my own experience, I can say that this printing method can lead to the problems listed above. It is better to print documents one at a time and not rush to print everything at once. Software, created by programmers, is designed for a print queue.
Methods for printing a document
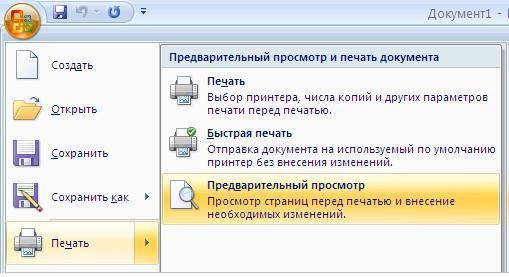
Launch the Microsoft Word program and click the file menu and select print. You can specify the conditions for printing a document on a printer this way, but you will spend more time than doing it the usual way.
An easier way to type text is to use the program's hotkeys. Press Ctrl+P and  We see a window with printing settings. In this window you can specify options for printing the document. You can specify specific pages and spacing for the document, how many copies are needed, display the document as a percentage, duplex printing and other options. In Word's additional options, you can specify what exactly needs to be printed in the document. For example, printing pictures, hidden text, background colors.
If you need to print a document or photo, you need to set the location of the information on the page - portrait or landscape. For printing in non-standard formats, there is a choice of sheet sizes A4, A5 and others.
Document border settings are also important. Typically, the Microsoft Word text editor warns the user about incorrect margins in a document, but it is better to check the margin size settings yourself before printing. If the field is entered incorrectly, part of the document will not print and you will ruin the ink and paper.
The number of pages per sheet is configured in the print settings. By default, the text editor places one page on an A4 sheet. The user can specify the required number of pages in accordance with the document's print settings.
You can also print a document through the text editor toolbar by clicking on the printer icon. In standard mode, the document will be printed from the first to the last page.
Advanced printing settings and printer properties
Print quality is standard and high. The first option uses less ink in inkjet printers. At high quality printing the difference will be noticeable when printing photos on glossy paper.
Grayscale—allows you to print a text document or scanned material faster.
Maintenance (inkjet printer) - cleaning rollers, nozzles and tray. Silent operation mode is suitable for night work with documents.
Printing photos and text on a printer is not complex operation. When the printing options are configured correctly, high-quality document printing will be ensured.
After making sure that the printer is connected, the drivers are installed and the device is working properly, you can start printing. Using the example of an office Word programs Let's look at how to print the text.
Open ready-made text document or prepare it yourself, for which you need to copy or type the text into Word sheets, then edit and format it.
Further actions, based on the Office version, may vary slightly.
In version 2010
printer icon for fast printing displayed on the quick access panel. Pressing it will help fast printing.
In Word 2003
You will also find the printer icon without any problems. 
IN 2013 There is no version of the Word icon on the quick access panel by default, but you can easily add it by clicking the drop-down list and selecting . There is also a point below View, if you want to preview the design of the document.


You can also access the window responsible for sending to the printer through the menu File/Seal.


A universal combination will work in all versions Ctrl-P. Next you will go to the settings window. For the 2010 version it looks like this. 
For 2003
So. 
Here you can tune page range or specify specific numbers, select the number of copies, and specify the printer to which you want to send the document. Among the many other settings, let’s focus on the setting color or black and white print. To go to the window for setting these parameters, you should open Properties.
Here you choose Color and press OK for confirmation. 
It is worth noting that these actions similar for any program that works with text.
Printing a web page
There are two ways to do this. First - copy(Ctrl+C) the desired text from the web page and insert(Ctrl+V) in text editor(for example, the same Word). Then print as shown in the first paragraph. 
The second way is to print directly directly from the browser.
The easiest way to do this is by pressing the keyboard shortcut Ctrl+P– a window will open settings. You can also open it using the menu button in the browser - Seal(example for Google Chrome).
Here, in settings, you can set all the same parameters as in a Word document with a slightly different interface, but quite intuitive. 
How to print a picture
You can open the picture print window without even opening it by selecting in the menu, after right-clicking on the icon, item Seal.
If the picture is open in the window viewing, then there should be a button on the taskbar Seal. Or a universal method - pressing a combination Ctrl+P.
The settings window may vary slightly depending on the viewer. Let's look at a standard example. 
Customizable Paper size and type, quality, number of copies and other parameters. To select colors, go to the link Options \Printer Properties.
If you need to print a photo, on the right there are layout settings indicating the dimensions. Eg, let's choose 10x15
. Button press seal will send the text to the printer. 
Help is needed?
Do you want to know 1C: Accounting? Sign up for
free first lesson!
Which programs have a print function?
It should be remembered that any program designed to create text or graphic documents always has a print function. And in fact, if you created a document, but cannot output it to a printer, then why is such a document needed at all?
By the way, it’s worth immediately clarifying the concept of a document. Very often, users by document mean something reminiscent of ordinary paper documents. For example, a contract. In fact, in computer terminology, a document means something that you create in a program. This can be not only text, but also text with pictures, individual pictures in a graphics editor, drawings, etc.
If you yourself have not created anything in the program (any one!), this does not mean at all that there is no print function. For example, if you view your photos, you can also print them directly from the program you use to view them. The same applies to web pages viewed through a browser - they can also be output to a printer. And, on the contrary, there are programs that do not print. These are programs in which nothing to print
. For example, in a Windows calculator you don’t have to look for the print button, since obviously there is nothing to output to the printer.
How to print a document - general information
Now let's get down to actually printing the documents. And first, let's look at where the print function is usually located in programs. In the process of conducting computer courses for beginner Windows users, I often observed how people spend a very long time looking for the print button. Let's look at this issue. Remember: if you can’t find where in the program to print a document, then just press the keyboard shortcut Crtl + P (P - English; on no need to switch). This is true for any program that allows you to print the data you are viewing. If the program has printing, a print dialog will appear. For example, this one.

The appearance of the print dialog may vary depending on the program you are working with. As a rule, regardless of the type of print window, it contains the following items:
- Selecting a Printer
- Selected printer settings
- Print range (makes sense for multi-page documents)
- Number of copies
- OK / Print button or similar in meaning, as well as a cancel button.
There may be other elements present depending on the program you are working with. However, in any case, the meaning of the print dialog is the same - specify the printer you will print on, as well as the print settings.
If the print dialog does not appear when you press Crtl + P, it means that the program most likely does not have a print function.
In addition to the Ctrl + P keyboard shortcut, you can print a document in other ways. For example, this could be the print button on the program toolbar. Typically, such a button has a standard icon in the form of a printer.

Also, very often the Print item is in the program’s File menu.

Features of the print dialog in Word and Excel
In the new Microsoft Office, the print dialog does not open in a separate window, but occupies the entire area of the main program window. A preview function is also available, allowing you to see exactly how the document will look based on the settings of the selected printer.

It is worth noting that the preview function is not available in every program that has a document printing function. Preview is, so to speak, a pleasant bonus from the creators of the program.
I would especially like to note the setting of document margins when printing. Often, some users, in order to fit more information on one printed sheet, set the margins too narrow or even set them to zero, i.e. Print without borders. You shouldn't do this, since most printers, both laser and inkjet, have a limit on the minimum margin size. If you set the margins in the document too small, then part of the document will simply be cut off when printing, that is, it will not be printed at all. And in the case of an inkjet printer, ink will also fly past the sheet, which contaminates the printer.
Be careful when setting print margins in your document: do not make the margins too narrow!
Margins of 1 - 1.5 cm are quite suitable. You can also set 0.5 cm - most printers print them normally, despite Word or Excel warnings about too narrow margins. The minimum margin size can be found in the documentation for your printer or found out experimentally.
How to print if there is no printer - print to file
What if the computer on which you are creating the document does not have a printer installed and connected? In this case, you can print the document to a file.
Print to file - it's very simple. As a result of such “printing” a file of a certain format is formed. Windows has a built-in virtual printer that implements the print-to-file function, without the need to connect a regular printer. To execute, select a virtual printer in the print dialog Microsoft XPS Document Writer.

When printing to a file using the specified virtual printer, a file with the extension *.xps or *.xpsx is generated. During the "printing" process, save the file to disk as you would normally save a document. This file can then be transferred to any computer that has a printer connected and run. A print dialog will appear.

There are also other virtual printers installed as individual programs. In addition, the function of saving a document to a file is already available by default in some programs. For example, this is the web Google browser Chrome, which allows you to save web pages as PDF files.
I would also like to draw your attention to the fact that the document printed in a file is not intended for editing!
Video tutorial on printing documents to a file and to a printer
Typically, the created document is output to a printer. However, if necessary, it is possible to save a document in a special format file, which can then be opened on any computer: this is printing to a file. Why is this needed - look at the video.
Similar articles
 The best amulets against the evil eye and damage Amulet against the evil eye with hands for children
 How to read the Psalter correctly
 Delicious dishes with sausages
 A glimpse of Bella. Romantic chronicle. A glimpse of genius. Messerer about Akhmadulina Boris Messerer glimpse of Bella romantic chronicle
 I dreamed that I was sailing on a boat on the river
 How to cook beef entrecote in a frying pan
 About the company Foreign language courses at Moscow State University
 Which city and why became the main one in Ancient Mesopotamia?
 Why Bukhsoft Online is better than a regular accounting program!
 Which year is a leap year and how to calculate it