
Fashionable bun on the head. Bun for long hair
How to make a bun on your head and beautifully remove long or semi-long hair long hair styling your hair is not a difficult task. It is difficult to choose from several hundred options and choose the most successful ones for yourself. Cosmetic magazines advise pouring buckets of foams, mousses, varnishes and stylers on your head, fixing strands, lifting roots, curling ends, straightening everything else with an iron. Of course, you don't need to do this.
A rigidly fixed hairstyle is needed for filming films, walking along the catwalk, ceremonial events like the Oscars - in all cases where changes are unacceptable, and no one is guaranteed to touch your head. A bun on the head is just a bun on the head, which can be unraveled and re-tied in 1 minute.
Any bun is incredibly sexy. Even in the most modest version with tightly laid strands. Except, of course, for the varnished catwalk hairstyles. A bun is much more interesting than loose hair or a haircut. It’s not in vain that the Chinese sell tons of artificial buns that can simply be attached to the head, causing the envy of girlfriends and the interested glances of men.
To make a bun on your head you need to have the following equipment:
- A wide-toothed comb is more convenient for collecting buns. Ideally, the comb should have a long handle with a tapered and slightly rounded end - for separating strands, parting, and pulling strands under the bun.
- Tail brush - for maximum volume and fluffiness.
- Strong and dense hair ties
- Silk scarves, bandanas, scarves. They can be woven or wrapped around a bundle, creating new shapes. They become an additional interesting accessory.
- For a voluminous bun, you need a donut made of foam rubber or an old sock. A special bagel made of elastic mesh is the best, it is lightweight and holds its shape perfectly.
- Hairpins and barrettes are needed to secure the hairstyle. This is an optional but convenient element.
- For a choreographic bun, you will need a hair net with an elastic band. A choreographic high bun is formed from a rolled strand of hair or from a braid, but very tightly. The mesh is needed so that the bundle does not fall apart during sudden movements.
- A plastic loop with a handle allows you to create an inverted tail.
ponytail
The ponytail is the wildest and most unapologetic version of the bun.
A ponytail, of course, is not suitable as an office hairstyle, but for sports, travel, parties - this hairstyle will certainly become an attractive magnet for everyone men present. The ponytail is the hairstyle of bright and dangerous women.
To make a ponytail, gather your hair tightly into a high bun and tie it tightly with an elastic band.
Wrap a scarf around the elastic or pull a strand of stripes over it to lift the ponytail and make the base thicker. The lifting height depends only on your imagination. A ponytail looks great on any long hair - wavy, straight, curly, regardless of color.
This is the famous hairstyle of Lara Croft, the archaeologist and adventurer. As you can see, it is not necessary to lift the bun high to create an image. A chic hairstyle for chic women that combines the convenience, beauty of an updo, a smooth head and the luxury of loose hair.
Sharon Stone as an adventurer and sexy psychopath - with a bun, of course.
In “that very scene”, which still excites men’s hearts, the heroine Sharon is present with the sexiest hairstyle of all time. Do you still think a bun on your head is a sign of a simpleton?

Even Harvey Queen, the famous girlfriend of the Joker, walks around with two buns on her head.
Low bun

The peculiarity of the low bun is that it is incredibly easy to create feminine image. The easiest option is to gather your hair in a low ponytail, tie it with an elastic band, twist it into a tight rope and let the rope twist on its own. The tip of the ponytail can be wrapped around an elastic band or pinned with a hairpin.

A low bun always looks very natural and free. If you choose a hairstyle for several hours, a low bun is more comfortable than a high bun. Installation will take just a few minutes. And the result is quite impressive.
Smooth bun with wrap

One of the most spectacular office hairstyles. There is no bright challenge or demonstration in it stormy character like a high ponytail. There is also no excessive softness and femininity, or provocative negligence in the office world. There is elegance, neatness and practicality. Such a bun does not seem to crumble with one touch.
The bun is formed at the back of the head and threaded through an elastic band so that the hair forms a short loop. If there is not enough hair, you can use a foam donut. Then the loop or donut is wrapped with a slightly twisted tail and pinned with long hairpins.
This hairstyle can be done even if your hair is barely long enough to pull it into one bun. You can also wrap the bun with an artificial tail if you choose the right color. Synthetic hair is lighter than natural hair.
A bun with a loop and wrap can also be made high. Even though the hairstyle seems complicated, it takes no more than a couple of minutes to create. Even in the country house or in the kitchen it is quite possible to flaunt a hairstyle from the world high fashion. After all, it's actually not difficult. The wrapped bundle is quite strong and does not fall apart. To create this hairstyle, you only need a comb and a good hair tie. 
Look how charming, collected and businesslike our hottie Lara Croft looks with just a change of hairstyle.
Bagel

A bun twisted into a donut is an ever-fashionable and very simple hairstyle. The only secret of the hairstyle is that the donut gives volume, but does not hold the hair. You definitely need an elastic band, then the bagel won't fall apart. For strength, the donut is secured with pins.
Another tricky trick is to not wrap your hair around a donut, but carefully distribute it on top and grab it with an elastic band or scarf. Additional braids create an airy appearance. Let’s say it’s difficult to create such a formal hairstyle in 2 minutes, but in half an hour it’s definitely possible. Don't be afraid of falling strands. Lubricate them with gel or secure them with hairpins.
The size of the bagel is always impressive. The woman appears to be wearing a heavy crown of thick hair on her head. In reality, of course, such volume of hair does not exist. Glamorous diva Lena Lenina, according to rumors, creates lush buns on her head using balloons. And in this form he walks along the red carpet. What's surprising is that she is mistaken for an elegant celebrity and applauded. Don't be afraid to experiment.
Bun with bandana

How to make a fluffy and high bun on your head with medium length hair? Use scarves and bandanas. Make a high ponytail, cover the elastic with a bandana and braid a loose braid, weaving in the ends of the bandana. Twist the braid beautifully and fasten the ends of the bandana together - you get a luxurious and bright bun that perfectly harmonizes with your clothes. This method is suitable for uneven strands and even for damaged and split ends.
How to make a beautiful bun on your head using a pencil or brush
The secret of the stunning hairstyle that girls from art schools turn the heads of guys and fully grown men in is using a long brush instead of a hairpin. This special hairstyle is a challenge. Her thoughtful carelessness is striking. It would seem like a trifle, pinning your hair with the first object you come across, even a brush, but it’s impressive. You can even pin your hair up with a chopstick.

Tie your hair into a ponytail at the back of your head, twist it with a tourniquet and pin it with the first one you come across. suitable subject. Give your gaze a slight absent-mindedness and get ready to receive admiring glances and invitations to get acquainted. A mysterious, practical and not at all pretentious girl - this is a dream!
Any woman knows how to make a bun on her head and create an amazing hairstyle. But many, for unknown reasons, prefer to wear their long hair loose, spit it out of the wind, and cling to various foreign objects with their hair. For men, loose hair also does not arouse interest - there is no mystery or riddle in it. At the same time, a simple beam solves all problems. Hair twisted into a bun is less damaged, does not interfere, does not get into your eyes or into your food. Be sure to wear buns on your head. High and low, with scarves and hairpins, with braids and simply twisted.
In many situations, hair tied up in a bun looks much neater and more stylish than loose strands or carefully styled curls. This is a hairstyle that transcends style and time; it suits everyone, with the exception of women over the age of gray hair— she ages them and turns them into “grandmothers.” In this case, a modern, neat haircut would be ideal. Young women and young girls the bun is very flattering, it is fashionable and has many options. To make your hair look modern, you need to know how to do it correctly and quickly.
Features of making a bun of short hair
If desired, you can make a bun from short hair. To do this, you need a bob-type haircut and hair length at least to the shoulders. It may not be possible to wrap the strands in a classic bun, but you can wrap them in curlers or a curling iron and fix the curls in the form of a slightly careless, but lush and stylish bun. It should be placed on the back of the head, not too low.
To work, you will need a soft elastic band, bobby pins or pins, styling product, curling iron or curlers, and for thin hair, a special comb for blunting (backcombing).
If we describe the work step by step, we get the following sequence of operations:
- Treat the ends of the hair with styling product and curl the curls.
- Gather hair at the back of the head with an elastic band.
- Lightly comb each strand at the base to give the bun volume and fluffiness.
- Gently straightening the strands, arrange the curls so that they give the impression of a bun collected from curly hair.
- Secure your hair with bobby pins or hairpins.
- Fix with a light spray varnish.
To make such a bun look organic, you should pull out several thin strands from your hairstyle. If your hair is very short, you can choose extensions, ready-made hairpieces, and even already decorated buns - it is important to choose them exactly to match your hair color. Good quality extensions made from natural hair or Kanekalon can blend perfectly with your own curls and be completely indistinguishable even when viewed closely.

Features of making a bun from long and medium length hair
A bun for long hair is a real classic. These hairstyles never go out of style and look great on any hair type. They can be combined with various bangs, use special linings for volume, or leave them natural. Bunches can also be made on medium length hair, the main thing is to follow simple rules:
- It is difficult to make a bun on very clean hair - it quickly falls apart. It is better to do this hairstyle on the second day after washing.
- To secure the ponytail under the bun, you need to choose an elastic band that matches your hair and is made of soft material so as not to injure your hair.
- Bunches can be very diverse; they can be decorated with various hairpins, brooches, scarves and other decorative elements.
Making a bun for yourself at home is not at all difficult. The hair must be combed thoroughly, gathered into a ponytail with an elastic band and twisted around its base. The hairstyle can be varied - divide the hair into strands and twist them into a rope, and then collect them into a bun, gently intertwine the strands together to obtain a natural and voluminous bun, even braid them into a braid and then wrap an elastic band in it - you get a strict hairstyle “a la school” teacher."
Types of beams
A bun hairstyle is a rewarding basis for experimenting with your appearance. You can collect the strands in a smooth and tight bun very high on the top of the head, like ballerinas. This somewhat childish bun is suitable for girls with regular and delicate facial features and good, dense hair. If they are thin, the bun may be small, which will further enhance the feeling of “liquid” curls.
Curvy thick hair You can style it in different ways - put it in a knot at the back of your head, place it on the top of your head, make an asymmetrical bun, and so on. There are many types of buns, and their choice depends only on the wishes of the owner and the condition of her hair. Making buns is easy and the results are amazing. But this type of hairstyle can be tricky - if you choose the wrong technique or choose the wrong outfit, it can seem outdated or add age, and no one wants that.
Vanilla bunch
Previously, girls of this type were called Turgenev girls, but now they have acquired the name vanilla. Naturally, their favorite hairstyle has the same name. This is a soft, feminine and very simple bun, the creation of which requires a minimum of time and accessories - an elastic band, a comb, hairpins, and, if desired, hairspray to fix the finished bun.
The vanilla bun has its own characteristics - it should not be too neat, “sleek”, protruding short hairs give it a special charm, as if the girl had just gotten out of bed and simply twisted her hair into a bun. And still very important feature- the vanilla bun is done only on the top of the head.
To create it, you need to comb your hair, lift the strands up, securing them on the top of your head in a ponytail. Comb the collected hair again and gently twist it around the base of the ponytail, securing it with hairpins. The finished hairstyle can be treated with varnish, but you should not get carried away - the bun should look somewhat relaxed and at ease.

Messy bun
This hairstyle looks like it was done on the fly, however, even such a simple bun requires certain knowledge and skills.
Usually this is a low bun, can be positioned asymmetrically, tied so that not even individual hairs come out of it, but whole strands, but thin, graceful ones. You don’t have to fix your hair in a ponytail with an elastic band, but just wrap it around its axis, not too tightly. This way the bun looks more natural and relaxed.

Bun with bagel
A special foam lining in the shape of a donut or donut allows you to get a beautiful high bun with a clear shape. The choice of donut size depends on the size of the bun you want to get, and you need to take into account both the length and texture of the hair.
Nowadays, most often they do a large bun with a donut, located high on the head. To create it, you will need the donut itself to match your hair (they are available different colors- for blondes and brunettes, you can even find them for redheads), two elastic bands, a comb, a bristle brush for smoothing strands, hairspray.
The hair is thoroughly combed using a brush with natural bristles - this way the hair becomes smooth and supple. Then you need to lower your head down, comb the strands and collect them high on the top of your head in a ponytail. Place a donut on the tail and carefully distribute the strands of the tail over its surface. Place a second elastic band on top, which will secure the hair on the surface of the donut. Carefully tuck the protruding strands under the base of the donut and secure the entire hairstyle with hairpins to match the hair. For reliability, the finished bundle can be varnished.

Volumetric beam
A fashionable and effective voluminous bun is quite easy to create. The main condition is that the hair is in good condition and preferably on the second day after washing, since too “fresh” strands fall apart and a voluminous bun can quickly fall apart. If your hair is still very clean, you can use styling products, such as texturizing paste.
The easiest way to make a bun is to not secure it with an elastic band or tie it not too tightly. You can use a fashionable “trick” - an invisiboble elastic band in the form of a piece of telephone cord. It doesn't tear your hair and allows you to pull it into a ponytail that isn't too tight.
The entire mass of hair must be divided into several strands and gently intertwined with each other. An important condition is that the hair should not be pulled too tightly, otherwise the required volume will not be obtained. If the hair is very thin or thin, the strands can be lightly combed along the length, but without being overly zealous.
Intertwined or softly twisted strands are rolled into a knot and secured with hairpins. The bun should be soft. If the volume is not enough, you can slightly “stretch” it, making it more magnificent.

Bun in a wedding hairstyle
Using a bun in wedding hairstyles is a very long-standing tradition; this makes it much easier to attach a tiara or wreath with a veil to the bride’s head. This hairstyle looks very beautiful and emphasizes the beauty and tenderness of the bride.
To get perfect image, you need to carefully collect your hair and carefully secure the bun. No bride will like it if her hair suddenly starts to fall apart in the middle of the celebration. This alone can ruin the whole mood.
Very often, in a bride's hairstyle, a bun is collected from hair twisted into curls. They are carefully lifted up, smoothing the sides with a bristle brush so that the hairstyle is flawless. High on the top of the head, strands are secured with an elastic band to match the hair so that it is not noticeable, then each curl is laid around the base of the ponytail. The strands are secured with invisible pins, as the pins can easily “pop out”.
Around such a bun you can easily attach an orange blossom wreath with a veil or place other wedding decorations.


Bun with sock base
If you want to make a big, stylish bun, but don’t have a donut or roller at hand, you can use “improvised means” - an ordinary sock. You need to choose a product of medium length, from soft, fairly loose knitwear, without a pattern, as close as possible to the shade of the hair color.
Making a hairstyle based on a sock is very simple. To do this, the part at the toes is cut off from the toe, and the remaining “pipe” is rolled into a volumetric ring. Then everything is extremely simple - the sock ring plays the role of a classic donut. In the same way as with the finished donut, the sock ring is put on the base of the ponytail, the hair is straightened, pressed with an elastic band and tucked under the bun. Just secure with pins, sprinkle with hairspray - and your fashionable, stylish hairstyle is ready!
Bun with a roller
You can create a stylish bun quite quickly if you use a special foam roller. It matches the hair color and has a button closure at the ends. To get the hairstyle, you need to connect the strands into a ponytail, and then carefully wrap the strands around the roller, starting from the bottom and pressing the ends of the hair with your fingers.
When the roller with the hair wound on it rises to the elastic band, its ends are connected by fastening the button. Now all that remains is to carefully straighten the hair at the place of the fastener so that it is not visible, and secure with hairpins.

Backcomb bun
This type of bun is especially suitable for very fine hair, since it will be very difficult to create anything out of it without backcombing. The “bun” can turn out to be very small, especially if there is not enough hair. Combing will quickly correct this situation.
You can make a simple voluminous bun by combing it into separate strands, smoothing them with a brush and gathering them together. But you can take a different path. You can comb your hair on your forehead and on the top of your head, leaving smooth strands on the sides. By laying your hair high like a bun, you can make a fairly fluffy bun on the top or back of your head. The result is a retro hairstyle that perfectly suits the style of the 60s.
This hairstyle must be done very carefully, otherwise the combed areas will be noticeable, and the bun will be untidy and ugly. It ages and makes general view not modern.

Options for beautiful hairstyles using a bun
Based on the bun, you can create many hairstyle options that can be worn every day and used as an addition to a festive outfit.
A bun with loose hair is one of the simplest and most stylish options. It's not difficult to do. Need to collect top part hair as for “malvina”, secure with an elastic band approximately at the level of the back of the head, and collect the strands in a soft bun, securing with hairpins or a decorative hair clip. The loose ends of the hair can be straightened with a straightener or curled into spiral curls with a curling iron.
To get a neat little bow on your head, your hair needs to be treated with styling foam and combed with a bristle brush until completely smooth. Gather your hair into a ponytail and twist it tightly, pinning it with hairpins. Treat the top of the bun with gel for fixation and shine. This type of bun can be placed anywhere - on the top of the head or at the back of the head. This sleek hairstyle looks good with straight, dense bangs.

For young and daring girls, a bun gives a huge scope for imagination. You can make two buns on the sides of your head in the style of Princess Leia from " Star Wars", and to create a cosmic image, a high cylindrical stump will be useful. It's not as difficult to make as it seems, all you need is a few "terry" hair ties, which are put on the ponytail until the desired height is reached, and then wrapped with loose hair. The result is an original cylindrical bun that looks stylish with outfits made of leather and neoprene.
A bun goes well not only with smoothly collected hair.
- The strands can be left loose, creating the effect of a careless styling in boho style, or you can give it an aristocratic look if you use styling products with a glossy shine effect, or you can use texturizing paste and hair clay.
- If you use special salt sprays, you can create a special texture in the “surfer’s girlfriend” style. This type of hair has a slight waviness, which adds volume, so the bun will be loose, textured and very modern.
Young ladies can have a little fun and make cute bun horns using the same technique as when creating a bun. Weaving, which is still fashionable this season, can be combined with buns. Various braids and “lattices” will neatly shape the head, and the free ends of the hair can be made into buns rather than hidden. Depending on the type of weaving, these can be flat bunches, “shells”, dense “bumps” or thin braided braids tightly rolled into a roll.
For stylish girls with thick and long hair, a half bun in the style of Angelina Jolie will suit you. To do this, you need to give the strands shine and smoothness, gather them into a high ponytail, separate a fairly voluminous strand and wrap it around the base of the ponytail. This hairstyle will look very impressive on well-groomed long hair cut in a straight line.
The bun can be as varied as your imagination allows. Introduce false strands, braids and curls into it, use hairpins, bows and ribbons, experiment with extensions - a bun can be surprisingly beautiful. This hairstyle will never go out of style and will look modern and stylish if you use our simple recommendations and descriptions.


You can create many different hairstyles based on long hair. However, in lately, due to the constant lack of free time, every woman is increasingly looking for hairstyle options that not only look fashionable, relevant, elegant and stylish, but also do not require much time to create. The leader in this case can safely be called a bundle. Bundles have gained popularity due to their simplicity of execution, versatility and relevance. Buns are suitable for almost all women. In addition, by choosing the most suitable version, with this hairstyle you will look appropriate in any situation. So, what options are there for this simple but incredibly popular hairstyle?
In order to collect the simplest beam into classic style it will take very little time. Having filled your hand, creating this hairstyle will take no more than 4-7 minutes.
Option 1.
Step by step instructions:
Step 1-2. Gather your hair into a ponytail using an elastic band.
Step 3-4. We hold the hair by the ends and wrap it around the elastic band. We secure the finished bundle with hairpins around the entire circumference.
Step 5-6. There is no need to tuck the protruding ends under the bun and smooth it. On the contrary, the hairstyle will come out much more natural if the ends are straightened a little.
Step 7-8. Let out a couple of strands at your temples so that they beautifully frame your face. If the final hairstyle is too smooth, then using a pencil you can slightly lift it at the base. Fix the result with a reliable varnish.
Option 2.
The next version of a quick and simple bun can be done as follows. Tie your hair into a ponytail using a thin elastic band, leaving one strand at the bottom untouched. After this, the tail needs to be rolled into a bun and pinned with hairpins. Wrap the remaining strand around the bun and secure its ends again with hairpins. Using a thin pencil or knitting needle, lift a couple of strands from the bun.

Bundles with braids for long hair
Very interesting option hairstyles with braids and buns for long hair. It is quite simple to do, looks impressive and original.
Option 1.
Step by step instructions:
Step 1: Tilt your head and comb your hair forward.
Step 2. Braid the spikelet from the neck to the crown area.

Step 3. Secure the spikelet to the crown with an elastic band.
Step 4. Pull the rest of your hair into a high ponytail at the top of your head.

Step 5. To make the final hairstyle more voluminous, the hair in the ponytail can be backcombed a little.
Step 6. Place your combed ponytail into a simple bun by simply wrapping your hair around an elastic band. Secure the ends of the ponytail with bobby pins or bobby pins.

Option 2.
The next option is a bun with a graceful French braid, which is perfect for women of any age. Step by step instructions:
Step 1: Create a side part.
Step 2. On the right side of the head, separate the strand from the top of the head to the very middle of the neck.

Step 3. Gather the remaining hair into a low ponytail.
Step 4a-4b. Based on the selected hair, braid a French braid: separate a strand, divide it into 3 parts and braid the braid, each time capturing new strands of hair with the strands.

Step 5: Braid the ends of the French braid into a simple braid.
Step 6a-6b. Wrap the end of the braid around the elastic band that secures the ponytail. Secure everything with pins.

Step 7. Take another elastic band and use it to tighten the bottom of the ponytail, without pulling the hair at the end all the way.
Step 8a-8b. Curl the tail into a ring as shown in the picture. Tuck the “ring” to the very back of your head. Secure the resulting bundle with bobby pins.

Step 9-10. Decorate the bun decorative flower, securing it with a hairpin.

Option 3.
Using braids, you can create a fairly simple, but at the same time very romantic bun. In this case, you will need small elastic bands to match your hair color, hairpins or small hair clips.
Step by step instructions:
1. Braid five braids (2 at the temples and 3 at the back) using elastic bands that match the color.
2. Starting from the back braid, start making a bun. To do this, simply twist one braid around your base. The ends of the braid can be hidden in the center of the bun. The result must be secured with pins.
3-4. Take adjacent braids and wrap them around the existing bun (one at a time). Pin it with pins.
5. Now it’s time for the side braids. We do the same with them, that is, we wrap them around the bundle.

The end result looks like this:

Option 4.
This version of the romantic bun is based on two thick braids:


Volume bun for long hair
Option 1.
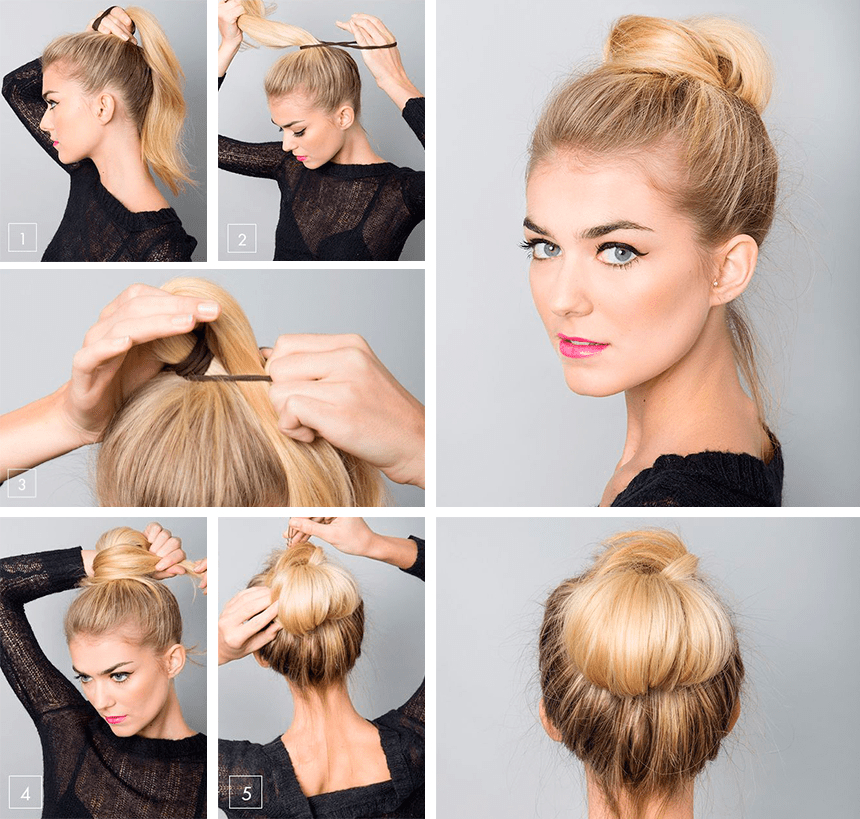
In order to make a beautiful and fashionable voluminous bun, you need to prepare a small elastic band, a pair of bobby pins (2-3 pieces), a comb and hairspray. Next, you should follow the following step-by-step recommendations:
Step 1: Comb your hair thoroughly. Separate one fairly large strand at the top of your head. Spray it with varnish and lightly comb it.
Step 2. Create a high ponytail based on all the hair and secure it tightly with an elastic band. After this, slightly pull the elastic band away from the surface of your head.

Step 3-4-5-6. Insert your fingers into the free space created under the elastic band and carefully pull the tip of the tail through it. Secure the ends of the tail with bobby pins. Before doing this, for a more stylish and neat look, wrap it around an elastic band. Straighten the bun. Fix your hair with a suitable hairspray.


Here is the final result! If you want the bun to be more voluminous, you can comb the tail (each strand separately) and only then proceed to step No. 3.

Option 2.
The next type of bun is best created on slightly combed or curled hair, because in this case the hairstyle will be as natural and voluminous as possible.
Step by step instructions:
1. Curl hair that is not voluminous enough using a curling iron.
2. Tilt your head forward and gather all your hair into a simple ponytail.

3-4-5-6. When tying your ponytail with an elastic band, try to make sure that the tip of the ponytail is at the front of your head, and a kind of loop is formed from the hair. Straighten the loop as shown in photo 3. Wrap the end of the tail around the elastic.


7-8-9. Secure the tip with pins and fix the bun with varnish.

Messy bun for long hair
There is another type of bun that “vanilla” girls often prefer to wear. That is why such bundles are often called “vanilla”. Such hairstyles are distinguished by slight carelessness, soft and free lines, which will come in handy for dreamy, romantic and creative people.
Option 1.
In order to create such a careless bun, you need to stock up on a comb, hairpins and hair ties.
Step by step instructions:
Step 1: Comb your hair. If your hair is not of a “gentle disposition,” then moisten it a little with water.
Step 2: Pull your hair into a high ponytail. The hair in the ponytail needs to be combed again.

Step 3-4-5-6. We twist the tail around its axis. If the hair is excessively thick and thick, then the tail can be divided into two equal parts and intertwined with each other. We wrap the tail around its base, covering the elastic. You don't want to make this too tight, as we want the bun to be as loose as possible.


Step 7-8. We hide the ends of the tail under an elastic band. We fix the bundle with hairpins. If during the process of creating a hairstyle, the hair becomes a little disheveled, then this is only for the better. If the hairstyle turns out to be too neat, then the situation can be corrected by simply pulling out a couple of strands in a chaotic manner.

Option 2.
1. Wash and dry your hair, and then comb it thoroughly with a massage brush. Apply to curls small quantity foam to make hair more manageable.
2. It's time to tie the ponytail. At the first turns, thread the curls all the way through, but not at the last. Our goal is to get something like a loop out of the hair. There is no need to hide the ends of the tail.

3-4. Now we have to work with the “loop”, which needs to be given the most careless look. To do this, you can lightly comb it or simply tousle it with your hands. It is also necessary to comb the ends of the tail sticking out from under the elastic band. If the hair does not hold its shape for too long, then the hairstyle can be sprayed with hairspray.

5-6. Enjoy the final version!

You can create a beautiful and fashionable hairstyle using a regular knitted sock. In order to get a similar “donut”, you have to remove the part of the sock that is intended for the fingers. After this, fold the sock so that it looks like an elastic band.

Option 1.
In this case, you need to understand that the volume of the bun will greatly depend on the diameter of the sock and on your own hair length. If you want a noticeable and large bun, then choose a larger and tighter sock.
Step by step instructions:
1. Using a simple elastic band, gather your hair into a ponytail.
2. Thread the tail into the sock, as if through a regular elastic band.
3. Move the sock towards the ends of your hair, creating a palm tree-like ponytail.

4. Distribute the ends of the ponytail evenly over the entire surface of the sock and begin to curl your hair into a homemade donut.
5. Place an elastic band of a matching color over the sock, thereby securing the bun securely. Hide any protruding ends using pins or bobby pins.

Option 2.
In this case, the sock should be placed at the place where the tail is attached, all the curls should be evenly distributed around its circumference and once again secured with an elastic band. The protruding ends should be collected into one large curl and wrapped around the resulting bun. The hairstyle will be supported by hairspray and bobby pins. Simple, elegant and fast!


Long hair bun in the form of a bow
You rarely see a bun in the form of a bow, as many girls naively believe that doing it is time-consuming and problematic. However, this is absolutely not true!
Step by step instructions:
1. Prepare your hair by applying styling products.
2. Gather your hair into a high ponytail.

3. Using an elastic band, you need to curl the tail in half. As a result, the tail should turn into a loop, and its tips should end up on the top of the head in front.
4. Separate the loop into two equal parts.

5. Bring the ends back through the middle of the loop. Secure them with bobby pins.
6. Secure the bow with varnish.
7. The hairstyle is ready!

Here is another step-by-step instruction in photographs:

In order to create a side bun, you need to prepare an elastic band, a thin comb and hairpins. This is the result you should get:

Step by step instructions:
1. Using a thin comb at the top of the head, separate a wide strand of hair.
2. Comb the separated strand.
3. Gather all your hair on the side. This must be done so that the bouffant does not fall off. Tie the ponytail at about the level of your earlobe.
4. Twist the resulting ponytail into a rope (away from you).
5. Roll the tourniquet into a bun.
6. Tuck the ends into a bun.
7. Secure the bun with hairpins.

Low bun for long hair
The bun can be located in any part of the head. To achieve a low bun, you can use the following step-by-step instructions.
Option 1:


Option 2:
How to decorate a bun
The bun is a pretty universal hairstyle. By decorating an everyday bun with decorative hairpins, flowers, tiaras, elastic bands or bows, you can quickly turn it into a festive evening hairstyle.


Every girl with long hair should know how to make a messy bun!
You will need
How to make a messy bun from? Watch the video and follow step by step instructions. The messy bun is one of the few hairstyles that looks chic without much effort.
If you don't know how to create a messy bun with long hair, you're missing out. Loved by celebrities and regular girls alike, it's suitable for almost any situation, especially when you're short on time.
 When you want something fast and elegant.
 Learn how to style a messy bun on your head - a modern and relaxed version of the sleek ballerina bun. It looks both chic and like you didn't try too hard, but already with such a beautiful hairstyle.
Be that as it may, if you've ever tried to replicate this look, you know that a messy bun doesn't always work out well at first. Sometimes the skill of how to make a messy hair bun is like a real art. If you need a short tutorial, watch the video at the top of the page, then scroll down and reinforce your knowledge with step-by-step instructions.
How to make a messy bun on your head: instructions
A little trick How to make a messy bun on your head look modern and relaxed is to create a ponytail that is loose enough. This will prevent your bun from looking slick or flat.

Add texture.
Apply texturizing along the entire length of the tail. The beauty of this hairstyle is in the lush textured strands. The spray not only gives hair texture and long-lasting volume, but also has a conditioning effect and protects against UV rays.

Comb it.
Comb individual strands of the ponytail using gentle upward movements. A light backcombing helps lift heavy, long locks of hair away from the roots. This will help your hair not look flat compared to a full, messy bun.

Twist it.
Twist your hair into a bun, leaving a few strands free, and secure it with bobby pins or bobby pins. It doesn’t matter which way you twist the ponytail - clockwise or counterclockwise, the main thing is to hold the twisted strands with one hand until the entire structure is well secured.
You can use as many bobby pins as needed to keep the bun well secured and you feel comfortable with this hairstyle. When you're done, try loosening or even letting out a few strands to keep it from looking too flawless - this is a tutorial on how to create a messy bun!

Secure.
In how to make a careless bun, modern hairspray for flexible fixation of hair plays an important role. Try to choose medium-hold varnishes that do not weigh down or stick your hair together.
For example, fix your hair with clover extract. This product perfectly fixes, but does not “cement” the hair, and also gives it a healthy shine.
Now that you've mastered the basic technique of how to create a messy bun that's so modern and relaxed, it's time to perfect your style a little more.
When you want to look more like a girl than a ballerina, try letting out even more strands around your face. If your hair is straight, such a careless bun will be a little reminiscent of.
 Release as many strands as you like.
 If you have curly or simply “always disheveled” hair, careless buns are one hundred percent suitable for you. For example, try letting out and combing more hair under the base of the bun, adding visible accessories and clips.
 A messy bun for creative people.
 Or release random strands and create a so-called artistic mess. Such styling is not suitable for every occasion, but sometimes, especially with a classic and neat outfit, they look simply great in contrast.
Related articles
 The best amulets against the evil eye and damage Amulet against the evil eye with hands for children
 How to read the Psalter correctly
 Delicious dishes with sausages
 A glimpse of Bella. Romantic chronicle. A glimpse of genius. Messerer about Akhmadulina Boris Messerer glimpse of Bella romantic chronicle
 I dreamed that I was sailing on a boat on the river
 How to cook beef entrecote in a frying pan
 About the company Foreign language courses at Moscow State University
 Which city and why became the main one in Ancient Mesopotamia?
 Why Bukhsoft Online is better than a regular accounting program!
 Which year is a leap year and how to calculate it