
How to pose correctly at a photo shoot. Tips from professionals: how to look good in photographs
How to stand up, sit down, lie down, how to turn your head? We are confident that our selection will help you have a great photo shoot and get a decent result that will suit both the model and the photographer.
1. Let's start with a simple portrait pose. The model should look over her shoulder. Pay attention to what an unusual and interesting portrait you can get if you photograph a girl in the same pose, but from a different angle.
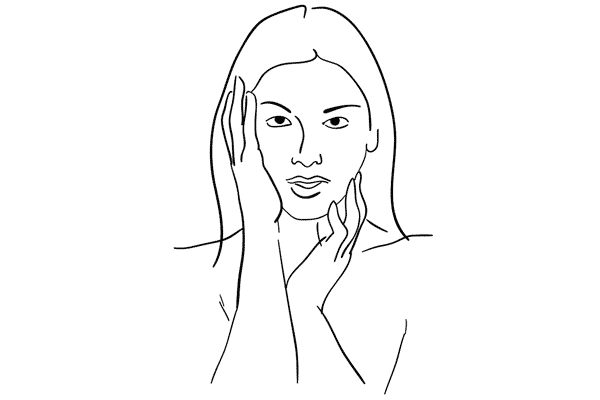
2. In a portrait, hands are usually not visible, at least they do not dominate. You can create an interesting photo by asking your subject to play with different hand positions around the face.
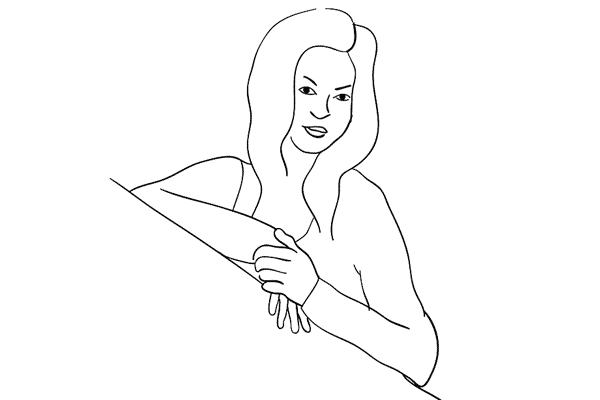
3. You may be familiar with the rule of thirds. A similar result can be achieved using diagonals. Also remember that you don't have to keep the camera straight all the time; tilting it can give you a new, interesting angle.
4. A nice photo will work if the model sits with her knees together. It's better to take pictures a little from above.

5. A sincere and attractive pose as the model lies on the ground. Get down on the ground nearby and take pictures from this level.

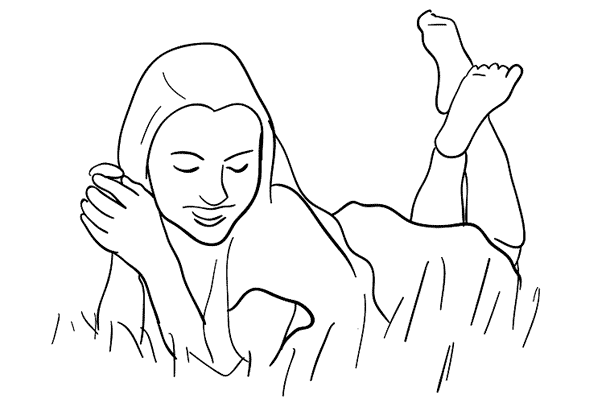
6. One of the variations of the previous pose - the model lies on her stomach, resting her hands on the ground. It looks very cool if the photo is taken in a field, among meadow flowers.
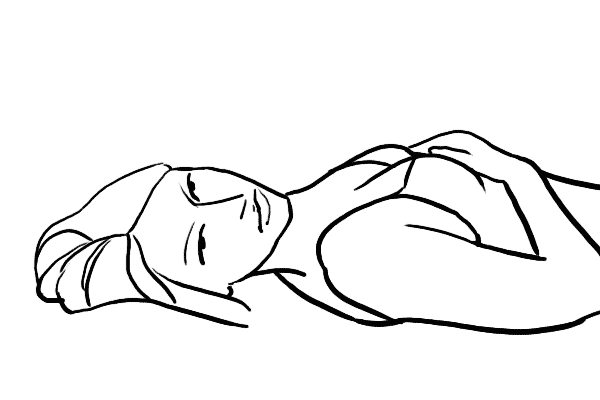
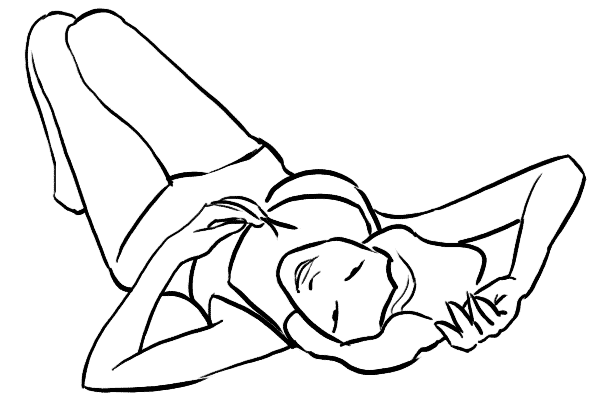
7. Surprisingly simple, but absolutely stunning and winning pose - the model lies on her back. Take photos from ground level, moving around the model. Ask her to sometimes change her facial expression, the position of her head and hands.
8. Another simple pose that is perfect for girls with any body type. Ask the model to change the positions of her arms and legs, focusing on the eyes.
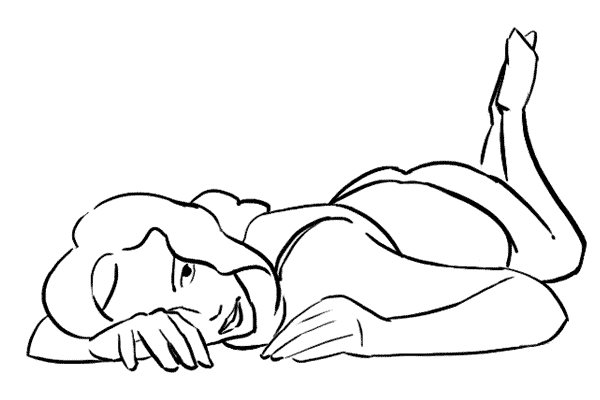
9. Playful and cute pose. Looks great if the model lies on almost any surface: bed, grass, sandy beach. Shoot at a slight angle, focusing on the eyes.
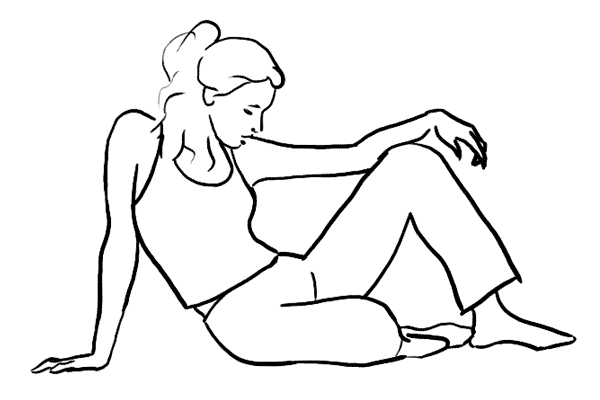
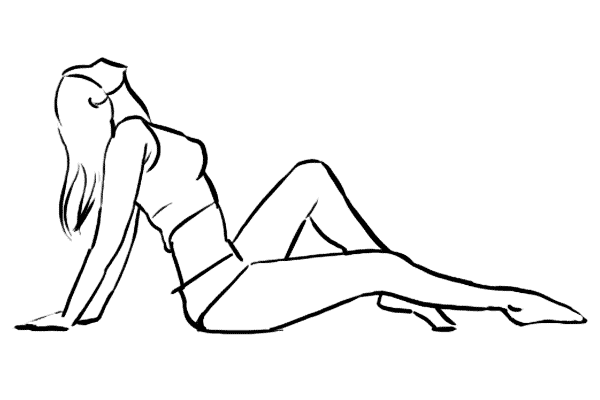
10. Proud and simple pose. The model is sitting on the ground. The pose emphasizes posture and slim profile.
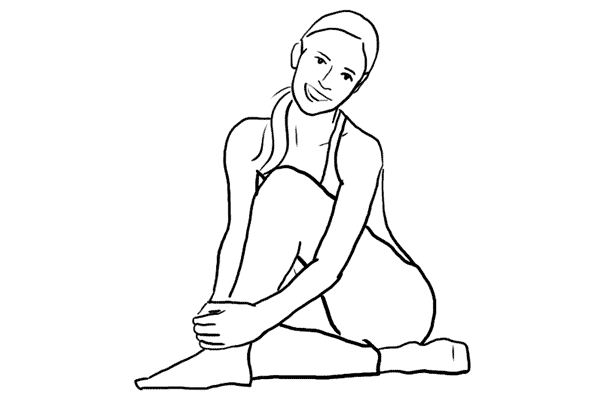
11. The model is sitting on the ground. This pose is sincere and open. Try taking photos from different angles.
12. A great pose to showcase the beauty of the model's physique. Looks great if the silhouette stands out against a bright background.
13. Relaxed pose. Ask your model to experiment with hand positions, twists, and bends.

14. Elegant pose. The model stands half sideways, with her hands in the back pockets of her trousers.

15. A seductive pose when the model stands slightly bent over. This pose allows you to subtly emphasize the model’s shape.

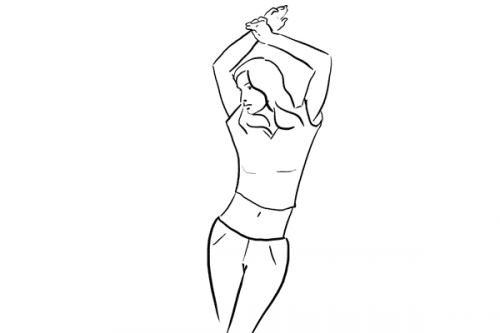
16. Sensual pose. It is good if the model has a fit, graceful figure. Hands above the head further elongate the figure, which allows you to demonstrate the relief.
17. When photographing a model in full height a huge number of variations are possible. The pose in the illustration is just a starting point for many experiments. Ask the model to change the position of the body, arms, head and eyes.

18. Relaxed pose: the model leans against the wall. She can support herself with one leg or her arms. Try several options.

19. The principles of such full-length shots are simple: the body should be curved in the shape of the letter S, the arms should be relaxed, and the body weight should be transferred to one leg. Girls with toned figures look good in such photos.

20. An attractive pose for girls with a sporty figure. Experiment and find a body position in which the relief will look most attractive.

21. Romantic and tender pose. Using fabric draperies you can take very sensual photographs.

These are the basic poses that always look good. Please remember that the illustrations are only starting points. Each of these poses has many variations. Ask the model to change the position of her hands, head, body, and facial expression. Observe and look for the most advantageous angle for each girl. Shoot from different angles and in different lighting conditions. Be creative and your photos will turn out unique.
Instructions
Put a picture on the web page that matches your essence. And you don't need to use any text. Your image should be clear without words. You can put your own photo on your Avatar. Choose a filming location with a beautiful landscape and take photos with a professional camera. It is advisable to have someone else photograph you, rather than yourself.
Sources:
- how to take a beautiful photo on ava
Feel free to follow the professionals and learn skills. The time will come - you will “grow” with useful skills and your own tricks. And if you liked some other person's photo, don't hesitate to repeat it. Perhaps you can do better. And if the photo doesn’t work out, you can always analyze what you did wrong.
Materialize your photos. Which means you should print them on larger formats too. You can immediately see minor flaws in a large photograph and work on the mistakes. And your friends, looking at the live photo with fresh eyes, will also be able to point out mistakes and evaluate the photo.
Participate in exhibitions and competitions more often. There is no point in burying your talent. And besides this, it’s useful for you to see other photographers. Strive to take photographs, because competition increases the desire for excellence. And don't be afraid of criticism. But look for it wisely. Show your still unprofessional photos around your level or a little higher. They will really help you with advice, while a professional photographer would limit himself to a couple of phrases like “not bad” or “will do for a start.”
And the last piece of advice: don’t get carried away with something that is too early for you to get carried away with. Many capable people They immediately try to buy cameras, fashionable and other gadgets, but in the end they are disappointed, having spent a lot of money and not getting the desired result. You need to be able to handle professional equipment. So take your time with it, improve yourself.
Video on the topic
Related article
Sources:
- How to learn to take beautiful photographs and take good pictures
We often want to capture certain moments on video so that the best or most significant moments of our lives remain in our memory. And we want them to last as long as possible, so that in the future we can revisit them and fully immerse ourselves in the mood. The quality of video is influenced by many factors: from the choice of camera to the final edit of the film that we want to keep in our home archive.

You will need
- - video camera
- - computer
- - video editor
Instructions
Choose the camera that your budget allows for. at the moment. Of course, you can record from digital, but the quality of video shot using is much higher. Pay attention to three main parameters: the grain of the image, its lightness and color, especially color. The brighter the colors, the better.
Video on the topic
Sources:
- Lesson on how to make a face like in the movie "Avatar" good video
Avatar is a small image that is used as a graphic component of a profile on a thematic forum or website. social network etc. An avatar can be copied from a special website or made yourself using any graphic editor.

You will need
- - software Adobe Photoshop;
- - image for the avatar.
Instructions
You can use any picture, photograph, etc. as an image. Initially, you can use any graphic file copied from the Internet, then you can try to repeat it on your portrait. Before you start working on the blinking avatar, you need to install Adobe Photoshop on your computer.
Open the program and double-click on an empty program field or press Ctrl + O to open the image.
Make a duplicate of the main layer that was created when loading the image into the program. Right-click on the layer in the Layers panel and select Duplicate Layer or press Ctrl + J.
The color levels change needs to be applied to the bottom layer. Click the top menu “Image” and select “Levels” (keyboard shortcut Ctrl + L). In the window that opens, move the middle slider to 2.35.
The top layer (newly created) also needs to have its levels changed. Press the keyboard shortcut Ctrl + L. In the window that opens, move the slider to a value of 0.40.
Now click the top Window menu, then open the Animation palette. In the layers panel, leave only the bottom layer visible; to do this, click on the eye image opposite the top layer - it will become invisible.
In the Animation window, duplicate the image by clicking the Duplicate button. Turn on the visibility of the top layer and make the bottom layer invisible by clicking on the eye image next to the corresponding layers.
In the Animation window, activate the Always loop option and click the Play button. If you want to decrease or increase the frame rate, adjust this value in the same window.
To save the resulting avatar, click the “File” menu and select “Save for web and devices...”. In the window that opens, select the Gif image format and 256 colors. Click the "Save" button.
To create a simple animation, you don’t have to study to become an animator. Sufficient tools are available in Adobe Photoshop CS5. You will also need to learn a few simple skills.

You will need
- - Russified version of Adobe Photoshop CS5.
Instructions
As a source image, use, for example, photograph with a skyscraper against the sky. Launch the program and open the required file: press “Ctrl” + “O”, select a picture and click “Open”. Select the Straight Line Lasso tool (hotkey “L”, switch between adjacent elements “Ctrl” + “L”) and select the skyscraper. Press the combination “Ctrl” + “J” to create a new layer and transfer the selected area to it.
Open in the program photograph with clouds, it should be larger than the skyscraper image. Press “Alt” + “Ctrl” + “I” and note the values that are in the “Width” and “Height” fields. Create a new file: “Ctrl” + “N”, in the “Width” field enter the same value as the photo with clouds, in the “Height” field - the same, but multiplied by three. As a result, you should have three documents: with a cut-out skyscraper, with clouds, and an empty document. In the following, they will be called documents 1, 2 and 3, respectively.
Switch to the document with the clouds, activate the Move Tool (V) and drag the image onto Document 3. Align it so that it completely covers the bottom. Switch back to document 2 and drag the image onto document 3. Align it so that it takes up top part. With Document 2 active again, click Edit > Transform > Rotate 180 Degrees. Then Edit > Transform > Flip Horizontal. Drag the result onto document 3 and align it to the center.
In the Layers window (if it's not there, call it hotkey“F7”), select the three existing cloud layers (they should be named “Layer 1”, “Layer 2” and “Layer 3”) by holding “Ctrl” and clicking on each of them. Right-click and in the window that appears, click “Merge Layers.” Drag the newly created layer onto Document 1 and place it below the skyscraper cutout layer.
Click Window > Animation. At the bottom of the window that appears, click the only active button – “Create a copy of the selected files.” Another frame will appear. At the bottom of the frame the time it will be on the screen is displayed. In each frame, change it to 0.1 seconds.
Switch to the first frame and then to Document 1. Select the clouds layer and, using the Move tool, align its bottom right edge with the bottom right edge of Document 1. Switch to the second frame and then back to Document 1. Select the layer with clouds and align its upper right edge with the upper right edge of document 1. These two frames will be the starting and ending frames of the animation being created - the movement of the clouds.
Click the Create Tweaks button at the bottom of the animation window. In the Add Frames field, enter 20 and click OK. Delete frames 21 and 22 using the “Delete selected frames” button, which has a trash can logo and is located at the bottom of the animation window. The animation is ready. You can check this by clicking on the “Play” button.
Video on the topic
Taking a selfie, like working on a self-portrait, can rightfully be called a form of art. After all, knowing the world always begins with knowing yourself. If you urgently need a beautiful photograph, but no one is around to help with it, it doesn’t matter. You can always take a beautiful selfie. And you don’t have to have a phone to do this. latest model With the most modern camera, you just need to follow a few simple rules.
Anyone can take a selfie
IN lately The question of how to beautifully photograph yourself has become very relevant. Not a single beauty goes out without a mobile phone; they take gadgets with them on any vacation or to an event. Mobile phones equipped with cameras, and some models have two. At the same time, the front camera is specially designed so that a girl can take beautiful pictures of herself. How to do this will be discussed in this article.
Hand position
Hands are a part of the body that is unfairly deprived of attention when taking selfies. However, you can give your photos a certain mood if you experiment a little with the position of one hand on the body or face. Also, do not forget that there should be no open palms in the frame. Hands should only be removed from the sides. Poor placement of your free hand can degrade your photography. After all, hands convey stiffness and tension. If you wish, you can take some object in your hand - for example, a toy or a flower.

Turn your head
Those girls who are wondering how to beautifully photograph themselves should remember: a skillfully created selfie should be indistinguishable from a photo taken by a friend. No one will guess that this is a self-portrait and not the work of a professional photographer. First of all, you need to choose the right angle. And one of the most advantageous options is the head turned half a turn. This way you can visually make your face smaller and emphasize sharp cheekbones. If you try to take pictures “as if for a passport,” then the result is unlikely to please you. The camera can even demonstrate those disadvantages that would be invisible from other angles.
Since taking a beautiful photograph of a face yourself is the most simple task for selfie lovers, here to get a good selfie it is enough to follow the most simple rules. Sometimes you can turn your head even a few millimeters to the side. This will be unnoticed, but will significantly affect the perception of the photograph.
Many girls are interested in how to beautifully photograph themselves at home. In any setting, when taking a selfie, it is important to adhere to the main rule: the eyes should be expressed as clearly as possible, and other parts of the body should not be distorted. To do this, you need to either turn your head to the side or raise your chin slightly. Sometimes when taking a selfie, your nose turns out to be too enlarged. This can be avoided by holding the camera slightly up.

Photo standing
By following these simple rules, you can solve the question of how to beautifully photograph yourself at home. Poses for a selfie, as for regular photography, can be very different - standing, lying, sitting, with emphasis on any surface. One of the most popular poses is standing. The only feature taking selfies in a standing position (as in most other poses) - to perform them you need to stand in front of a mirror. Those who would like to take a selfie in this position should remember: it should not be a standing position. Try to keep all the muscles of your body in a relaxed position, but keep your back straight. If you don’t want to appear older, you should avoid leaning forward towards the camera. If you get too close to the lens, skin imperfections may become visible in the photo.
One of the most popular standing poses is called Triumphant. To perform it, you need to bend your arm above your head and bend one leg. The chest should be as tight as possible and slightly tilted forward. Another pose that all selfie lovers like is called “Supermodel”. To perform it, you need to lean on a tree, a car, or the wall of a house and cross your legs. Your free hand can lie on the wall or play with your hair. To make a photo in a standing position look beautiful, it is best to concentrate all the weight of the body on one leg, while simulating a calm walk.

How to beautifully photograph your feet yourself? Taking a photo of feet
The first thing to remember when taking a photo like this is to wear nice shoes. It should match your skin color as closely as possible. You can visually lengthen your legs with beige shoes. Also, before taking a photo, you can use a bronzer - a product that will give your legs radiance and a beautiful shade. Another way to visually lengthen your legs is to stand on tiptoes.
For many girls who like to take selfies, the question is how to beautifully photograph your own legs while lying down. To make the photo truly aesthetic, you should use the previous tips - white skin unlikely to be attractive in a selfie. If you don’t have bronzer on hand, you can solve the problem by simply wearing beige tights. You should not choose tights with a high lycra content - because then your legs will shine unnaturally in the photo. It is worth remembering that a photograph of feet in shoes will always look much more aesthetically pleasing than without shoes or boots. In addition to bronzer, you can apply a little body oil or cream with pearlescent particles to your legs.

Take a photo of yourself sideways
We looked at how to beautifully photograph yourself from different angles. There is one more pose left - sideways. Of course, for many it will not be the most convenient, but it is quite possible to take a beautiful photo using a mirror. In such a selfie, the figure always looks slimmer, folds of fat are, as a rule, almost invisible, and the girl seems taller.
However, from this angle special attention worth paying attention to clothes. It should be the right size. After all, if the clothes are tight, it will be difficult to move. If things are too big and baggy, this will add weight.
To take a good selfie, you need to stand sideways to the mirror and try to arch your back in the shape English letter S. It is better to place your free hand on your hips or waist area. In this pose, the body weight should be distributed on only one leg, and the other should be as relaxed as possible. Also, if you have long beautiful hair, they can be demonstrated in a selfie. To do this, you need to throw your head on its side and bow your head a little.

Selfie in a dress
Such photographs always turn out very feminine and beautiful. It doesn't matter what length or color the dress is, your photos will be filled with positive energy. When taking such a selfie, it is worth remembering that the clothes should be combined with the external environment. For example, if you evening dress, then taking pictures against the backdrop of the kitchen will not be entirely appropriate. You need to stand straight, put your free hand on your waist or use it to move the hem of your dress. If you need to show off your figure with a selfie, then you should choose a tight dress and stand sideways to the mirror.

What to avoid
Let's look at a few rules without which it is impossible to photograph yourself beautifully. As soon as some ladies forget about these basic principles, their photographs do not come out as aesthetically pleasing as they could be.
- Firstly, you shouldn’t make your lips “bow” - it looks unnatural and can be unpleasant for many visitors to your page on social networks.
- Also, girls should not take pictures from low points - it is better to hold the camera higher. Low angle shots are more suitable for guys.
- Also, do not retouch photos using blue, purple, red and other shades. As a rule, this is done using special plugins. But all these colors were previously used by professional photographers as parodies of classic works.
- Since it is almost impossible to photograph yourself beautifully on your phone in a dark room, you should choose more illuminated places for selfies. You should avoid taking selfies in any dark rooms or dark places outdoors. No matter how high-quality cameras are, they can ruin photos in dark places.
Steps
Composition
- take a photo in profile, that is, from the side;
- photograph only half of the face – left or right;
- take a photo close up eye, lips or cheek.
-
Don't place your face strictly in the center of the frame. Best photos usually built according to the rule of thirds. This means that the eyes (the compositional center of the portrait) should be one third vertically from the top border of the photo and to the right or left of its middle. The photo will be more interesting, and the angle will probably be better.
Keep the camera away from your face. The lens distorts objects that are too close. Selfies are usually taken with the camera or phone held at arm's length, which is a very short distance, and therefore the nose often looks larger than it actually is - definitely not the effect you want to achieve.
- If you want to take close-up photos, it's better to use the optical zoom and shoot from a greater distance. You can also take a waist-length or full-length photo, and then crop it.
- If your camera has a timer, lean it against something stable, set the timer, and step away. Such a photo will most likely be more successful than a selfie taken handheld.
-
Use your phone's main camera. It is more convenient to photograph yourself on front camera smartphone, but the main one allows you to take much better pictures.
Place a mirror behind the camera. Taking photos is easier when you can see yourself, so placing a mirror behind your camera or smartphone will help you achieve more good pose or facial expressions. Make sure your smile is natural!
Ask someone to take your photo. This is not always possible, but it is preferable to have someone else take your photo. You'll be able to focus on posing without having to think about holding the camera and pressing a button at the same time.
- Ask a friend to take your photo. He may tease you a little, or he may ask you to take a photo of him too.
- If this is happening at a holiday or other event, ask someone present to take a photo of you (and your friends, if you came in a group). It's better to be someone you know, or at least someone who seems trustworthy, so your phone or camera doesn't get stolen.
-
Don't look directly into the lens. Even if your eyes are your most beautiful feature, try looking away from the camera to make the photo more interesting.
- You can still make your eyes pop by opening them wide and looking over or away from the camera.
- Try not to look away too obviously. Looking slightly away from the lens will make it seem like you don't know you're being filmed. If you look away even thirty centimeters from the camera, it will already look like conscious posing.
-
Show emotions. Sincere emotions are usually immediately visible on the face. A forced smile usually does not make you more attractive. So if you pose for a photo smiling, think about something really nice or funny.
Dress appropriately. If you are taking a self-portrait for a specific purpose, think about how you should dress.
- If you need a photo for work or for a page on a professional network, choose clothes in a discreet, business style and a simple, neat hairstyle.
- If you're taking photos for a dating site, you can wear something bright or funky, but don't dress too sexy (this photo will immediately show that you're trying your best to look sexier!). Hair doesn't have to be perfect; let it be casual, but show that you pay attention to your appearance.
- If the photo is for your social media page, think about how people will perceive you. The choice of clothes is very wide, but a dirty T-shirt is still not best choice for a selfie (unless, however, you demonstrate that you just returned from a twenty-kilometer hike).
-
Don't do duckface! The so-called duckface (a face with duck-shaped lips) - lips folded into a bow and stretched out as if for a kiss - has become boring to everyone and has become an example of bad taste when taking selfies. There are plenty of other, cuter facial expressions.
Find the shadowed side of the face. Look in the mirror or take a test photo and see which side of your face is further from the light source and therefore looks darker. Take your photo from this side to achieve an artistic effect and appear slimmer. In bright sunlight this technique may not work.
Take creative photos. Instead of a traditional full-face self-portrait, try artistic photo with a completely different composition. Here are some ideas:
Situation
- If you have a choice, it is better to take photos on a cloudy day.
- Indoors, try to take photos near a window, in natural light (but not in direct sunlight).
- If you must use artificial light indoors, avoid fluorescent lamps and overhead lighting. You may find more favorable lighting if you turn off the ceiling lights and turn on table lamps and sconces.
- If you're shooting with direct overhead lighting (whether natural or artificial), use flash to fill in shadowed areas so your photo doesn't have shadows under your nose or eyes.
-
Check the background. When posting a photo on the Internet, you are unlikely to dream of the fame of the person who captured himself against an absurd or indecent background.
Think about visual frames. The photo can be more interesting if the composition forms a kind of frame. Here are some ideas for such visual frames:
- pose in a doorway;
- hold the camera in two outstretched hands, not in one;
- stand between two objects - for example, trees or bushes;
- Grasp your chin or prop it up with your hand to create a visual frame underneath.
Shoot in natural light. Natural light is always preferable for photography. However, direct sunlight, especially at midday when the sun is directly overhead, is not suitable for portrait photography: you don't want harsh shadows on your face!
Editing
-
Zoom into the desired area. If you want to highlight a part of your face or body, use a photo editing app to zoom in on it and save the edited version. Most smartphones and computers have photo editing software, many of which are very easy to use.
-
- Try taking photos in different rooms to see which has the best lighting.
- When editing your photos, use the soft focus effect to keep details sharp and your skin looking flawless.
- There is nothing more banal in a selfie photograph than an outstretched arm in the frame. Try setting a timer instead. You can also experiment with different shooting angles to hide that ever-present hand.
- Take many pictures to choose the best one.
- Let your feet be the heroes of the story! A photo of your feet in front of a stunning landscape will document your presence - without you having to worry about how you look in the photo.
- Before taking photos, look in the mirror and, if necessary, adjust your clothes, hair and makeup.
- If you don't like certain features of your face, highlight others. For example, if you don't like lips, then use bright eye shadow to highlight your eyes.
- Be happy with yourself. There is no other person like him in the whole wide world. You are one of a kind and unique - embrace it!
- Place the phone on the floor or other flat surface, resting it on something, and sit opposite. The phone camera should be facing you. Start the timer and start posing. Look to the side and smile mysteriously if you think that such a photo will show you in a favorable light; if not, try something else.
Everyone probably knows this situation - you dressed smartly, put on impeccable makeup, took photos, but the photos turned out not entirely successful. Of course, all the stones fly towards the photographer or camera. But, in fact, the quality of the resulting photos largely depends on you. You just need to know a few secrets, and you will always be irresistible in all photographs.
How to learn to take photographs - smile and facial expressions
A radiant smile always looks more impressive in a photo than a gloomy grimace. But you need to smile sincerely, as if you met a good friend. If you can't seem to smile, follow these tips:
- Pay attention to short training in front of the mirror: “try on” a flirtatious, mischievous, intriguing, soft smile. Choose the one that suits you best, and then use it when taking photographs.
- A real smile is always accompanied by a subtle sparkle in the eyes. When taking photos, try to remember something funny, then you will laugh more believably.
- Always imagine that the photographer is yours close person the one you smile at.
- Don't be afraid to make funny faces. This looks much better than the blank expression on your face like in your passport photo.
- Never stand directly in front of the lens, as this will give your face a bad side. It is better to turn half a turn, while your eyes should not aim at the camera, but at any point around it.
How to learn to take photographs - choosing clothes and disguising figure flaws
When preparing for a photo shoot, you need to choose not only the most beautiful clothes, but those that will hide your shortcomings and highlight your strengths. Also consider important nuances:
- Avoid baggy clothing and opt for a smooth-fitting style that fits your figure.
- Wear heels, it will make you taller and slimmer.
- Clothes made of plain fabric look better than those with colorful fabrics.
- Do not wear clothes that hide your neck, as well as scarves and jewelry that visually separate your neck from your body.
- Choose a clothing style that suits your age.

How to learn to take photographs - makeup, hairstyle
It’s not at all difficult to create a hairstyle no worse than that of fashion models:
- Long, well-groomed hair is a real trump card, so don’t hide it.
- If you have wavy hair, give them a natural look. To do this, moisten them with water, shake and let dry without combing.
- Never smooth your hair, this will make your look very strict and rough.
- Complicated hairstyles - no best solution for photos. They will take all the attention away from you.
If you're going to do professional photo shoot, it is better to use the services of a makeup artist. But for simple friendly photos you can do it yourself:
- Use foundations, lipsticks, and shadows only with a mattifying effect.
- In the photo, warm-colored cosmetics look more natural.
- The bright pearlescent lipstick in the photo gives a hint of vulgarity, so it is better to use light, muted tones.
- Dark shadows give a strong tired look and “throw on” a couple of extra years.

How to learn to take photographs - choosing a pose
The final step in preparing for photography is your pose.
- Try not to stand straight; it is better to put one leg slightly to the side or turn half-turn.
- Don't hold your hands like two wooden sticks - touch the hair, put it on your waist, pick up the kitten.
- Watch your posture - move your shoulders back, stretch your neck, tuck your stomach.

Taking photographs is also an art. Practice in front of the mirror, look at photos where you turned out just fine, ask your friends for their opinions and then all your efforts will not go unnoticed.
Related articles
 The best amulets against the evil eye and damage Amulet against the evil eye with hands for children
 How to read the Psalter correctly
 Delicious dishes with sausages
 A glimpse of Bella. Romantic chronicle. A glimpse of genius. Messerer about Akhmadulina Boris Messerer glimpse of Bella romantic chronicle
 I dreamed that I was sailing on a boat on the river
 How to cook beef entrecote in a frying pan
 About the company Foreign language courses at Moscow State University
 Which city and why became the main one in Ancient Mesopotamia?
 Why Bukhsoft Online is better than a regular accounting program!
 Which year is a leap year and how to calculate it