
How to disable the Windows key on your keyboard
The Windows operating system can be completely customized, both using built-in utilities and third-party applications. Accessories, such as a keyboard, can also be customized. On it you can reassign the necessary keys by installing the necessary commands on them or completely disabling them.
The Windows key on your keyboard defaults to launching the Start menu. Also, using it in combination with other buttons allows you to execute various quick commands, for example, by pressing Windows + R you can launch the “Run” line, and Windows + I will open the parameters. At the same time, not all users use the Windows key, and some may want to disable it if for some reason it interferes, for example, it gets stuck or a game, application, or program is minimized due to its accidental pressing.
In this article we will look at various ways how to disable Windows key on the keyboard or reassign it.
How to disable the Windows key using system tools
Despite the fact that many users reassign some keys on the keyboard, there is no built-in utility in Windows that would allow this to be done conveniently. At the same time, disable the Windows key using operating system perhaps if you change some registry settings.
To disable the Windows key using the system, do the following:

After you restart your computer, the registry changes will take effect and the Windows key will no longer do anything when you press it. If you need to return the Windows button to a working state in the future, delete the setting you created in the registry and restart your computer.
How to disable the Windows key with third-party applications
There are a lot of programs on the Internet that allow you to reassign, disable, and combine keys into shortcuts to perform certain actions. Large companies supply similar programs along with keyboard drivers, but there are also a number of “generic” applications that cope with similar tasks just as well. Below we will look at two free programs, which allow you to disable or customize the Windows key.
The SharpKeys program is distributed free of charge on the developers' website and does an excellent job of reassigning or disabling keys on the keyboard. The application works on the principle of making changes to the registry, that is, it does not have to be constantly active in the background, due to which it can be used even on low-performance computers.
To disable the Windows key using the SharpKeys application, download it, install it and launch it. A window will open in which you need to click Add. Next, on the left side of the window you will need to select a key, and on the right the action that it will perform. Select the "Special Left Windows" and "Special Right Windows" keys and set them in the right column to "Turn off", then click "OK".

After this, the selected keys will appear in the list of program combinations. For the changes to take effect, click “Write to registry”.

After you restart your computer, the Windows keys will no longer work. If you need to make them work again, you will need to run the SharpKeys program and delete the changes made.
Simple Disable Key
Above were scenarios on how to completely disable the Windows key in the operating system. However, you may want to disable only the commands that run when you press a keyboard shortcut, including Windows. This can also be done using the third-party application Simple Disable Key.
To disable keyboard shortcuts with the Windows button, do the following:

Please note: Changes made to the program only work while it is active. If you want a certain keyboard shortcut not to work all the time, you need to add the program to startup.
It would seem, why do this? Still, there are times when the Windows key (the one between Ctrl and Alt) gives the user a headache. For example, to avoid accidental minimization of the game during particularly active online matches. This is why manufacturers of gaming keyboards often include software with the ability to software disable the Windows key. If you came to this article from a search, then you probably know why you need to disable the Windows key.
Does your keyboard not have built-in mechanisms to disable the Windows key? No problem. You can also disable the Windows button on the keyboard using conventional system tools, namely using the registry editor. If this method is not an option for you, consider also disabling the Windows key using simple third-party utilities.
For reference: This instruction requires that you have account with Administrator rights. If you do not have one, you will need the Administrator password.
Once again for reference: Disabling the Windows key will deprive you of many useful bonuses, like dozens of keyboard shortcuts. If you've read a few instructions on our website, you've probably noticed that we often recommend using a combination Win+ R(execute), Win+X (context menu Start), Win+ E(Conductor), Win+I(Options) and many others. They all speed up your computer (not to be confused with speeding up your computer) and save you a few extra clicks. Once you disable the Windows Button, all of these shortcuts will no longer be available. Read more about keyboard shortcuts In Windows, you can read the article “Windows Hot Keys”.
How to disable the Windows key using Registry Editor
A relatively simple method that does not require the user to download any third-party software or a lot of time to complete. All actions take place inside the Windows registry editor. Please note that there are certain risks associated with editing the registry, so we advise you to follow the instructions carefully and never change registry values blindly. No matter what happens, you alone are responsible for your computer.
To enable the Windows key back, you need to follow the same instructions, just delete the key you created ScancodeMap. Please note that launching the Registry Editor using a keyboard shortcut Win+ R it won't work (you just turned off the Win button), so use the search. Just open the Start menu and enter the same command regedit and press Enter.
How to disable the Windows key using SharpKeys
This simple but very functional utility will allow you to disable the Windows key or change the settings of any other button. We won't go into too much detail about using SharpKeys, but will just focus on disabling the Windows key (or keys if you have two). The advantage of SharpKeys compared to disabling it through the registry editor is that the utility allows you to equip the key with some more useful action, and not a simple dull shutdown.

To return everything back and turn on the Win button again, open the same SharpKeys, click on the parameters you wrote down and click Delete, or DeleteAll. Then press again WritetoRegistry, so that the application can overwrite your changes and roll back everything to its original form. After this, don't forget to restart your computer.
Such simple instructions will help you get rid of random games crashing or anything else that caused you to disable the Windows key.
The Sticky Keys feature is designed for users who have difficulty holding two or more keys at the same time.
The situation can be alleviated by alternately pressing keyboard shortcuts.
If you need to use a specific keyboard shortcut, such as CTRL+P, mode "Sticky Keys" Allows you to press keys one at a time rather than simultaneously.
For some, sticky keys are the only way to properly interact with the computer and operating system.
This mode applies to keys such as Ctrl, Alt, Shift and Windows key (depicting the Windows flag). Once a control key is pressed, it remains active until the user presses a second key, completing the combination.
IN Windows such a possibility is provided. But to do this, you need to configure it first.
Calling the Sticky Keys settings window can be done by pressing the button five times "Shift", just not fast :o). Or standardly, using the mouse Start>>>Control Panel>>>Accessibility(If Vista or Windows 7, then in the control panel look for "Ease of Access Center").
VK Resolving Sticky Keys Using a Mouse
- Click the button Start and select Control Panel .
- Make sure it's selected classic look and control panel icons are displayed on the screen. If not, select in the left pane of Control Panel.
- Select Accessibility to open the corresponding dialog box.
4. Select a tab Keyboard and check the box Sticking.
To further configure Sticky Keys settings, use the button Settings.
Click the button Setting (1), to open the Sticky Keys options dialog box. Select the checkboxes that correspond to the options you want. Click the button OK(2), then Apply (3), and then the button Close(X) on the control panel .
Window Setting Sticky Keys mode contains the following parameters:
If you are incredibly unlucky and your mouse does not work, then open the settings window "Sticky Keys" possible using the keyboard
Enable Sticky Keys using your keyboard
- Open menu Start by pressing the keys CTRL+ESC (or Windows logo key). Then open Control Panel by pressing the key C.
- Make sure Classic View is selected and the Control Panel icons are visible on the screen. If this is not the case, go to the left area of the control panel and select Switch to classic look by pressing the key TAB, and then ENTER. Use the arrow keys to select Accessibility and press the key ENTER.
- In the dialog box Accessibility go to the tab Keyboard , and then check the box Sticking by pressing the key U.
- Using the key S click the button Parameters. A dialog box will open Setting Sticky Keys Mode , where you can select the following options.
Press the key U, to check the box Use this method of inclusion . This setting allows you to turn Sticky Keys on or off by pressing a key five times. SHIFT.
Press the key P to check the box Double pressing locks the keys CTRL, SHIFT and ALT . This setting allows you to lock the CTRL, ALT, SHIFT, or Windows logo keys when you press any of them twice in a row.
Press the key T to check the box Disable sticky behavior when pressing two keys at once . This setting allows you to disable Sticky Keys when the CTRL, ALT, SHIFT, or Windows logo key is pressed at the same time as any other key.
Press the key M to check the box Play a beep when pressing CTRL, SHIFT and ALT . This option allows you to play a sound when the CTRL, ALT, SHIFT, or Windows logo key is pressed, locked, or released.
Press the key S to check the box Display sticky mode status on screen . This feature allows you to display the corresponding icon in the taskbar when the Sticky feature is enabled.
5. Press the key twice ENTER to exit the accessibility menu.
6. Close the control panel by pressing the keys ALT+F, C.
How to disable Sticky Keys feature
As a rule, it is convenient to activate the function of sticky keys and mouse buttons in cases where novice users or people with disabilities. If you do not need to use these modes, it is better to disable them.
Sometimes keys get stuck automatically, and many people have probably encountered such problems. This often happens in games when you press several keys at the same time.
Or sticking turns on by itself when you hold down any button on the keyboard for a long time.
Or you are typing some text and suddenly something switched... and it became impossible to print with one click, and it prints only if you hold the button for several seconds.
Most likely in such cases. You have turned on Sticky Keys mode»
.
According to statistics, the Shift key gets stuck most often. At the same time, when sticking is turned on, the computer begins to make a characteristic high-pitched sound, reminiscent of an intermittent squeak. Every five seconds, when the same key gets stuck, the sound is repeated, which is very annoying for those sitting in front of the computer.
To remove sticky keys without disabling this mode, press the Shift key five times while working.
To disable Sticky Keys completely , follow these steps
To forcefully disable Sticky Keys:
For Windows XP :
Method 1. standard
1. Pass in “Start” → “Control Panel”. Call the component "Special Features". In general, the initial steps are the same as when you enable Sticky Keys mode (see above)
2. Click on the icon "Special Features" left mouse button, a new dialog box will open. In the window that opens, go to the tab "Keyboard".
3. In the section "Sticky Keys" "Sticking".

4. Click on the button "Apply" for the new settings to take effect.
5. Close the window "Special Features" by pressing the button OK or icon [x] in the upper right corner of the window.
For Windows 7: For convenience, I also give an example for the English version.
1. Go to “Start” → “Control Panel”.
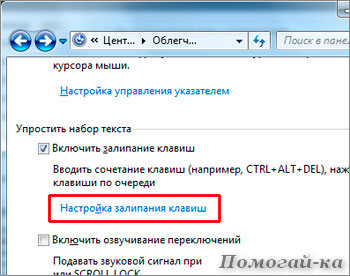
Below we find the item «» (Ease of Access) and go into it.
In the next window you will see a list of simplifications for working with a computer. Choose « Making the keyboard easier to use» (Make the keyboard easier to use)
By the way, by default, in the section "Make typing easier" Most options are unchecked, which does not prevent Windows from prompting you to enable new features whenever you press a certain key sequence. To get rid of these suggestions, you will have to dive even deeper into the settings.
Click the link Set Up Sticky Keys to go to the window " Set Up Sticky Keys. In this window you need to uncheck not only the item « Enable Sticky Keys» ,
but also from the point “Turn on Sticky Keys when SHIFT Is Pressed Five Times”.
Then Windows will stop prompting you to enable this feature.
When everything is ready, save the settings made by clicking "Apply". Close window with button "OK ".
Method 2. Lightweight
To disable the Sticky Keys feature, you need to follow these simple steps:
When you press the left key five times quickly
in Windows XP
a dialog box appears asking you to enable Sticky keys
After pressing the button "Options" a window opens immediately "Special Features" . Next, we work with this window, as in the first method.
For Windows 7, a dialog box asking you to enable Sticky Keys
will look like this:
Or a window Sticky Keys for English version:
3. The Sticky Keys settings window appears.
6. We enjoy working in Windows or playing our favorite game.
Disabling the Input Filtering feature
You disabled the Sticky Keys feature, but the problem still persists; there are still typing delays. Perhaps the point is that in addition to sticky keys, the mode may be turned on "Input filtering"
Filter Keys, turns on when pressed and held right key for more than 8 seconds.
To turn it off,
For Windows XP :
Let's go Start>>>Control Panel>>>Accessibility >>>Keyboard.
In the section Input filtering remove the marker from the field opposite the inscription "Filtration".

Click the button Setting, to open the Filtering Options dialog box. Uncheck the box “Enable filtering mode: hold down the SHIFT key on the right for 8 seconds” Click OK, then Apply and close the window by clicking OK or X
For Windows 7:
Let's go Start>>>Control Panel>>>Accessibility Center
In the window “Make the keyboard easier to use” uncheck the section “Enable input filtering”:
- “Turn on Filter Keys when Right SHIFT Is Pressed for 8 Seconds”
Click Apply, close the window by pressing OK
Well, one last thing:
How to turn off the Sticky Keys alert
If you want to keep Sticky Keys active but only want to turn off the distracting beeping sound your computer makes,
That For Windows 7 check the box " Enable Sticky Keys" leave / or put and click on the blue link "Setting Sticky Keys".
In the window that appears, uncheck the box next to the option at the very bottom « Beep when pressing CTRL, ALT and SHIFT",
then click Apply, then OK and close the control panel.
For Windows XP this action will look like this:

You can also uncheck “Use this way of inclusion” V Settings section “Sounding mode switching”
This way you will not disable sticky keys, but will remove the annoying sound.
That seems to be all I wanted to say about such Windows functions as "Sticky Keys" And " Input filtering". If you don't need these special features, disabling these two options will save you from intrusive operating system suggestions and annoying beeping from the speaker.
Based on materials from www.kakprosto.ru, www.inetkomp.ru, www.nb1000.
Related articles
 The best amulets against the evil eye and damage Amulet against the evil eye with hands for children
 How to read the Psalter correctly
 Delicious dishes with sausages
 A glimpse of Bella. Romantic chronicle. A glimpse of genius. Messerer about Akhmadulina Boris Messerer glimpse of Bella romantic chronicle
 I dreamed that I was sailing on a boat on the river
 How to cook beef entrecote in a frying pan
 About the company Foreign language courses at Moscow State University
 Which city and why became the main one in Ancient Mesopotamia?
 Why Bukhsoft Online is better than a regular accounting program!
 Which year is a leap year and how to calculate it