
We create boot disks with Windows XP. How to make an installation disk multiboot
Anyone who has encountered installing an operating system on a computer on their own is familiar with the problem of creating boot disks on optical or flash media. There are specialized programs for this, some of which support manipulation of disk images. Let's look at this software in more detail.
The review opens with Ultra ISO, a software tool for creating, editing and converting images with ISO, BIN, NRG, MDF/MDS, ISZ extensions. With it, you can edit their contents, as well as directly create ISOs from a CD / DVD-ROM or hard drive. In the program, you can write a pre-prepared image with the operating system distribution onto an optical disk or USB drive. The downside is that it is paid.

WinReducer
WinReducer is a convenient application designed for creating personalized builds of Windows. It is possible to record the finished package into images in ISO and WIM formats or deploy the distribution directly on a USB drive. The software has ample opportunities for customizing the interface, for which a tool called "Preset Editor". In particular, it provides the ability to remove unnecessary service features and enable those that make the system faster and more stable. Unlike other similar software, WinReducer does not require installation and has its own version for each edition of Windows. At the same time, the absence of the Russian language slightly reduces the overall impression of the product.

DAEMON Tools Ultra
DAEMON Tools Ultra is the most complete software for working with images and virtual drives. The functionality is slightly similar to Ultra ISO, but, unlike it, there is support for all known image formats. There are functions for creating ISO from any type of file, burning onto optical media, copying from one disk to another on the fly (in the case where there are two drives). It is also possible to create virtual drives in the system and a bootable USB drive based on any version of Windows or Linux.

Separately, it is necessary to note the TrueCrypt encryption technology, which ensures protection hard drives, optical and USB drives, as well as support for virtual RAM storage for storing temporary information to increase PC performance. Overall, DAEMON Tools Ultra is one of the best solutions in your class.
Barts PE Builder
Bart PE Builder is a software tool for preparing bootable Windows images. To do this, it is enough to have the installation files of the desired OS version, and he will do the rest himself. It is also possible to record images on physical media such as a flash drive or CD. Unlike other similar applications, burning is performed using the StarBurn and CD-record algorithms. The key advantage is a simple and intuitive interface.

Butler
Butler – free utility domestically developed, the main function of which is to create a boot disk. Its features include providing the ability to deploy different operating systems on the drive and choosing the design of the Windows boot menu interface.

Power ISO
PowerISO refers to specialized software that supports the full range of possible manipulations with disk images. It is possible to create ISO, compress or edit finished images if necessary, as well as burn them to an optical disc. The function of mounting virtual drives, in turn, will allow you to do without burning an image onto a CD / DVD / Blu-ray.

Separately, it is worth noting such features as the preparation of Windows or Linux distributions on USB media, Live CD, which allows you to run the OS without installing them, as well as Audio CD grabbing.
Ultimate Boot CD
Ultimate Boot CD is a ready-made boot disk image that is designed to solve various computer problems. This distinguishes it from other programs in the review. Contains software for working with BIOS, processor, hard drives and optical drives, as well as peripheral equipment. These include applications for checking the stability of the processor or system, modules random access memory for errors, keyboards, monitors and much more.

Software for performing various procedures on the HDD takes up the largest amount of disk space. Includes utilities that are designed to display information and control the loading of different operating systems on the same computer. There are also programs with functions for recovering passwords from accounts and data from disks, editing the registry, backup, complete destruction of information, working with partitions, etc.
All of the applications reviewed do a good job of creating bootable disks. More advanced functions, such as working with disk images and virtual drives, are provided by UltraISO, DAEMON Tools Ultra and PowerISO. With their help, you can easily create a bootable image based on a licensed Windows disk. But at the same time, you will have to pay a certain amount for such functionality.
Using Butler, you can make a disk with a Windows distribution kit with an individual design of the installer window, but if you want to completely customize the OS installation process, including the installation of third-party software, then WinReducer is your choice. Ultimate Boot CD stands out from other software in that it is a boot disk with many free programs for working with a PC. It can be useful in restoring a computer after virus attacks, system failures, and more.
Instructions
First, download a boot disk image. It is recommended to use files with the iso or mdf extension. Remember that when creating a boot disk image, you need to take several parameters into account. Otherwise, recording such an image will not allow you to create a new multiboot disk.
Now download and install a program called Nero. Better to use comparatively new version, because outdated analogues may not have the functions needed in a given situation. Run the NeroExpress.exe file. In the left pane of the menu that opens, select the DVD-ROM (Boot) option. A new menu will immediately open. Select the "Download" tab.
Now click on the “Image file” item and click the “Browse” button. Select the required ISO disk image. Click the New button. Now add the necessary files to this disk, if necessary. Please note that the disc will need to be finalized, i.e. further recording of data to it will be impossible.
After creating the desired project, click the "Record" button. Check the box next to the “Finalize disc” option. Now go to the "Record" menu and select the speed at which it will be recorded new disk. Please note that high-speed discs may not be read correctly on relatively older drives. Now open the ISO menu.
Under File System, select the ISO 9660 + Joliet option. Check all the boxes located in the “Easy Restrictions” menu. Click the Burn button and wait until your boot disk is created.
If you need to quickly burn an image to disk, then run the Iso File Burning program. It takes up only a few megabytes on your hard drive. Just click the Browse button, select the ISO file and click on the “Burn ISO” button. Be sure to check the functionality of the created disk.
Sources:
- how to burn bootable iso disk
Multi boot disks used to install the operating system (OS) of a computer. The difference between multiboot media and regular installation media is that a number of programs and drivers are added to the image of the former, which are also loaded from disk and can be installed along with the OS.
Instructions
A multiboot disk allows you to work with a computer that does not have an OS installed. This media is capable of breaking HDD into partitions, format them and perform other operations with the file system. Antivirus, office and any utilities for installation can also be downloaded. Specialized programs can be used to record multiboot media.
Download images of the boot disk and programs that you want to include in the multiboot disk from a suitable Internet resource. Make sure the file you download is in .iso or .mdf format. It is with these extensions that most utilities for burning installation discs work.
Download and install the XBoot program. To do this, go to the official website of the program and select the download section. After the download is complete, go to the folder where the installation file was downloaded. Launch it and follow the installer instructions. If you find a version of the program packaged in an archive, then simply extract it to any folder convenient for you in the archive manager window.
Its main purpose is to install or reinstall the Windows 7 operating system (OS). It can also help to reset a forgotten or lost administrator password. This media can also be used to enter the OS preinstallation environment (Windows PE), which is a minimum set of operating system functions used to prepare the computer for OS installation, launch its installation, and roll back to a previously created restore point.
The first and most important condition is the presence of a so-called Windows 7 installation image file. This is a file containing all the necessary data for installing the OS. It has a file name extension of .iso and is about 4 GB in size. It can be downloaded from various Internet sources, for example, torrent trackers. Typically such sources provide so-called hashes ( checksums) images, which after downloading must be checked to ensure the authenticity of the image and the absence of errors during downloading.
We will need a DVD blank (namely a DVD, not a CD, which is explained by the size of the file - the system image), and one of the programs for transferring (not copying - a bootloader is also written to the DVD) of this image to DVD. This disc can be either one-time recording (DVD-R) or rewritable (DVD-RW), and its recording speed is of great importance does not, since it is produced at very low speeds. The following article discusses several in various ways perform the required task.
Ways to create a boot disk
Now let's move on directly to describing methods for creating an installation disk using third-party utilities such as:
- Ultra ISO
- CDBurnerXP
- ImgBurn
- Windows 7 USB/DVD Download Tool
All of them can be easily downloaded from the Internet and have a simple and intuitive interface that does not require any complex actions from the user. In addition, the installation disk can be made using the tools built into the seven.
Burn a bootable disc using UltraISO
After launching this program, its main menu is displayed, in which you need to select the “File” element, and in the submenu that opens, select “Open”.
A window opens to select a boot image of the seven, in which you need to point to the required iso file and click the “Open” button. Then this window closes and you return to the main menu of the utility. After that, click on the “Tools” item in the main menu and in the drop-down list click “Burn CD image...”. 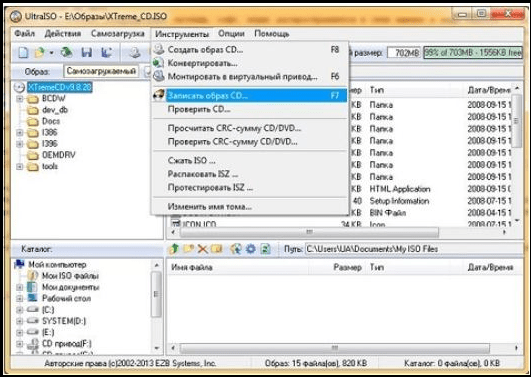
In response to this, a window with recording parameters appears: 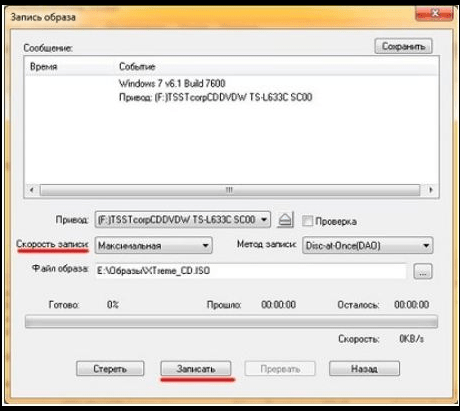
It needs to be set:
- The “Drive” parameter is a DVD device with the future boot disk installed.
- Recording speed is “Minimum”.
- Disc-at-Once recording method.
After this, you need to click the “Record” button. The burning process starts, usually taking several minutes. At the end of the process, the DVD device tray opens, which signals the completion of the process.
Creating a boot disk with ImgBurn
Before you run this utility, you need to install a DVD blank into the DVD device. In the Russified version of the program, its main window looks like this:  In this window, you need to click on the “Burn image to disk” picture, after which a window appears to set the parameters for the image burning process:
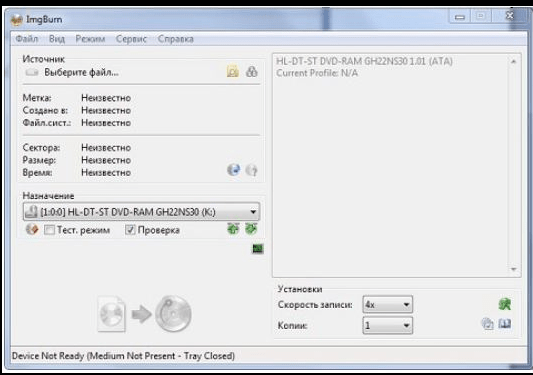
Here you need to set the following parameters:
- In the “Source” parameter, select (yellow button) the required image file.
- In the “Destination” parameter, set the DVD device.
- Check the “Check” checkbox so that upon completion of the recording process, the recorded image is compared with its original file.
- In the “Recording speed” parameter, set the lowest speed.
- Click on the picture with the arrow in the lower left part of the window to start the recording process.
The process of burning the image begins, which also takes several minutes. Having finished recording, the program pulls out the DVD device tray, then pushes it back in and begins the process of checking the recorded image. If the check is successfully completed, the utility plays a melody as a signal that the recording process has completed.
How to burn an installation disc using the CDBurnerXP utility
Despite the presence of “XP” in the name, starting with XP, this utility is functional in all versions of the OS. As for its interface, it is not much different from the ImgBurn interface. This is what the main CDBurnerXP window looks like: 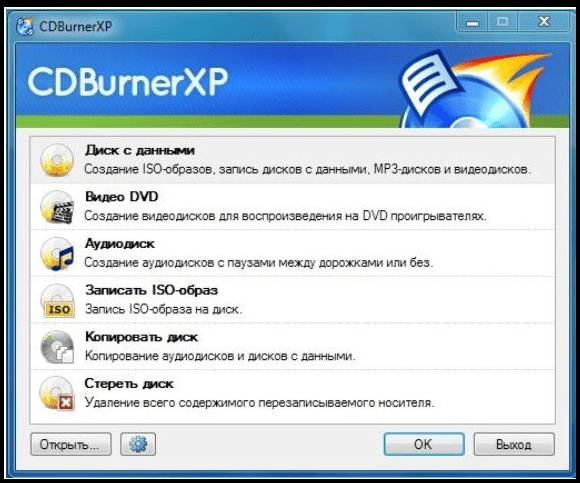
Of course, to make installation media, you should click “Burn ISO image” in this window, and then click the “OK” button. In response to this, a window appears for setting recording parameters: 
What to do now:
- Using the Browse button, specify a file with an iso image of the seven.
- In the “Recording device” parameter, specify the DVD drive, and to the right of it – the minimum speed.
- In the “Recording method” parameter, set Disc at Once.
- Check the “Check data after recording” box.
Other parameters are set by the user at his discretion. The image burning process begins by clicking the “Burn disc” button. Upon completion, a check is performed - comparing the recorded image with its source in the file.
USB/DVD Download Tool
This utility was developed by Microsoft. It can be downloaded from the Internet and installed. The recording process in this utility is divided into several steps, each of which has its own window.
Step 1 of 4. In this window you need to specify the file with the iso image. To do this, click the Browse button, select the required file and click “Next”. In some cases, the program does not like the specified files, about which the user receives a message. If he is sure that the image file was downloaded correctly and is not corrupted, then the only thing that can be done is to use another utility;
Step 2 of 4: This step selects the type of media that will be used as boot media. It can be a USB drive (for example, a flash drive) or a CD. To create an installation DVD, press the DVD button;
Step 3 of 4. At this step, the utility asks you to install a blank DVD disc. You should not try to install a DWD-RW disc that has already been burned - it must be erased in advance. Insert a blank DVD-R or DVD-RW disc and press the “Try again” button. The utility will make sure that the disk is clean and display the “Begin burning” button. We press it, the next step begins;
Step 4 of 4. This is the process of burning the image itself. We are waiting for the message “Bootable DVD created successfully” to appear, indicating the completion of the process of creating the installation disk of the seven.
Recording an image using built-in OS tools
It should be noted right away that this method, although it does not require the installation of third-party programs, is not reliable and sometimes requires repeated repetition due to errors that arise.
To make the installation disk built into the OS, you must complete the following steps:
- Insert a DVD-R disc (or DVD-RW - whichever is better) into the drive.
- When using a DVD-RW, erase all data recorded on it. To do this, in the “Computer” window, right-click on the DVD drive and select “Erase this disk” from the list that appears. A message will appear indicating that all information on the disk will be deleted. Click “Next” and wait for a window to appear indicating that the erasure was completed successfully, then click “Finish.”
- Double-click on the iso image with the left button. If no program is associated with this file, a window opens to select the program to record. In it, select “Windows Disc Image Burner” and click “OK”.
- The Disc Image Burner window appears. In it you need to set the “Disc recording device” parameter, check the “Check the disk after burning” checkbox and click the “Burn” button. The disc burning process will begin.
Sometimes all of the above steps have to be repeated due to errors that occur.
- The need to set a minimum write speed is explained by the fact that DVD discs do not always support the write speed declared by the manufacturer. It follows from this that errors may occur during recording, which can only be detected after the recording is completed - at the verification stage. If using a DVD-R, this will result in the CD having to be thrown away.
- The recording process must not be interrupted under any circumstances - this usually leads to the same thing as described in paragraph 1.
In contact with
Regular disks have been replaced by flash drives and the Internet, but despite this, many continue to use such removable memory media.
In particular, most people use boot disks to, for example, create a startup disk with some game or Windows. There is no point in buying discs with the necessary games and programs; the easiest way is to create a boot disc yourself.
Don't you know how to make a boot disk? You only need one useful program called Daemon Tools. Its popularity is off the charts; in addition, it is free, so you can easily find it online. Its main purpose is to work with images, special files that emulate a regular disk.
Creating Auto-Boot Discs
To burn such a disc, you first need to find or create an image. The main difference between the image is the complete copying of data from the disk, i.e. Not only files and folders are copied, but a full copy of information is created. When you launch the image, the same thing happens as when you install the disk into the computer.
With the free Daemon Tools you can make a copy of any disc. The simplest tool, thanks to which even a beginner can cope with the task:

Select a drive that already has a disk to create a copy and indicate the path where the image will be loaded. It is not necessary to create them yourself; a huge number of all kinds of images from the OS, games, software, and so on are distributed on the Internet.
If you decide to use this, then skip the step of creating an image and go straight to burning the disc.
How are image files written?
Again, the Daemon Tools program will come in handy, which has a special tool for recording images. A special icon is installed on the main panel to perform this operation, and after clicking it, the following window appears:

A blank disk is installed in the CD-ROM on which the image will be written; do not forget to specify the path to the file of the created copy. Just click “Start” and wait until the program creates a boot disk.
Boot disk without programs
Having a ready-made image file on Windows 7, no programs will be required, since this system has a default image burning tool. To use it, right-click on the image and select the item as in the image:

After this, a window opens where you only need to select the disk to record to:

The OS installer media is useful. You never know at what point the system will refuse to work or a friend will need to urgently reinstall Windows, let alone a recovery disk that can bring a dying woman back to life. operating system. Let's look at how to create and burn bootable (installation) media for different cases.
How to create a boot disk for Windows 7
To create a disk or flash drive to boot the system, you need to have with you what you will need directly during the work process:
- the media itself (disk or flash drive);
- utility for working with disk images;
- disk image or Windows 7 system files to create it.
Nothing else is required from the user. To begin with, let's get acquainted with the first, preliminary part of creating a boot disk - building an ISO image for its subsequent recording to media.
Creating and Burning an ISO Disc Image
Creating a boot disk assumes that the user has an ISO image that will be burned to the media. A disk image is a file that is a complete copy of the entire contents of a disk with software and is widely used in creating bootable disks and flash drives. If the image is not available, you can create it yourself without experiencing any problems: only for this... you will need an existing installation disk with Windows 7 or system installer files copied to a separate folder. If you have any of this, you can safely start creating an image for a new boot disk.
ISO is the most popular image format, and it is what most utilities for creating and burning images work with. You can also create a recording file using standard OS tools, but there is no data on the quality of such recording on systems younger than Windows 7. That's why third party programs recommended to use in any case.
Ashampoo Burning Studio Free
This is a free, lightweight utility for working with disks, characterized by ease of use and a laconic interface, as well as the absence of advertising and built-in malware programs. In it you can not only write files to a disk or flash drive, but also create an image in two ways to choose from: from physical media (CD or DVD, which is previously inserted into the drive) and from a folder with files located on the computer.
Working with this utility is very simple: an ISO image is created in just a few clicks.
You can download Ashampoo Burning Studio Free on the official website.
CDBurner XP
This program is also free, very easy to use and is considered one of the best utilities of its kind. It is adapted for older versions of Windows, but it also works great in new ones (unless the antediluvian interface confuses you). Just like the previous one, the program can create disk images from CDs, DVDs and user files, as well as burn them.

The utility is available for download on the manufacturer's website.
Ultra ISO
The most famous and widespread program that is usually used to create and burn discs is UltraISO. A wide range of functions makes this program a universal tool for creating and recording images, so it is recommended to use it. We'll come back to this program when we move on to burning a disc, but for now we'll look at creating an image in it.

UltraISO is not a free program, but on the official website you can download its trial version, which you can use for free for some time.
Video: creating an image in UltraISO
Creating an image manually
If you don’t want to tinker with programs (note that you will still have to when writing to the installation flash drive), then Windows has something for you good news: You can create a disk image through the console using standard Windows tools. To do this, however, you still have to download utilities: this time official tools from Microsoft that work from the console.
However, there is nothing particularly difficult about this.
- First you need to place the files to be written to disk in a separate folder and save it in a convenient location, for example, C:\Win7ISO. Why convenient? Because the shorter the path to the file, the easier it is to register it in the console.
- Then you need to download from the Microsoft website a set of utilities that will be needed when creating the image. The utilities need to be unpacked and installed.
- After installing the utilities, you need to open the command line as an administrator (press the Win + X key combination and select “Command Prompt (Administrator)” in the menu that opens) and enter the following code in it:
oscdimg -n -m -b»C:\Win7ISO\boot\ etfsboot.com» C:\Win7ISO C:\Win7ISO\Win7.iso
Dmitriy
remontka.pro
The console will start creating the ISO image, and all you have to do is wait for the build to finish. After this, the newly created image will be available in the path you specified.
Burning an image to a disk or flash drive
When the boot image is created, all that remains is to move on to the most important thing - writing it to disk. This can be done both using Windows tools and through special programs, some of which have already been discussed above. Programs are a simpler and more popular option, but we will look at both methods.
Burning an image to UltraISO
We will show the software recording method using UltraISO as an example, since this program is the most convenient and popular among users. However, you can use any other utility for this: general principle their work is similar.

Video: how to burn an image to UltraISO
Manual recording
This option is suitable for people who use new versions of Windows (7, 8, 8.1, 10): they have the best implementation of disc burning. In the case of a flash drive, everything is a little more complicated: the instructions will only work for computers with UEFI. If you don't have UEFI, you will have to use programs.
If the system being installed is Windows 7 x32, then this method will also not work.
Let's start by burning the disc. Everything here is extremely simple: you just need to right-click on the image and select the “Burn disk image” option. Of course, you first need to check that the disk is inserted into the drive and there is enough space on it to record the image.
 To manually burn a disk image, just right-click on it and select the appropriate item
 But with a flash drive everything is a little different. To record it, you will need a command line opened as administrator (how to do this is indicated above).
IN command line The following commands should be entered in order:
- diskpart
- list disk
- select disk N (here N is the disk number under which your flash drive is displayed)
- clean
- create partition primary
- format fs=fat32 quick
- active
- assign
- list volume
Ready! The flash drive is formatted as bootable, then you need to copy files to it. It's done like this.

Creating a multiboot disk
To create a multiboot disk (that is, a disk on which not one OS is installed, but several, and in addition more programs), you will need slightly different software.
The best choice for today - free program Sardu, which in addition also provides a choice of many images that it downloads itself.
The program interface is quite complex, so some explanations would be helpful.
 In the main menu of the Sardu program, you can select images and write them either to a flash drive or to a disk
 - antiviruses;
- utilities;
- Linux distributions;
- different versions of Windows;
- other (allows you to upload your own images, but is only available in the paid Pro version).
On the right are the buttons used to record.

Creating a system repair installation disc
To create a system repair disk (this is the one with which Windows 7 can be restored if it fails), you need the disk itself - that's all.

Creating a recovery flash drive is somewhat more complicated.
- In this case, you should create a system image (in the same window where the recovery disk is, there is the “Create a system image” item.
- When the system collects and writes the image, you will need to write it to a flash drive using one of the methods discussed above. A little longer, but more convenient: a flash drive is more reliable than a disk. The only negative: the system image for recovery weighs quite a lot, so it is recommended to use a large flash drive or a removable hard drive.
Reliable media - very important point in the matter of “treatment” or installation of any system. Make sure to burn properly and don't neglect recovery discs: you never know when you'll need to reinstall or roll back Windows. And specialized software will help you with this.
Similar articles
 The best amulets against the evil eye and damage Amulet against the evil eye with hands for children
 How to read the Psalter correctly
 Delicious dishes with sausages
 A glimpse of Bella. Romantic chronicle. A glimpse of genius. Messerer about Akhmadulina Boris Messerer glimpse of Bella romantic chronicle
 I dreamed that I was sailing on a boat on the river
 How to cook beef entrecote in a frying pan
 About the company Foreign language courses at Moscow State University
 Which city and why became the main one in Ancient Mesopotamia?
 Why Bukhsoft Online is better than a regular accounting program!
 Which year is a leap year and how to calculate it