
Outdoor lighting cable by air. WEBSOR Electrical Information Territory
When organizing indoor wiring, many people do not think about choosing a wire and often use the first option they come across. When laying outdoors, this approach is unacceptable, because there are a number of negative factors - temperature fluctuations, the influence of UV rays, high humidity, the risk of mechanical stress, and others. This is why it is important to know which wire to use for outdoor wiring and what to consider when installing it.
Design and marking features
In order not to make a mistake with your choice, it is important to understand the intricacies of marking and the decoding of each letter in the product name. All cables are conventionally divided into two categories - single-core and multi-core.
The core itself can be solid or formed from many wires of small cross-section. In the second case, the wire acquires additional softness, bends better and practically does not break if bent.
In the manufacture of cores, as a rule, two types of metal are used - aluminum and copper. The exception is special products where the use of alloys is allowed. By the way, the cable for outdoor SIP wiring has aluminum-steel cores.

For installation at home, wires with copper conductors are used, which have the best characteristics and are designed for high currents. Aluminum cores were previously used due to their low cost and greater availability, but today they are abandoned due to poor corrosion resistance and brittleness.
When making insulation for wires, the following can be used:
- Rubber.
- PVC material.
- Polyethylene.
- Lead and other materials.
Wire marking
If the core material is aluminum, the wire is marked with the letter A. Copper is the default core material and therefore is not reflected in the marking.

According to their purpose, the wires are marked as follows: Ш - installation, K - control, M - installation and others.
Insulation (material):
- P - polyethylene.
- N - non-flammable rubber.
- B - PVC.
- K - nylon.
- Ps - self-extinguishing polyethylene.
- C - lead.
- PV - vulcanizing polyethylene and others.
Cable protection level:
- B - with an armored shell.
- G - without armor (flexible).
- A - paved and so on.
In addition to the letter designation, there is also a digital marking. In it, the first symbol reflects the number of cores, the second - the cross-section, and the third - the rated voltage class. If there is no first digit, the cable has one core.
Which wire to use for outdoor wiring: the best options
We smoothly approached the main question of which wire to use for external wiring in order to be confident in its reliability and ability to withstand negative natural influences. The main requirements for such products are combustion resistance, strength and non-hygroscopicity.
The most popular types include:

Capable of conducting voltages up to 1000 V. Structurally, the product is a group of wires with individual insulation and aluminum conductors. Such products have their own subtypes (SIP -1, 2, 3, and so on) and are produced in many countries around the world. The main feature is the black insulation of the wires. The use of such a cable guarantees greater reliability during aerial installation and reduces installation costs. An additional advantage is its compactness, which allows the cable to be used even in conditions of limited space.

AVBbShv is a product based on a group of wires with aluminum cores combined under one armored sheath. One of the cable varieties is VBBShV - a version with copper wires. A special feature is the possibility of laying in the ground without the use of additional protection and resistance to mechanical stress. Main characteristics:
- The presence of steel tape in the shell.
- The wire insulation is made in different colors for ease of dialing and connection.
- The outer shell is black.
- Resistant to moisture and temperature changes.
- Resource - 30 years.
Due to the presence of armor, cable products of this type are characterized by increased rigidity, which creates additional problems during the installation process.

NYY is a cable characterized by versatility and reliability in operation. May have copper or aluminum conductors. This product is increasingly used for external wiring in the ground or by air, as well as for connecting electrical receivers indoors. Main characteristics:
- Resistant to water and fire.
- Compliance with international standards.
- Availability of multi-colored wire insulation.
- Convenience of organizing outdoor wiring.
- The outer shell is black PVC plastic.
- Resistant to temperature changes.
- Resource - 30 years.
This cable is produced in many factories due to its versatility and reliability. The main competitor of the product is considered to be the VBBShV cable, which was mentioned above.

Which are actively used in production and when creating outdoor wiring. Its peculiarity lies in its versatility and ability to operate in various conditions. Specifications:
- Compliance with the standards of the German Electrical Engineers Association.
- Heat resistance and ability to operate over a wide temperature range.
- Non-hygroscopic and durable, which allows the product to be laid in concrete or in a layer of plaster.
- The cross-section is round, the color is gray.
- Fire resistance.
When installing wiring outdoors using NYM, protection from sunlight is recommended. Such cable products are produced at many factories located in Europe and Russia. Some manufacturers produce cables according to individual specifications, but such products have a lower price and, accordingly, worse quality. The use of such cables for external wiring is not recommended.
Alternative solutions

In addition to those discussed above, it is worth highlighting a number of other brands of cables used in organizing street wiring:
- with PVC sheath and marked wires. The number of cores is from two to five.
- . It is distinguished by its flat shape and double insulation, which allows the wire to be used outdoors .
- PV, APV, PV1 and other wires are suitable for laying external wiring, but only if they are located in pipes. The main disadvantage is the presence of single insulation, which makes them vulnerable to mechanical stress.
- VBBvng is a product characterized by fire resistance and flexibility. The number of cores is from one to six. Most often used to connect portable devices.
After the 2000 Bell Telecom building tragedy in New York City, cable manufacturers changed safety standards. The reason is the release of toxic gases from the braided wires during the combustion process, which is why most people died. In addition, toxic gases also negatively affect complex electronics. That is why at the present stage manufacturers focus on the production of non-flammable wires characterized by low levels of gas and smoke emissions.
Rules for installing outdoor wiring
When choosing wires for external wiring It is important to take into account the features of its laying. There are a number of rules regarding protection and distance from residential buildings. So, the distance from the cable to the porch should be at least 250 cm, and to the balcony or window - 100 and 50 cm, respectively. If the wiring is vertical, the distance from the ground surface should be 275 cm, to the balcony or window opening - 100 and 75 cm, respectively.

If the wire is laid along the wall, you should follow a number of rules:
- In the case of using individual wires, the use of plastic or metal pipes is mandatory.
- The connection of the wires must be ensured using terminal blocks (twisting is prohibited).
- When hanging a cable between buildings, it is necessary to use a cable and a corrugated sleeve.
- Wire connections should only be made in sealed junction boxes.
- Installation of wiring on the roof is prohibited.
When laying wires on the street, it is worth considering a number of important nuances. Thus, the network of a private home can be connected to a power source of 3 or single-phase voltage (380 or 220 Volts, respectively). If wiring is done by air, it is recommended to use SIP-4 wire.
Armored wires of the VBShv or AVBShv brands are more suitable for underground installation. A special feature of such products is their resistance to water and mechanical damage. For external wiring, as a rule, wires with an aluminum core of larger cross-section are used, which reduces installation costs.

Another factor that must be taken into account is the installation method. The most popular options:
- Air. This option is suitable for cases where the cable has a length of 3 meters or more. The advantages of the method are high installation speed and ease of maintenance. On the other hand, aesthetics suffer and the service life of the product decreases. In the process of such installation, a steel cable is used, to which the cable itself is attached using ties.
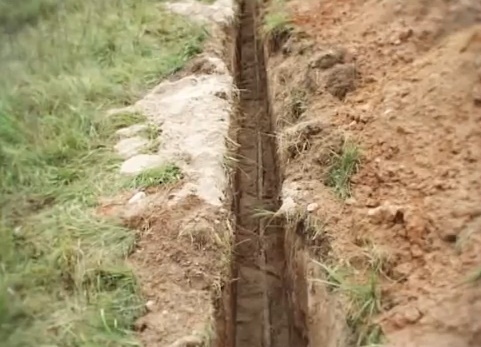
- Underground. This method is used in most cases when it is necessary to lay a long cable. Installation is carried out in several stages - choosing the cable type, marking the location and laying it. The depth of the trench is about 70 cm. Below there should be a “cushion” of sand about 8-10 centimeters thick. The cable must be laid without tension, after which it is covered with sand, soil and finally compacted.
An example of cable laying in a trench is shown in this video:
Results
When choosing a wire for outdoor installation, it is worth considering many factors, as well as thinking about the installation method in advance. Remember that your peace of mind, safety, and sometimes even your life depend on the correct choice of cable and compliance with the rules of the electrical installation instructions during the installation process.
Street wiring is used as a way to bring electricity to the house. It is used to install outdoor lighting devices and CCTV cameras. It must comply with safety standards and be easy to use. Properly done electrical wiring will eliminate the occurrence of undesirable moments, such as a wire break or short circuit.
Items included in electrical wiring
Electrical wiring is cable and wire products that include cables, wires and cords. A cable is a conductor; it is protected by a special sheath in which the conductors are located. The cores are one of the most important elements in a cable; they are made from copper or aluminum wires, solid or stranded, single-wire or multi-wire. The thickness of the wire affects how much current can pass through it without heating it up. Due to the fact that powerful current collectors (power tools, vacuum cleaners, kettles, lawn mowers, etc.) are increasingly being used in everyday life, copper has come to replace it. Because copper conducts current better.
The purpose of insulation is to protect the conductor carrying current; for this purpose it is made of plastic, polymer and rubber that prevent the spread of current in the wiring.
The wiring includes:
- Input circuit breaker.
- Group line machines.
- Electric meter.
- Protective devices - RCDs, circuit breakers, fuses (plugs)
- Zero and ground buses
- Connecting conductors
How to choose the right electrical wiring? What to follow? First of all, the capabilities of the room and fire safety, and not the interior of the room. If the rooms are well heated and do not have high humidity, then preference can be given to any type of wiring. In rooms such as the kitchen, bathroom, and utility room, combined wiring is used. This is especially important for outdoor electrification. It is better to hide the wires in special pipes with a plastic or metal sheath, which is guaranteed to prevent short circuits.
Type of postings

The types of electrical wiring on today's market are practically no different from those that were popular half a century ago, the only thing is that the insulation materials have changed somewhat and taken on a more modern look. The simplest installation methods include open electrical wiring; it is laid on ceilings and walls, but is not masked.
There are three types of such wiring:
- Portable
- Mobile
- Stationary
Useful information about external wiring:
It is better to use wires with stranded flexible cores. They are suitable for exposed wiring and are flexible to fit into corners with ease. A cable with a larger cross-section can withstand greater loads.
You need to choose a thick wire carefully, since it is difficult to give it the required shape. The cross section is calculated after calculating the power of all devices that will be connected to the cable.
Disadvantages of external wiring:
- Wires are not protected from external damage
- Unaesthetic appearance
Advantages:
According to the PUE, the wiring is properly hidden and fireproof.
- The chance of damage is zero. The wire is protected from ultraviolet rays, low temperatures, and humidity. Because of this, the shelf life of the wiring increases.
- Saving material.
- Easy cable replacement
The main disadvantage of hidden wiring is the significant cost of materials.
Rules for installing street wiring

Optimal distance from the wire to residential premises:
For a horizontal route:
- to the porch - 2.5 meters;
- to the window – 0.5 meters;
- to the balcony – 1.0 meters.
For vertical installation:
- to the window – 0.75 meters;
- to the balcony – 1.0 meters.
Distance from the ground – 2.75 meters.
When laying wiring along the walls, you must follow the following rules:
- Insulated cargo is placed in metal or plastic sleeves.
- Using special fasteners, the hoses are mounted to the load-bearing surface every 1 meter.
- Installation is best done using terminals and clamps.
- It is not advisable to use twists when connecting wires.
- If they are still present, they need to be insulated with a special tube or PVC tape.
- A holding cable is pulled between the two buildings, after which a corrugated sleeve or tube with wires is attached to it.
- All connections are made only in sealed junction boxes.
- Installing external wiring on the frame is prohibited.
For installation you will need the following tools:
- Screwdriver
- Pliers
- Wire cutters are needed to cut the cable in the required place.
- A knife is needed to strip the cable tip before installation.
- Indicator for determining voltage.
- Electric drill for making holes.
- Hammer
In addition to these tools, you will need insulating materials.
Choosing a cable for street wiring
Cable types:
- SIP - necessary to supply power from the pole to the house.
- PVA - has flexibility, PVC shell, which makes it round and dense. The wires are marked. The number of cores is from 2-5. PVA is used for domestic purposes.
- VVG - power cable. The veins range from 1 to 5. Flat in shape. PVC insulation TPZH. Due to double insulation, it is a suitable option for external wiring.
- PPV, PV1, APV, APPV are suitable for external wiring, provided that they are located in pipes, since they have single insulation.
- VBBShv - armored cable with copper conductors. Able to withstand temperatures from -50 to +50 Celsius. Suitable for conducting electricity underground.
Varieties:
- AVBBSHv is a cable with an aluminum core.
- VBBShvng - fire-resistant cable.
- KG - flexible cable.. Cores - from 1 dl 6. TPZh insulation - rubber. Alternating voltage up to 600V, frequency up to 400 Hz, constant voltage 1000V. Operating temperature -60 to +50. Used to connect portable devices.
- NYM - made of copper, TPZh PVC insulation, outer shell fire-resistant PVC. Chalk rubber located between the insulation layers makes the cable more durable. Copper conductors, from 2 to 5 conductors. It is used for outdoor installation because it is moisture-resistant and heat-resistant. Operates at temperatures from -40 to +70. The cable must be hidden from ultraviolet rays. Compared to VVG, the NYM cable has greater durability and is more convenient to use. However, its cost exceeds the price of VVG.
Almost all wires with the letter A in their name are made of aluminum. All the rest are copper. The number in the name indicates the cross-section and number of cores.
When choosing external wiring, it is necessary to ensure its safety, the main condition of which is the correctly selected cable. First, connect the current source. If you plan to install it outdoors, we choose a place where it will pass through the air, but this will create many difficulties, since it will occupy a considerable area, in addition to which it will be vulnerable. In this case, it is more advisable to lay the cable underground.
Having chosen the underground installation method, you will have to use a cable that is protected by PVC insulation. It is placed in a trench at least 4.5 meters long under the courtyard, 7.5 meters under the grass or lawn.
To lay the cable outdoors, you can use wires made of copper or aluminum. A cable with aluminum conductors is less flexible and lasts less than a cable made of copper, but is also quite affordable in price.
Street wiring installation basics
SIP and AVK wires are used for wiring installation. A private network can be connected to a voltage of 380 or 220 volts. The best option for connecting over the air is SIP-4 wire.
Cables with armor AVBShv and VBShv are used to conduct electrical networks underground. These cables are excellent for installation in trenches as they are resistant to damage and groundwater.
For external wiring, aluminum wire is usually used in the case of wiring between the pole and the panel. This method helps reduce costs.
Determining the most suitable installation method
Conducting a cable by air is more advisable when laying a cable several meters long. It will be quick in terms of time, but perhaps not particularly aesthetically pleasing or reliable. The underground wiring method is distinguished by its durability and quality. When the distance from the pole to the living space is large, they resort to the method of laying it underground.
Laying the cable underground
At the very beginning, select and mark where the supports will be installed and
where the cable will be laid. If there are large trees on the site, a distance of 1 meter should be maintained. We dig a trench at least 70 centimeters deep, if we take into account the pillow it is 80 centimeters. Carefully check the trench for the presence of various objects that could damage the cable sheath.
We prepare a sand cushion; its layer should be about five centimeters, ideally 10 cm. Using a megger we check the cable for integrity, only after that we can lay it in the trench. We lay the cable in a “snake” pattern without tension. Then we cover the cable with a ten-centimeter layer of sand, a fifteen-centimeter layer of soil, compact it and lay down signal tape. Now you need to finally fill the trench. Over time, the soil will settle.
How to lay it through the air?
For aerial installation you will need a galvanized steel cable. With a length of 80 meters, the cross-section should be from 1 to 1.5 mm square. Laying is carried out by fastening the cable, using nylon ties along the entire length every 50 meters. There is no need to tension the cable like a string. The attachment to the cable should have some slack.
Street lighting. Selecting the wire

Flexible wire is suitable for outdoor lighting like no other. The presence of lighting in the yard is important in the dark; in addition, it is necessary to provide the area with sockets to connect various devices, such as mowers, pumps, etc.
External wiring must be protected from precipitation. The wire itself must have two or three cores and double insulation; it must be carried out in a protective sleeve.
On the street, SIP-4 is installed according to the principle of internal wiring.
The only difference is the need to install distribution boxes, which are best placed indoors. It is better to connect the wiring from below so that water does not flow down it. The wire for outdoor lighting should be connected only to devices and sockets protected from moisture. There must be a rubber seal at the junctions of wires and devices. A bracket in the shape of a round bowl is necessary to allow water to flow through it without getting on electrical appliances. Sockets must be equipped with covers.
Selecting a switch for external wiring
For external wiring, you can choose a single-key switch or, depending on how many light sources you need to control. There is no need to make recesses in the wall for installation boxes. The non-conductive gasket and switch are mounted to the wall. We select a switch based on its technical data. Pay attention to the rated voltage and current, degree of protection. Leningrad brand products are in demand.
Creating street lighting poses certain difficulties that are associated with the correct installation of cables powering outdoor lamps. At the same time, when carrying out installation work in the ground with your own hands, you must be careful and strictly follow the standards and requirements prescribed in the relevant special documentation.
Moreover, for proper operation of street lighting, it is important to lay the power cable in accordance with all standards and requirements. Our article will tell you what the regulatory documents say and how to correctly install outdoor lighting cables on the street.
What to rely on in theory
Everything related to the creation of lighting, especially the street plan, is spelled out in the appropriate documentation. These include:
- SNiP, which stands for “building codes and regulations”. This documentation provides standards for the level of illumination, as well as the requirements for organizing external and internal lighting;
- SanPin. This abbreviation stands for “sanitary norms and rules”. This document serves as a supplement to SNiP and comes to the fore only when it concerns public premises, especially educational ones;
- GOST These documents list all the requirements that lighting and other devices used in certain situations must meet.
Laying cables in the ground to create street lighting is a labor-intensive process that ultimately must:
- provide high-quality power to outdoor lighting fixtures;
- create conditions for the safe movement of people along the ground in which the cable is laid;
- prevent moisture from penetrating inside the electrical component of the wiring. This situation carries the risk of a short circuit, which can lead to a fire.
In addition, it should be remembered that violation of the technology for laying cables for outdoor lighting in the ground can lead to electric shock to a person. Therefore, in order to avoid negative consequences for yourself and others, these installation works should be carried out only after detailed familiarization with all special documentation. Below are the requirements, standards and work procedures specified in this documentation. Everything necessary for the work can be found in the relevant sections and subsections. Here we will consider the main and most important aspects of laying for understanding.
Start of work on organizing lighting
When starting to create an outdoor type of lighting, the first thing you need to do is create a project. The following points must be taken into account in this document:
- relief that exists on the street or on the plot of a private house;
Terrain variant
- the level of illumination required for a given area;
- power consumption that the installed lighting electrical equipment will consume;
- cable cross-section and its length in the ground;
- the number of lighting fixtures that will be installed on a specific section of the street;
- what system will be installed to control the external type of lighting, as well as its protection system;
- option that will be used for electrical installation of the external lighting system.
Remember that the project, after it is completed, must receive approval from special authorities responsible for the safety of organizing outdoor lighting.
Today, laying the power cable to lighting fixtures can be done in two ways:
- air option. Here the cables are thrown between the pillars and brought to the building from above. But this method cannot always be used due to various restrictions (lack of outdoor lighting poles, etc.);
Pay attention! This method involves packaging the cable in a pipe or special winding to eliminate the risk of negative influence of various weather phenomena.

Aerial cable routing option
- in the ground. Here the wire is laid in a specially dug trench. The dimensions of the trench are determined by the number of cables that will be laid in it, as well as their cross-section and power consumption of the outdoor lighting system being created.
Pay attention! All requirements and standards that must be strictly followed during the process of overhead or underground installation are spelled out in detail for each specific case in SNiP and GOST.
The most labor-intensive and difficult is installation in the ground. Although aerial conduct also requires special skills and knowledge.
Let us consider in more detail the process of electrical installation in the ground, as the most complex and dangerous option for installing street lighting.
Start of excavation work
Once this method of laying the cable for street lighting has been chosen, you should not immediately start digging a trench. Before starting direct excavation work, you need to obtain all the necessary permits, as well as approve the project, which must contain all measurements and parameters for the trench and other aspects of the work.
Pay attention! Obtaining permits and approving the project is necessary, among other things, in order to avoid the situation of damage to communications already existing in the ground when digging a trench.
Cable trench
To go through all the organizations at once and get the desired permit, you need to study the geological basis and add your power system for street lighting into it.
After this, to create a trench in accordance with all the rules and regulations, it is necessary to carry out the following manipulations:
- measure the territory of the site at the place of work;
- then mark the future trench. To do this, you should use a special device - a level. It will also help determine the exact location of the lighting poles based on the previously created project;
- According to the markings, dig a trench in the ground.
At this point, the stage of creating the trench ends and you can begin the actual laying, according to the created project.
What you need to know when installing
Outdoor lighting cable that will be placed in the ground must have an adequate level of protection against potential or accidental damage. These requirements are clearly stated in the regulatory documents described above.
The developed project must indicate the type and features of the cable to be laid. If it is made of polyethylene, then for its proper installation in the trench, the wire must be in a special pipe.
Pay attention! Placing it in a special pipe will reliably protect the wire from any external mechanical damage.

Pipes at the bottom of the trench
There are situations when an armored cable is used (for example, VBBShV). In this case, pipe installation does not occur. This is done only in those places where the cable will be laid under the roadway (according to the requirements of SNiP and GOST). For such an armored cable for the lawn part, the laying depth must be at least 0.8 m (the smallest permissible value) from the fixing (reference) mark on the ground. When placed under the road, the depth will be no less than 1.25 m.
Cable laying for street lighting occurs as follows:
- a layer of sand 15 cm thick is poured into the trench at the bottom;
- then the sand is abundantly moistened with water, which will simplify and make further compaction more effective;
- special vibrating plates should be used to compact sand;
Pay attention! After compaction, the 15 cm layer of sand should turn into 10 cm.

Vibrating plates for compacting sand
- after this, electrical measurements of the cable should be carried out to ensure that there are no holes in the insulation;
- Direct installation begins from the cable entry into the structure or building. Laying the wire, if there are lighting poles, starts from the last pole;
- then the cable is unwound along the entire length of the prepared trench. In this case, it is necessary to give allowances for connecting the wires to the lighting poles (if they are installed);
Pay attention! The size of the allowance will depend on the installation location in the junction box post.
- To install the wire in the support, you need to cut out a technical window in it. It can be prepared in advance. A cable is inserted into it. A similar procedure is repeated for all existing lighting poles.

Cable laid in a trench
After the cable has been laid along the entire length of the trench and brought to all the poles, it is necessary to perform electrical measurements again. They will help ensure that during the installation process the power cable was not damaged in any area of the insulation. These requirements are specified in the regulatory documentation.
The final stage of installation
Once you have ensured that the cable has not been damaged during installation, the trench can be backfilled. All laid communications should be covered with sand. Its layer, as at the bottom of the trench, should be 15 cm. The sand, according to the scheme described above, is first moistened with water and then compacted. After this, the trench is simply filled with soil to half the remaining depth. Now you need to place a special signal tape in it. It will serve as an additional signal that a cable is laid below.

Laying warning tape in a trench
It is especially important to lay such a tape when laying it around the territory of a private house. It will protect the gasket from accidental excavations, which are most possible in this situation. After this, the remaining soil is poured into the trench and compacted.
Rules for laying power supplies in the ground
The laying of power supply lines in the ground is carried out in accordance with a number of rules:
- laying depth - 0.4-0.7 m;
- the trench should not be located at a distance of less than 0.6 m from the foundation;
- there should be a layer of sand on top and bottom of the gasket;
- Cables in the same trench can be spread at least 0.1 m apart. This should be taken into account when determining the width of the trench;
- There should be no trees near the installation. The minimum distance to them should be 2 m;
- distance from underground utilities - 2 m;
- the distance between intersecting cables is at least 0.5 m;
- connection between cables occurs only using special couplings.
All these requirements are specified in GOST and the relevant sections of SNiP. For each individual situation, this documentation contains its own requirements and standards, which are determined by the specifics of certain types of electrical installation work.
Conclusion
Proper laying of the cable in the ground to create outdoor lighting is the key not only to the high-quality operation of the lighting system, but also to the safety of people moving above it. All standards and requirements that you should know before starting this work are given in GOST, SNiP and SanPin.
 Calculation of lumens per square meter for different rooms
Overhead line > Linear fittings NILED for VLI 0.4 kV
Application of SIP in outdoor lighting networks (NO)
In four-wire NOs, as a rule, SIP-2 with a cross section of 3x16+35 is used; 3x35+35 and 3x50+54.6 mm2. The use of SIP-2 (old name SIP 2A) with a cross-section of 3x16+35 to power a small total load is not practical from an economic point of view, and sections with a cross-section of 3x70+54.6 mm2 require additional calculation justification. SIPs with a zero-carrying residential cross-section of 70 mm2 in NO networks are used mainly in rural areas on long lines or in lines with a high linear density of installation of lamps (for example, in power lines for poles with multi-luminaire lighting installations).
NO networks in cities are 3-phase with a solidly grounded neutral, they use 4 and 5-wire lines. Five-wire lines in which the TN-S grounding system is implemented are recommended for use on streets with heavy pedestrian traffic and in the territories of children's institutions, i.e. in places where increased electrical safety of the network is required.
The need to use combined cable-overhead lines requires solving the problem of ensuring high reliability of cable-overhead connections. Such a transition from a section of the distribution line, made with a cable in the ground, to a section made using SIP-2, is mounted in the base of the NO support or in an attached cable box, and the rise to the top is carried out by SIP-2 in the body of the support with their exit to the outer side of the support through special holes. The holes should not have burrs or sharp edges, and in the best case, they should be equipped with rubber or plastic bushings. The electrical connection between the cable and the SIP is made using a standard set of fittings. At the point where the cable is connected to the SIP, it is necessary to ground the armor of the cable and support (or attached cable box) using a branch clamp P 71.
The use of SIP with an uninsulated zero load-bearing conductor SIP-1 in a large city is not recommended due to the high chemical aggressiveness of the external environment, which causes intense corrosion of the uninsulated conductor.
Distribution lines of NO in courtyard areas, as a rule, have a short length (up to 300 m) and feed a limited number of low-power lamps. For such lines, in some cases, it is justified to use bundles of load-bearing insulated conductors and a zero working conductor with a cross-section of 16 and 25 mm2.
Branches from distribution lines to luminaires are carried out according to a 3-wire circuit. A fuse or personal protective circuit breaker must be installed in the power supply circuit of each lamp. Protective grounding of each support and bracket for mounting the lamp should also be provided.
Lighting connection is carried out according to the following diagrams:
Line with combined working and protective neutral conductors
Line with separated working and protective neutral conductors

Connecting an outdoor lighting fixture to a SIP

- P 21 or P 616 clamps for street lighting and entry into the house 2 pcs.
- ES 1500E intermediate suspension kit 1 pc.
- E 778 strap 3 pcs.
- F 207 fastening tape 2 meters
- NC 20 clamps for fixing the tape 2 pcs.
- PF + FG 106 (or FG 110) fuse housing with removable fuse 1 pc.
Note:
To ground the lamp body, you need to add one more clamp P 616 or P 21 - 1 pc.
Clamps P 71 and P 72 are also designed for street lighting.
These terminals allow multiple connections from the branch side.
Clamp P 72 is designed for two branches from one point.
To connect three or more lamps, it is advisable to use the P 74 clamp, designed for four branches from one point.
Name, designation |
Qty |
|
1
|
Anchor clamp PA 1500 or PAC 1500
|
12 |
Connecting the lamp

Position |
Name, designation |
Qty |
Weight, kg |
Bracket KS2 see 25.0017-37 |
|||
Clamp see 25.0017-42 |
see table |
||
Grounding conductor 3P6 see 25.0017-43 |
0,75 |
||
Clamp P21 for branching conductors with a cross section of 1.5-35 mm2. |
0,125 |
||
Lamp |
|||
Wire with rubber insulation PVA 3x2.5 GOST 7399-80 |
|||
CD35 Die Clamp |
0,13 |
||
Clamp P 72 for ZP6 |
|||
When connecting two lamps on one support, instead of the P 21 clamp, use the P 72 clamp. When connecting three or more lamps, use the P 74 clamp, designed for 4 branches from one point. |
|||
You can’t do without lighting in the area near your house. Even at a dacha far away, there should be at least minimal lighting. It’s somehow calmer and more comfortable with him. And street lighting of a permanent home is also a way to decorate the area, giving it more personality in the evening.
Functions and purpose
- Security. In illuminated areas, there is less chance of getting away with impunity, which is why attackers try to avoid such areas. For security, they place lamps near the gate, on the porch, near outbuildings. They are placed at a considerable height to illuminate a larger area. The peculiarity of this type of street lighting is that it stays on all night. There is an option to save money - install motion sensors. With this device, the light turns on only when there is at least some movement in the sensor’s coverage area.
- Ensuring movement safety. To avoid stepping on something left on the path in the dark, they are also usually illuminated. Lighting is required on stairs and around water bodies. Most often, special street lights with medium-height legs are used for this. They are installed at some distance from each other on one or both sides of the track. This lighting is turned on until the owners go to bed.

- Decorative. To make the yard or garden look no less attractive in the evening than during the day, use decorative lighting. It is usually located on an open gazebo, near or other decorative elements on the site. With such lighting, street wall lamps, garlands, LED strips, etc. are used. This street lighting at home works only when necessary.

- Festive. To create a festive atmosphere, houses and yards are decorated. Festive illumination is not mandatory, but such a nice type of lighting.

Typically, the lighting on the site of a house - country or country house - is comprehensive. There are at least a lantern at the doors and gates, and a couple of lanterns along the main paths. Floodlights controlled from the house can be installed to illuminate the area if necessary. This is the minimum that ensures a normal degree of safety and convenience.
Selection of lamps
Outdoors it is necessary to install special dust- and moisture-protected lamps. The degree of protection of the housing is indicated by the safety class. It is designated by the Latin letters IP and two numbers that follow it. The first number reflects the degree of protection against dust, the second - moisture. The lower the number, the lower the protection. For example, IP 44 has a lower protection class than IP 65. A specific explanation of the meaning of each number is shown in the photo below.

It is clear that street lighting at home is best done with lamps of class IP 68, but they are quite expensive, and their range is not so wide. But you won’t have any problems with their operation - neither during rain, nor during strong winds carrying dust.
Which lamps to use
If we talk about lamps for street lighting, it is best to use not incandescent lamps, but LED or economy lamps. The best option is LED. With low power consumption they shine very brightly. For example, a lamp consuming 7 W produces light as a 50 W incandescent lamp (or 650 lm). At the same time, they practically do not heat up, so that nearby plastic parts do not overheat. The scope of application is somewhat limited by the operating temperature range from -20°C to +40°C.
If you want to further reduce the cost of street lighting, you can install solar-powered lamps. By the way, these are also LED lamps, the housing of which contains a rechargeable battery. During daylight hours, the battery accumulates energy, which is then used for lighting. Such lamps come in different formats - from small ones that are stuck along the path, to solid floodlights that can be used to illuminate roads.

In general, solar-powered street lamps vary in design and installation method. The simplest options - garden ones - can simply be stuck into the ground (pictured on the left), there are also hanging options that can be hung on trees or a veranda. There are sealed models that can float in water. Running such a lamp into a pond is a great solution (second image from the left).
Not long ago, models appeared that can be built into a walkway or staircase (right). They cost quite a lot, but if you consider that installation costs are minimal (no need to lay cables), and there are no lighting costs at all, then such an investment is extremely profitable.
Automation on/off
Despite the fact that the presence of sensors requires additional costs and also complicates installation, it is convenient and economical. There are time relays that can turn the street lights of a house on and off at a given time. It makes sense to install such systems on security and functional lighting. You can also think about installing a relay for decorative lighting - also convenient.

In less-frequented places, where you only need to turn on the lights when you are there, you can install motion sensors. They can also be part of security lighting - if there is movement, spotlights that were not working before will turn on. The surprise will not be pleasant. Another thing is that the sensor can trigger on a dog or other animal that comes into its field of view. But the security functions will still be more effective.
Another opportunity to automate the street lighting of a private home is to install a photo relay. It reacts to a decrease in the amount of light, including the lamp power circuit. Also in automatic mode, the power turns off when the sun begins to rise.
Another video on the topic
Wiring and work procedure
First of all, it is necessary to draw up a detailed plan of the illuminated area, which indicates the placement of all lamps. Next, you need to develop a route that will connect those light sources that need power (except for those powered by solar panels). A separate automatic circuit breaker must be installed for street lighting. In some cases, several separate power supply lines may be required (for example, one for lighting the fence and the area in front of the house, and a second for the backyard).
Choosing a cable
It is advisable to lay the cable for powering the lamps underground. The minimum laying depth is 80 cm; it is advisable to use armored cable types. Laying is allowed, but in a protective shell (special corrugated hose or asbestos-cement pipes).

Aerial cable laying for lamps is also allowed, but, firstly, it spoils the overall impression, and secondly, it is necessary to find a cable whose sheath is not afraid of ultraviolet radiation. These are certain types of polyethylene, the shells of which significantly increase the cost of cable products. Most often, VVG cable is used here, but it requires protection from ultraviolet radiation. It must be laid in cable channels (if they run along the walls of buildings) or corrugated sleeves. Without such protection, within a few years (3-4 years depending on the region), the shell will crack, which can lead to failure of the entire system.
Where to put switches
A few words about choosing the location for installing switches for street lighting at home. The system can be quite complex - there is a separate power supply to the lanterns on the fence, a separate branch for lighting along the paths, another branch for decorative lighting. But it is advisable to concentrate all switches inside the house, and most conveniently - near the front door.
The inconvenience of this scheme is that you need to turn the lighting off and on from home. This scheme can be made more convenient using a remote control system. But this is expensive equipment. Installation will cost less. They make it possible to turn on/off the light from two/three points. You can put one inside the house, the second one on the fence, near the garage, etc.
Related articles
 The best amulets against the evil eye and damage Amulet against the evil eye with hands for children
 How to read the Psalter correctly
 Delicious dishes with sausages
 A glimpse of Bella. Romantic chronicle. A glimpse of genius. Messerer about Akhmadulina Boris Messerer glimpse of Bella romantic chronicle
 I dreamed that I was sailing on a boat on the river
 How to cook beef entrecote in a frying pan
 About the company Foreign language courses at Moscow State University
 Which city and why became the main one in Ancient Mesopotamia?
 Why Bukhsoft Online is better than a regular accounting program!
 Which year is a leap year and how to calculate it