
DIY New Year's coffee magnets. A souvenir for everyone! “Coffee trio”: DIY refrigerator magnets Doggie magnet made from coffee beans
Handicraft master class. Coffee magnet “Kitten with a Ball”
This master class is intended for educators, teachers, older preschoolers, younger schoolchildren, as well as those who like to decorate the interior with their own hands and create original gifts. A kitten made according to this master class can be a wonderful gift or interior decoration, taking pride of place on the refrigerator.
Target: learning how to make a coffee magnet “Kitten with a Ball”.
Tasks:
- teach how to make crafts from coffee beans;
- develop fine motor skills, creative imagination, fantasy, aesthetic taste;
- cultivate perseverance, accuracy, and interest in working with coffee beans.
The kitten is fiddling with a ball:
Then he will creep up to him secretly,
Then he will start throwing himself at the ball,
He will push him, jump to the side...
Can't guess
That there is not a mouse here, but a ball.
Barto A.L.
For work we will need:
- a sheet of paper,
-thick cardboard,
-watercolor,
-tassel,
-scissors,
- jute twine,
-coffee beans,
- glue “Moment-crystal”,
-nail polish (pink color),
-sisal,
- eyes,
- decorative ball,
-satin ribbon or organza,
-paint in a can (silver color),
- glue gun,
-magnet
Today I bring to your attention a tutorial on making a coffee magnet “Kitten with a Ball”
To create it, you need to draw a pattern on a piece of paper and cut it out

Then transfer the pattern to thick cardboard

Cut it out

We cover all the details with watercolors on both sides, mixing brown with black, trying to find a shade close to coffee beans. This is necessary so that there are no gaps when gluing the grains.

While the paint is drying, you can do physical exercises with the children:
Pussy
It will bend
It will arch its back,
Pulls his paw forward -
It does exercise
Our Marquis -
Fluffy cat.
He scratches himself behind his ear,
He closes his eyes and purrs.
Everything is fine with Marquis:
Claws, fur and appetite.

Glue all the parts of the cat together and start decorating with coffee beans. We lay the grains with a stripe up, trying to select them in size so that the gaps between them are minimal

This is what happened

To create a mustache, glue sisal onto the muzzle. You can also use fishing line

Next, we make cheeks from two coffee beans, turned strip side down. We glue them on our mustaches

Glue the nose

and cover it with nail polish

Gluing the eyes

We attach a bow to the tail and put a ball in the cat’s paws. I covered it with spray paint to make it brighter. It is best to place the ball on hot glue, it will be more reliable. If desired, the bow and ball can be decorated with sparkles, which is what I did

All that remains is to attach the magnet to the inside using an adhesive gun

And the kitten is ready!


Cats may be different, but everyone retains the unique coffee aroma!

Thank you for your attention!
I wish you creative success!
Good mood to everyone! Do you feel that the New Year is already somewhere close! And the closer we are to January 1, the brighter the aromas of the holiday are felt. Fresh needles from Christmas tree markets, just brought from the store and immediately eaten by a tangerine. But here comes the smell of coffee (perhaps even with cinnamon): fresh, hot, so cozy, inspiring...
Perhaps it’s time to continue to expand on the topic of New Year’s gifts and souvenirs! And on the agenda we have coffee magnets, Christmas trees and horseshoes🎄. These fragrant beauties are not just a cute decoration for the refrigerator or something, they are a whole repository of New Year's mood. And also a very cool, albeit modest in size (but most importantly, with a soul!) present that many people can make.
Magnets made from coffee beans are a very convenient option for New Year's souvenirs. With little time and money spent on purchasing materials, we get truly handmade and unique gifts that will be appreciated by your guests, family, friends, and especially those who cannot imagine a day without a cup of coffee☕. Although, from experience, even non-coffee lovers are very pleased to receive such a thing.
The manufacturing process itself is no less pleasant. What a aroma it is while the grains are being selected! Glue Moment doesn't count 😀
Today I will show three options for making New Year's magnets from coffee beans. And you, of course, can come up with your own design. Waiting for us:
But first, let's look at the materials:
- millboard;
- brown (and also white) acrylic paint;
- coffee beans;
- glue Moment Crystal or tar glue;
- leg-split;
- magnet;
- decor: burlap, metal balls, bells, star anise, etc.
- acrylic contour “Gold”.
And also a stationery knife, pencil, ruler, sponge.
A few words about the choice of materials
Cardboard You should take a thick, gray one, like for cardboard. Dye artistic, glossy, good quality is preferable (if the paint is construction, after drying the surface must be protected with varnish).
For a magnet with decoupage, we will also need acrylic varnish, a napkin with a small motif, and a flat brush.
Regarding glue– you can use both Moment “Crystal” and hot melt adhesive. I prefer the first, despite its smell, because... Although hot-melt glue is more pleasant to work with, after it hardens it becomes more noticeable among the coffee beans, and the beans themselves sometimes fly off.
Christmas magnets made from coffee beans
So, first, let's prepare the groundwork. For all types of New Year's magnets from coffee beans, it is done the same way.
We draw Christmas trees and a horseshoe on cardboard. Using a stationery knife, cut them out.

Next you need to tint the surface on both sides. To do this, we use a sponge and acrylic paint and our favorite technique of a smacking brush))) We'll have to wait a while. Until the paint dries thoroughly, first on one side, then on the other.

Attention❗We paint over one of the Christmas trees (which is for decoupage) completely on one side only. I'll show you how much later u.
Coffee magnet Christmas tree with burlap
We will decorate the first coffee magnet - the Christmas tree - using burlap. We cut out a triangle from this material, slightly smaller in size than the base. Using the “Crystal” Moment, we glue it onto the cardboard.

Lubricate the stump with the same glue on both sides and, starting from the bottom, wrap twine around it. We don't cut it yet.

We apply glue around the perimeter and carefully fix the twine around our coffee tree.

It's the turn of the grains. I like to alternate coffee beans on magnets so that it looks natural, somewhere you can see a beautiful groove, somewhere you can see a rounded back. We select the grains according to size and gradually glue them. It’s better not to spare glue here.

All that remains is to add some finishing touches, namely a beautiful star anise and tinting. We tint the twine along the edge and the stump with brown paint, and then go over the top of the star and the stump a little with gold paint.

Magnet - a horseshoe made of coffee beans
Next we'll look at creating a fragrant horseshoe. This coffee bean magnet is made no more complicated than the previous one, by analogy and even simpler.
From burlap we cut out two small pieces in the shape of a horseshoe (the photo shows one of them). Along the perimeter of the horseshoe we glue a thread of twine, as well as pieces of burlap.

We select and glue the coffee beans, closing the gaps with paint.

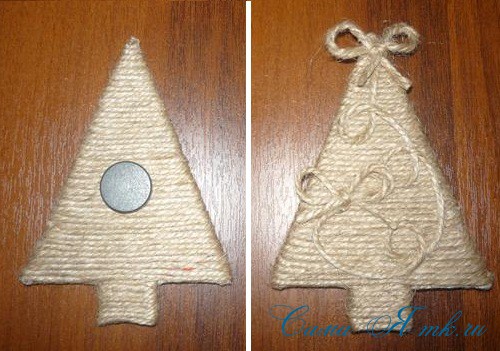
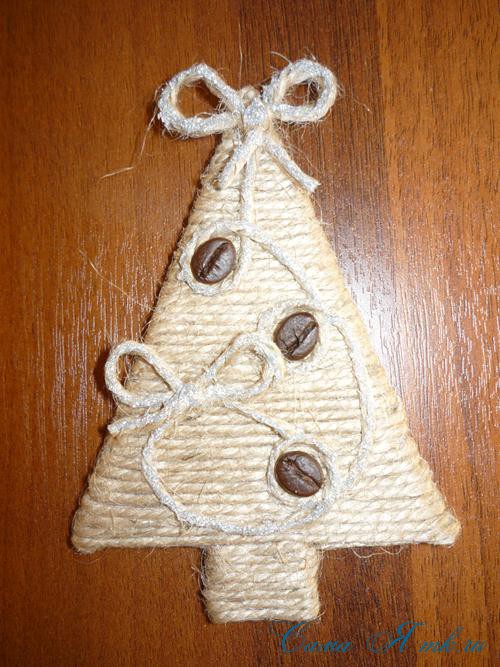
We knit two metal decorative bells. We make a small neat bow from twine (there is a master class on this topic). And we glue all this from below using either hot melt glue or the “Crystal” Moment.

The horseshoe magnet made from coffee beans is almost ready!
Coffee magnet Christmas tree with decoupage
Here’s another beautiful idea for a New Year’s coffee magnet – decorate it using decoupage. We have already discussed in the article the creation of an interesting little thing designed using this technique (if you haven’t seen it, take a look, don’t be lazy). Here we are interested in New Year's themes.
So, remember, at the beginning of the master class I talked about tinting the base on only one side. What about the other one? We tint the other side only along the edge. And after drying, cover the corner on which the drawing will be pasted with white paint.

We tear out the desired motif from the napkin, and then separate the top layer. We place it on the white part.

Now let's take the varnish. We drop a decent drop in the center of the motif and very quickly spread it over the surface to the edges.

After the varnish has dried, you can slightly sand down any uneven spots on a napkin if they suddenly appear. And then we apply brown paint so that, firstly, to cover all the white gaps, and secondly, to give a neat look to the edges of the napkin. To do this, use a sponge to touch the napkin itself, creating a rounded outline. Let it dry.

Before gluing the coffee beans onto the future magnet, let's add a few accents using an acrylic outline. I made a spiral on the stump and circled it in dotted circles. After this, cover the surface with another layer of varnish.

All that remains is to glue the grains and add a few small beads - balls.

Another New Year's magnet made from coffee beans is almost ready! Almost - because the most important touch remains - the magnet itself.
We place the magnets in the center of our Christmas trees and horseshoes (from below), glue them using the “Crystal” Moment.

And now it’s definitely ready! Let's take a look:


In the second photo you see another coffee Christmas tree magnet, such a rocker one with a guitar🎸. But the branded magnet 16+))) ⬇

In general, as you can see, there are options for every taste and color! And for one aroma – the aroma of coffee! 😉
I hope you found it useful and interesting today! New Year's theme is one of inspiring ones. So why give store-bought magnets with standard animals when you can make your own unique masterpiece! Try it! I have collected even more New Year’s ideas with soul for you in this article: .
And if you are partial to twine, welcome to a special review of ideas and master classes on twine →: .
Good luck to you, great inspiration and joy from the process!
And all the best and brightest!
Your brownie Elena.
Coffee magnets on the refrigerator will be wonderful souvenirs for friends and acquaintances. And making them is not at all difficult.
To create magnets with coffee beans you can use all kinds of materials and spices: jute twine, burlap, lace, satin ribbons, buttons, beads, instant and ground coffee, star anise flowers, vanilla, etc. It is not necessary to use everything in one magnet at once, because you can fully use your imagination and create a whole collection of souvenir gifts. For example, on the eve of the New Year, you can do coffee magnets or Christmas tree coffee pendants.
For coffee tree magnets I used a lot of different materials and decorative elements. But the beauty of this master class is that you can use not all of the above, but only part of it, or, conversely, something in addition to what will be on the list, and in the end you will make exclusive DIY coffee fridge magnets.
To make scented Christmas tree magnets I used:
- coffee beans,
- ground coffee,
- jute twine,
- burlap,
- PVA glue,
- brown acrylic paint (can be replaced with ground coffee with PVA),
- hot glue gun,
- cardboard,
- scissors,
- small magnets,
- dry glitter (gold and silver),
- star anise flowers, dried orange slices, etc.
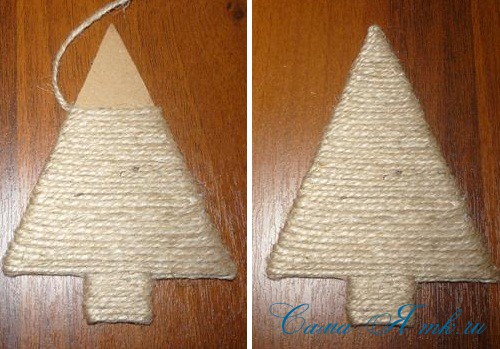
Cut out a Christmas tree from cardboard. It is better to have an elongated triangular shape, it will be more convenient to wrap it with twine and paste it with coffee beans.
The cardboard blank should be as dense as possible. It is better to use corrugated cardboard packaging.
Method 1: Twine and coffee beans.
You can cover the entire workpiece with twine. We wind the twine tightly around the Christmas tree, periodically coating the cardboard blank with glue or fixing it with a heat gun. Secure the end of the twine with hot glue.
I added silver glitter. To do this, dilute 1:1 water and PVA glue, add dry glitter. Apply the mixture with a regular brush.
Method 2: Burlap, twine, coffee beans, star anise flower.
We cover the Christmas tree with burlap on the back side and partially on the front. The rest of the part, which we will cover with coffee beans, is painted with brown acrylic paint.
Cover the end of the workpiece with two or three turns of jute twine to hide the not-so-pretty cut of cardboard. The twine is also secured with hot glue.
Fill the colored part with coffee beans. Glue using a hot-melt gun. 
We fix the magnet on the reverse side with hot glue.

Method 3: Linen, satin ribbon, coffee beans, star anise flower, dried orange slice.
We cover the workpiece with linen cloth, cover the end of the workpiece with two or three turns of twine or brown satin ribbon. We paint the fabric with brown acrylic.

When the paint is completely dry, fix an orange slice with hot glue and fill the remaining space with coffee beans. Decorate with anise flower and coffee beans painted with gold acrylic.
We fix the magnet on the reverse side with hot glue.

or so...

Method 4: Twine, instant coffee, PVA glue, gold glitter.
We wrap the entire Christmas tree with twine and secure the end with hot glue.
We use twine to glue any decorative elements that we will fill with instant coffee.
Generously flavor a certain amount of PVA glue with instant coffee, stir occasionally until completely dissolved (NO NEED TO ADD WATER!).
Fill the fragments with the resulting mixture, preferably in two approaches. You can dry it with a hairdryer.
Add some gold glitter. To do this, dilute 1:1 water and PVA glue, add dry glitter. Apply the mixture with a regular brush.
We fix the magnet on the reverse side with hot glue.

We turned out great DIY Christmas tree magnets for the refrigerator made from coffee beans, you can give them to someone or decorate your kitchen with them.

You can fantasize about this topic endlessly, the main thing is to understand the basic principles.
Making such a decoration is quite easy and quick. The magnets turn out to be very beautiful and original, and most importantly, with an extraordinary aroma.
I was glad to help!
DIY crafts made from coffee beans are not only pleasing to the eye, but also smell nice of coffee. These little things decorate our lives, give us a good mood, and improve the atmosphere in the house. The master class does not require large material costs; we will tell you how to make such a craft from coffee beans.
An interesting stand for spices. A cat from coffee beans can be made in one evening. A cat decorated with coffee beans, with a garden and a fence made of popsicle sticks or medical spatulas will definitely decorate your kitchen. It can be used as a stand for spices, or for a jar of coffee and a napkin holder. You can make a flower stand. The composition is decorated with lavender decor. A master class with elements of decoupage is not difficult. Let's decorate our home with such a cute craft with a coffee aroma.

To work you will need:
- Cardboard.
- Ice cream sticks or medical spatulas.
- Cotton swabs.
- Threads.
- Coffee beans.
- white and brown.
- PVA glue or glue gun.
- Napkins or a laser printer print of a design with lavender.
- Painting tape.
First we print it out or draw it by hand. We choose the template size ourselves.


The template must be cut out and transferred to thick cardboard. Trace and cut out.


We glue the cardboard sides to the stand and secure it with tape on top in a circle.

We take cotton pads and apply them to the product.

Then we fix it, that is, we tie everything up with threads.

There is another option: cut out the silhouette from dark fabric and glue it to the workpiece. And then glue the coffee beans directly onto the fabric. Choose which option you like best. It seems to us that the fabric option is simpler and faster. Then we take brown acrylic paint and paint over the Cat before gluing the grains. Let the paint dry, and only glue the coffee beans onto the dried surface. If you work with a hot glue gun, you need to glue quickly, as the glue dries quickly.


This is what the product looks like from the reverse side; if there were any threads left, we cut them off.

This is what it looks like from the “front side”. It looks a bit like a front garden.

We make a napkin holder out of cardboard, securing the edges with tape. Then we decorate it with decoupage - using napkins, printouts, or postcards with a lavender design.

We place the lid from the napkin holder on top and glue it, securing it with tape on the sides.

It is better to cover the napkin holder with white acrylic paint, wait until the paint dries, and then do decoupage.

To decorate a coffee jar you need napkins and white acrylic paint. Take a sponge and apply acrylic paint to the jar. Waiting for it to dry completely.

We make decoupage with napkins with the image of lavender. Napkins or pictures can be whatever you like best. If you have a laser printer, you're in luck; you can print any image.

Carefully remove one layer from the napkin, coat the napkins with a brush with PVA glue. That is, first we coat with glue the place where we planned to glue the drawing, and then we cover the drawing on top with glue. This is what happens in the end.

Professionals almost always coat the top of the decoupage with varnish, but we think that in this case it is unnecessary.

As you can see, it’s nothing complicated, but as a result we have an interesting decor for the kitchen.

I won’t reveal a secret if I say that twine and coffee beans make original souvenirs, for example, refrigerator magnets. You can make such a fragrant cat for yourself, or as a gift. After all, now many people collect refrigerator magnets, so such cats can be very expensive for someone. The master class uses various materials, and you can add something besides this, it all depends on your imagination.

To work you will need:
- Coffee beans.
- Cardboard.
- Burlap or other dark colored cotton fabric.
- Leg-split.
- Brown acrylic paint.
- Brush or sponge.
- PVA glue.
- Scissors, paper, pencil.
- Glue gun or Moment glue.
- A piece of magnetic tape (cut from an old advertising magnet).
- Ready-made or homemade eyes.

Print or draw the template by hand on a piece of paper. Transfer to cardboard. Please note that the distance between the paw and tail is only 0.3-0.5 cm. - this is important, since in the future we will need to connect the tail and paw. We do this so as not to break the tail, because it is thin. There should be 2 cardboard parts, since we need a dense base.

Glue two pieces of cardboard together to create a dense base.

From the inside, we glue the base to the burlap with PVA glue, first spreading the workpiece well.

It is advisable to put the workpiece under a press for a day. After gluing, the burlap will become rigid and will not crumble. Trim off the excess.

Paint the front side of the product with brown paint. In the future we will stick coffee beans on the brown side.

Let the workpiece dry.

We apply glue along the cut of the workpiece to glue the twine and hide the unsightly cut of the cardboard.

We glue the twine onto the cut of the workpiece, pulling it slightly.

We make two turns of twine and close the cut with glue.

Using a hot gun or Moment glue, glue the coffee beans to the front side.

Completely cover the workpiece with coffee beans.

Glue pieces of magnet on the inside. Alternatively, you can not glue, but cover the corners of the magnet with tape. Check if the magnet sticks to the refrigerator.

We decorate the cat's face: glue on eyes, which can be made from an empty pill bottle and a pea colored with a black marker. We put a pea in the recesses from the tablets, drip a drop of glue into the “eyes”, and seal the top with white paper. You will get wonderful “eyes”.

We make a mustache for the cat from twine and fix it with glue. Coffee bean nose.

Glue on the eyes and tie a bow of ribbon or lace.

What a great magnet this turned out to be.

To create the “Coffee Trio” I used many different materials, tools and decorative elements. But the beauty of this master class is that you can use not all of the above, but only part of it, or, conversely, something beyond what is on the list, and in the end you will make exclusive coffee magnets for the refrigerator with your own hands.
So, I found the following useful in my work:
- Scissors
- Glue "Moment Crystal"
- Magnetic vinyl
- Brown and light brown pigment ink sponges
- Oil paint, color - mars brown dark
- Beige linen lace
- Stretch lace cappuccino color
- Wooden and plastic buttons
- Red Iris threads
- Needle with big eye
- Narrow satin ribbons, brown and red
- Jute twine
- Matt acrylic varnish
- Brush
- Double sided tape
- Cardboard 2 mm thick
- Piece of paper
- Pen
- Coffee beans
- Ground coffee


I only had linen in a rather gray shade, and I wanted to bring it closer to the color of coffee so that they would look more harmonious next to each other. To do this, I diluted three teaspoons of instant coffee in boiling water and soaked the fabric in it for an hour. Then I rinsed it under running water and placed it on a very hot radiator. As a result, the color of the flax became more brown, and “burn” also appeared - I really liked this effect.

Then I cut out a heart-shaped template from paper and used it to make three blanks from thick cardboard 2 mm thick.

Coffee magnet (master class No. 1)
I covered the first blank with double-sided tape, and glued linen on top.

You should not cut the fabric according to the template and then try to glue it evenly onto the workpiece. It is much simpler, more convenient and neater to first glue a piece of flax to the cardboard, and then trim off the excess along the edges.
Then, using Moment glue (you can use hot melt glue or any other transparent superglue), I laid out and secured the coffee beans along the perimeter of the heart in one row. I laid the grains with both the flat and rounded sides up in a random order, fitting them tightly together.

Then I covered the end of the workpiece with two turns of jute twine to hide the not-so-pretty cut of cardboard and traces of glue between the coffee beans and the workpiece. The twine is also secured using Moment glue.

Next, I laid twine along the inner perimeter of the heart made of coffee beans, decorating the ends in the form of a bow.


I decorated two round wooden buttons with red “Iris” thread; a needle with a large eye helped me with this.

The edges of the buttons were tinted using sponges with pigment ink. First I went over it with a light brown sponge, and then with a darker brown one.

The cardboard on the back side of the heart was also tinted with pigment ink, so that it would be pleasant to look at the craft from the backside.

I glued a piece of magnetic vinyl.

And finally, I glued pre-prepared buttons on the front side under the bow.
So I made my first coffee heart magnet with my own hands!

Coffee magnet (master class No. 2)
The second blank, like the first, I covered with flax and laid coffee beans around the perimeter. And then I applied glue along the inner perimeter, poured in instant coffee granules, gently pressed them with my fingers, simply shook off the excess granules that did not stick and left them until the glue dried completely.


Instead of instant coffee, it is better to use ground natural coffee to create a coffee magnet with your own hands. It can be coated with varnish so that the pieces hold tighter and do not crumble or fall off. With instant coffee, coating with varnish or glue is not possible.
I decorated the ends of this heart with beige linen lace, securing it with Moment glue.


Then I tinted the lace with oil paint. You could also use pigment ink, as with the first magnet, but in this master class I wanted to show different materials and methods so that everyone could choose what is more accessible.
For tinting I needed oil paint “Sonnet”, color “mars dark”, a piece of dish sponge and a piece of cardboard. I squeezed a drop of oil onto the cardboard, then dipped a corner of the sponge into it and began to spread the oil from the sponge onto the cardboard. Only when the sponge leaves a dry, GREAT trace of paint, can you begin to tint the lace, lightly touching the lower edge of the heart.


Instead of a dish sponge, you can use a cosmetic sponge - the smaller the pores, the better. But you should remember that after such use the sponge will be damaged, so the sponge is cheaper.
After tinting, the heart resembles a chocolate cake with buttercream :)

I made a bow from a narrow brown satin ribbon, added a plastic flower button and decorated the second coffee heart with this composition! 🙂

Coffee magnet (master class No. 3)
I did not cover the third piece with flax, but completely covered it with coffee beans. I glued the first layer with the flat sides of the grains facing down.

And I glued the second layer intermixed, tightly laying the grains one to one, and in some places even placing them sideways.

After the glue dried, I saw that it was shiny in some places between the grains, and I didn’t like it. So I covered the entire front of the heart with Sonnet matte acrylic varnish. In bright sunny colors, the heart glares a little, but now evenly.

I decorated the ends of the third heart with cappuccino-colored stretch lace, securing it with Moment glue. This lace stretches. And due to the tension, it tightly clasps the heart, wrapping itself on the front side, which is what I needed.


I glued a narrow brown satin ribbon over the lace. It turned out very tasty! 🙂


I decorated the wooden flower button with red thread, as well as the round buttons for the first heart.
Related articles
 The best amulets against the evil eye and damage Amulet against the evil eye with hands for children
 How to read the Psalter correctly
 Delicious dishes with sausages
 A glimpse of Bella. Romantic chronicle. A glimpse of genius. Messerer about Akhmadulina Boris Messerer glimpse of Bella romantic chronicle
 I dreamed that I was sailing on a boat on the river
 How to cook beef entrecote in a frying pan
 About the company Foreign language courses at Moscow State University
 Which city and why became the main one in Ancient Mesopotamia?
 Why Bukhsoft Online is better than a regular accounting program!
 Which year is a leap year and how to calculate it