
Color the layer. Paint the layer that will retain water
Class: 3
Presentation for the lesson


 Back forward
Attention! Slide previews are for informational purposes only and may not represent all the features of the presentation. If you are interested in this work, please download the full version.
Lesson objectives:
- Give the initial concept of a spring.
- Based on laboratory work, talk about the formation of a spring
- To develop students’ cognitive abilities: attention, memory, logical thinking, creative activity and interest in the subject, independence.
- Foster a caring attitude towards springs, nature, and your health.
Equipment:
- Presentation on the topic of the lesson.
- Song "Live, spring" Spanish. S. Belikov
- Music for relaxation
- Cartoon "Hare Koska and Spring"
- For experiment: cups, funnels, clay, sand, soil, water, cotton wool
- Drawings
- Mineral water and glasses.
DURING THE CLASSES
I. Organizational moment(slide 1)
II. Checking homework
Work in groups. Game “Don’t let your row down” (slide 2)
The class is divided into 2 teams “Rosinka” and “Droplet”
– Guess the riddles:
- I am water, and I swim on water.
- There is a water bridge on the water.
– On a hot summer day it is very pleasant to drink sparkling water or juice with ice. What properties of ice do people use in this recipe? ( Tones, removes thirst, cools)
– Why did the inhabitants of the Far North used to build houses from snow? ( Because snow and ice are poor conductors of heat) Igloo
– Who can name more properties of snow and ice? ( Snow is white, opaque, odorless, loose, melts when heated. Ice is colorless, transparent, odorless, hard, melts when heated.)
– What properties of steam make it invisible to us? ( colorless and transparent)
– How can you prove that water easily turns into steam, and steam into water? ( When the water boils, it will begin to turn into steam. You need to hold a chilled plate over it. The plate will become covered with droplets of water.)
III. Announcing the topic of the lesson and explaining the new topic
Watching the beginning of the cartoon “Koska the Hare and the Rodnichok” (until the moment the Hare meets the Rodnichok)(slide 3)
– What did you learn from the beginning of the cartoon? ( how the hare Koska met Rodnichok)
– We will also meet the fontanel in class today and you will learn a lot about it. The topic of our lesson is called “Springs” (slide 4)
-What is a spring? ( Source, key)
- Let's play the game “I am a hydrogeologist.” Who knows what this word means? ( This is a person who studies groundwater)
(slide 5) Hydrogeology(from hydro and geology), the science of groundwater, studying its composition and properties, origin, patterns of distribution and movement, as well as interaction with rocks.
Our task find out how springs are formed, what kind of water they contain. Let's do laboratory work.
Laboratory work(slide 6)
The surface of our Earth consists of three layers: soil, sand and clay. (slide 7)

Safety precautions
In front of you are ready-made funnels filled with soil, sand, and clay. Let's pour water into them and see what happens. At the end of the work, we will draw a conclusion and learn about the formation of the spring.
The guys pour water into ready-made funnels filled with soil, sand and clay and watch how it seeps out.
conclusions: Soil and sand allow water to seep through, but clay does not allow water to pass through.
– What kind of water is in the glass?
- Clean.
Based on this experience, we will trace the formation of the spring. (slide 8)

It's raining. It passes through soil and sand until it encounters a layer of clay. Water accumulates and flows down the inclined surface until it finds a way out. This outlet is called a spring.
A spring from which a small stream flows may be the beginning of a river. (slide 9) Let's relax a little and play "Rucheek"
IV. Fizminutka(slide 10)
To the song “Live, spring” in Spanish. S. Belikov children play in the stream.
V. Children's messages(slide 11)
– And now our young hydrogeologists will tell us what they know about the springs.
- Without water there is no life. A person cannot live without water for more than 8 days. Water is a wonderful gift of nature. Humans need clean, fresh water to live. Humans are 80% water. (Slide 12)
Spring water is called "living" water because... it passes for many kilometers through fine sand, is saturated with microelements, and the water is perfectly filtered.
The temperature of spring (spring) water is up to 6 C, which prevents the growth of pathogenic bacteria in it. (Slide 13)
If a person often drinks spring water, he is less susceptible to various diseases. Pure spring water heals many diseases and increases life expectancy. (Slide 14)
It has been established that after 3 hours, spring water largely loses its medicinal properties. Therefore, you need to drink spring water, of course, at the springs themselves. Natural spring water gives energy to those who drink it.
Some springs have chapels that are of historical and cultural value. (Slides 15, 16)
Water from the source can be fresh or mineralized. In the first case we are talking about springs and springs, in the second - about a source of mineral waters. (Slide 17)
Resort city Essentuki It is famous for its world-famous drinking mineral waters - Essentuki 4 and Essentuki 17, its amazing mountain-steppe climate and picturesque hiking routes.
Currently, Essentuki takes a worthy place among the world's leading resorts specializing in the treatment of diseases of the gastrointestinal tract, liver, biliary tract, and metabolic disorders.
The basis of the resort resources of the Essentuki resort are salt-alkaline waters. In total, the Essentuki resort uses the waters of 20 mineral springs for medicinal purposes.
VI. Consolidation of what has been learned
1. Work from the textbook pp. 34-35 (slide 18)
Read how springs are formed.
2. Independent work in notebooks page 14 (slide 19)
– Paint the layer that will retain water. Show with an arrow in which direction the water will flow through this layer. Mark the place where the source forms.
3. Group survey(slide 20)
– Tell us how springs are formed?
– How can you prove that clay does not allow water to pass through?
– What kind of water is there in springs?
– What kind of water is called mineral water?
– How is it good for health?
– Who has seen springs in nature?
– Why should we take care of springs?
4. Relaxation(to the sounds of the murmur of a stream) (slide 21)
– Now close your eyes and imagine that you are next to a wonderful spring. Listen to how wonderfully it murmurs, how beautifully the birds sing...
VII. Summing up
1. – What new did you learn in the lesson?
– Did you like the lesson?
- Well done, you worked well today. ( Lesson grades)
– In the next lesson we will continue our journey on the topic “Water in Nature.”
2. Homework: pp. 34-35
– Together with a friend, come up with and draw a poster on the theme “Protect the springs!”
3. Now let's try mineral water. (slide 22)
Photoshop, as an image editor, allows us not only to make changes to ready-made pictures, but also to create our own compositions. This process can also include simple coloring of contours, as in children's coloring books.
Today we’ll talk about how to set up the program, what tools and with what parameters are used for coloring, and we’ll also practice a little.
To work, we need a special work environment, several useful tools and a desire to learn something new.
Working environment
The work environment (also quite often called the “Workspace”) is a certain set of tools and windows that determine the specifics of the work. For example, one set of tools is suitable for photo processing, and another for creating animation.
By default, the program contains a number of ready-made working environments, which you can switch between in the upper right corner of the interface. As you might guess, we need a set called "Drawing".
![]()
Out of the box the environment looks like this:

All panels can be moved to any convenient place,

close (delete) by right-clicking and selecting "Close",
![]()
add new ones using the menu "Window".

The panels themselves and their location are selected individually. Let's add a color adjustment window - we'll have to access it quite often.

For convenience, let's arrange the panels as follows:

The workspace for coloring is ready, let's move on to the tools.
Brush, pencil and eraser
These are the basic drawing tools in Photoshop.

Finger and mix brush
Both of these tools are designed to “smudge” drawn elements.

The tool “stretches” content created by other devices. Works equally well on transparent and colored backgrounds.

2. Mix brush.

A mix brush is a special type of brush that mixes the colors of nearby objects. The latter can be located both on one and on different layers. Suitable for quickly smoothing out clear boundaries. Doesn't work very well on pure colors.

Pen and selection tools
Using all these tools, areas that limit the filling (coloring) are created. They must be used, as this allows you to paint areas in the picture more accurately.

Fill and Gradient

Colors and samples
Main color so called because this is what tools are used to draw with Brush, Fill, and Pencil. In addition, this color is automatically assigned to the first control point when creating a gradient.
Background color can be especially important when using some filters. This color also has a gradient end point.
The default colors are black and white, respectively. Reset is carried out by pressing the key D, and changing the main to background – keys X.

Color adjustment is done in two ways:

Styles
Styles allow you to apply different effects to the elements contained on a layer. This can be a stroke, shadow, glow, overlay of colors and gradients.
Adjustment window by double clicking on the appropriate layer.

Examples of using styles:
Layers
Each area to be painted, including the outline, must be placed on a new layer. This is done for the convenience of subsequent processing.
An example of such work:
Practice
The coloring job begins with finding the outline. This black and white image was prepared for the lesson:

It was originally set on a white background, which has been removed.
As you can see, there are several areas in the picture, some of which should have the same color.
- Activate the tool "Magic wand" and click on the handle of the wrench.

- Clamp SHIFT and select a section of the handle on the other side of the screwdriver.

- Create a new layer.

- Adjusting the coloring color.

- Choosing a tool "Fill" and click on any selected area.

- Removing selection using hotkeys CTRL+D and continue to work with the remaining sections of the contour according to the above algorithm. Please note that the selection is made on the original layer, and the fill is made on the new one.

- Let's work on the screwdriver handle using styles. Call up the settings window, and first of all add an inner shadow with the following parameters:

The next style is inner glow. The settings are:

The last one will be the gradient overlay.

- Let's add highlights to the metal parts. To do this, select a tool "Straight-line lasso" and create a selection like this on the screwdriver shaft (on a new layer):

- Fill the highlight with white.

- In the same way, draw other highlights on the same layer, and then reduce the opacity to 80%
.

This completes the tutorial on coloring in Photoshop. If desired, you can add shadows to our composition. This will be your homework.
This article can be considered the basis for an in-depth study of Photoshop tools and settings. Carefully study the lessons that are located on the links given above, and many of the principles and laws of Photoshop will become clear to you.
How to Recolor Anything and Everything in Photoshop
Sofia Skrylina, teacher of information technology, St. Petersburg
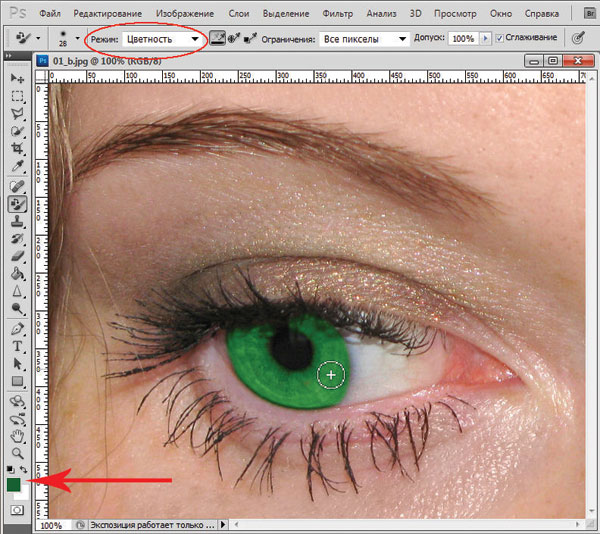
The Photoshop graphics editor has a huge number of tools that can be used to recolor various objects. Some of them require preliminary selection of fragments, others do not require the use of selection tools, affecting only certain colors of the image. In this article, we will only work with the background or regular layer, without using any fill layers or layer blend modes.
Color Replacement Tool
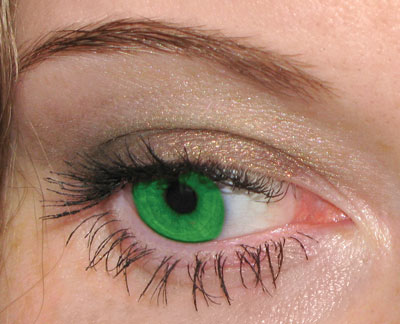
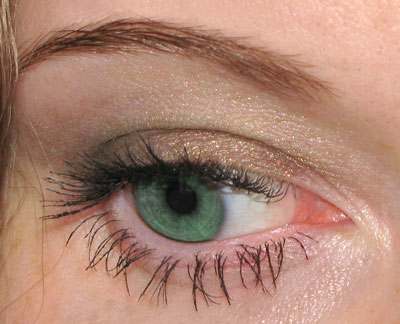
Tool Color replacement(Color Replacement) is in the same group as tools Brush(Brush) Pencil(Pencil) and Mix brush(Mixer Brush) and is intended for repainting image fragments. This tool has only four blending modes: Color tone(Hue) Saturation(Saturation), Chroma(Color) and Brightness(Luminosity). Modes are used to repaint fragments Chroma(Color) and Color tone(Hue). The first mode provides a brighter shade, so when using it you should choose shades of the color applied to the object that are much darker than in the second mode. So, in Fig. 1 shows an example of repainting the iris of the eye green in one shade: R=7, G=95, B=17. The first result was obtained in blend mode Chroma(Color), the second is in mode Color tone(Hue).
 b
b
 c
c
Rice. 1. Results of repainting the iris with the Color Replacement tool: a - original image; b - Color mode; c - Color tone mode
The tool properties panel has a number of other parameters (Fig. 2):
- All pixels(Discontiguous) - the color is replaced wherever it occurs on the path of the pointer,
- Adjacent. pix(Contiguous) - colors that are similar in color to the one under the mouse pointer are replaced,
- Edge highlighting(Find Edges) - when replacing colors, clear edges of objects are simultaneously preserved;
- parameter Tolerance(Tolerance) sets the sensitivity of the instrument;
- checkbox Smoothing(Anti-alias) sets smooth borders when replacing colors, set by default.
In the example considered, the object was not pre-selected, but if you are working with a more complex object that requires brush processing in several stages using several blending modes, then, of course, you must first select the object.
Note. Basically, instead of a tool Color replacement (Color Replacement) can be used Brush (Brush), which has the same blending modes: Chroma (Color) and Color tone (Hue).
Beyond the Tools Color replacement(Color Replacement) and Brush(Brush) color correction tools are used to repaint fragments. To call them use the menu Image(Image) -> Correction(Adjustments). Let's take a closer look at these tools.
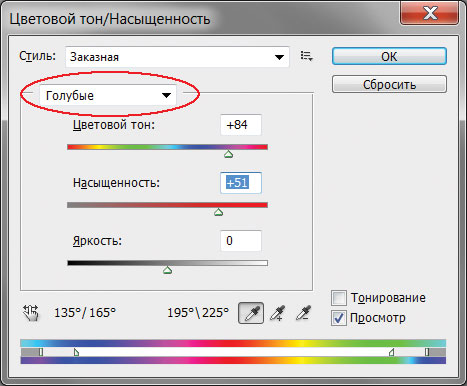
Dialog window « Hue/Saturation »
For changing the color of an object in a dialog box Hue/Saturation(Hue/Saturation) is answered by the slider Color tone(Hue). When selecting an item All(Master) replaces all colors in the selected area. At the same time, you can specify one of the base colors of the RGB and CMYK models, which will be affected by the tool (Fig. 3). In this case, if the object is the only one in the image consisting of one group of colors, there is no need to first select it.
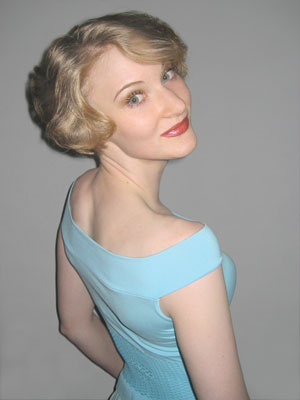
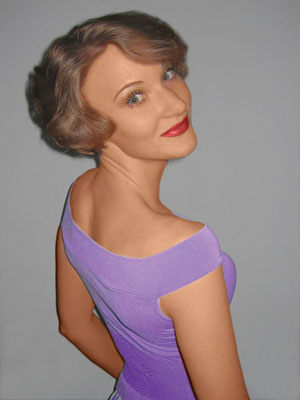
Rice. 4. The original image of the girl (a) and the result of repainting and tanning (b)
So, in Fig. 4, to change the color of a sweater from blue to lilac, there was no need to select it; it was enough to select the blue color to be replaced (see Fig. 3). But to color the remaining objects, they were pre-selected.
Note. In the above example, a tool was used to dye the hair and jacket Hue/Saturation (Hue/Saturation), and for applying tan - tools Replace color (Replace Color) to darken the skin tone a little, and Color replacement (Color Replacement) to repaint the leather brown.
Don't forget to use the remaining two sliders when replacing colors: Saturation(Saturation), which allows you to increase or decrease the saturation of the selected color, and Brightness(Lightness), darkens or brightens the selected color.
Replace Color Dialog Box
Team Replace color(Replace Color) replaces the color in the image that is selected using the eyedroppers. The first click with the eyedropper selects the color to be replaced, subsequent clicks with the “+” or “-” sign specify the range of colors (Fig. 5). Parts of the image that match the selected colors appear white in the preview area. In addition to the eyedroppers, a slider is used to expand or narrow the selected shades Scatter(Fuzziness).
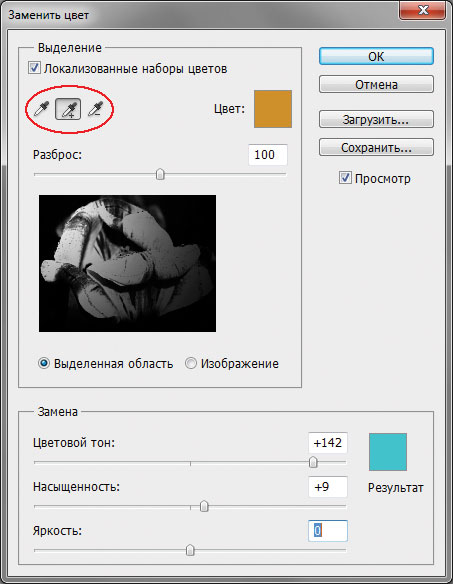
Using sliders Color tone(Hue) Saturation(Saturation) and Brightness(Lightness) determines the color of the replacement. In addition, the replacement and replacement colors can be selected from the color picker, which is accessed by clicking on the color swatch. In most cases, preliminary selection of fragments is not required.
Note. Please note that the dialog box Replacecolor (Replace Color) is very similar to the selection tool Color range (Color Range), which selects a fragment by group of colors. It turns out that the dialog box Replace color (Replace Color) combines the functions of two tools: the selection tool Color range (Color Range) and color replacement tool Hue/Saturation (Hue/Saturation).
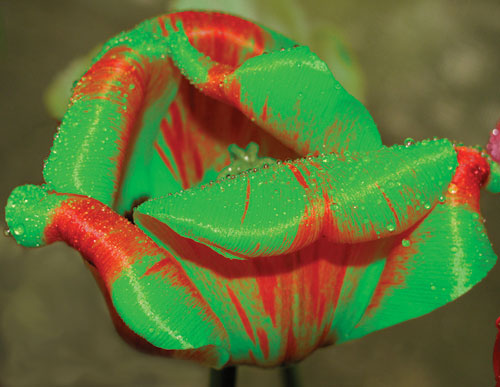
Best results when using a dialog box Replace color(Replace Color) is achieved if the replaced color is close to uniform. Otherwise, noise appears in the image, which you have to get rid of using additional tools. An example of using this tool to repaint tulip petals is shown in Fig. 6.
 a
a
 b
b
Rice. 6. The original image of a tulip (a) and the result of its recoloring in the Replace Color dialog box (b)
Selective color adjustment
Selective color adjustments are made in the dialog box Selective color correction(Selective Color) (Fig. 7), which allows you to selectively change the volume of a composite color in any of the primary colors without changing the other primary colors.

This tool can be used to recolor parts of an image while maintaining the base color. For example, red color can be changed to any other color that contains red: from yellow (a mixture of red and green) to lilac (a mixture of red and blue). But, for example, turning red into blue will not work. This tool is also indispensable in situations where you need to remove a color cast created by a light source, such as a regular table lamp (Fig. 8).
 a
a
 b
b
Using Lab Mode
The Lab color model is based on three parameters: L- brightness (Lightness) and two chromatic components - a And b. Parameter a varies from dark green through gray to purple. Parameter b contains colors from blue through gray to yellow. This circumstance can be used to quickly recolor image fragments by inverting the straight line in each channel (provided that this object is easy to select or all other colors in the image are close to neutral). To invert a line, simply drag the top right point of the line down and the bottom left point up.
a you can get the following results:
- red and burgundy colors are repainted green;
- green becomes light brown.
When inverting the straight line in the channel b You can get other results:
- red becomes purple or lilac depending on the original hue, and purple and lilac become red;
- yellow turns to blue.
When inverting the straight line in both channels simultaneously, the following results are obtained:
- red is repainted into blue, the shade of which depends on the original shade of red;
- blue and magenta become green.
Note. Because the Lab color model can display more colors than the RGB model, converting an image from Lab to RGB and back does not affect its quality. Therefore, the transfer can be carried out as many times as you need.
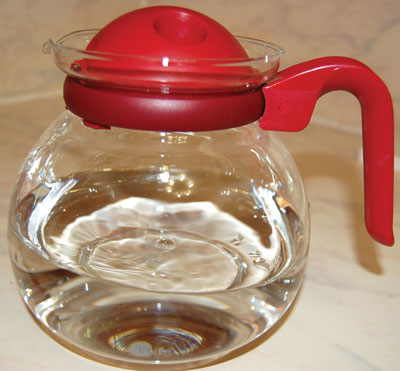
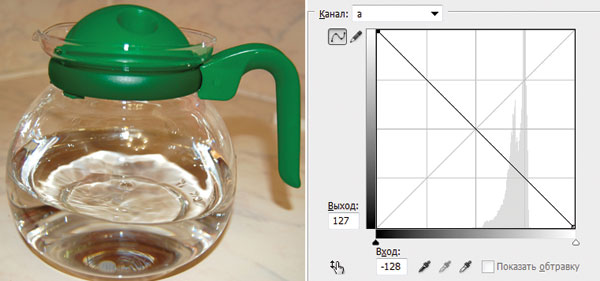
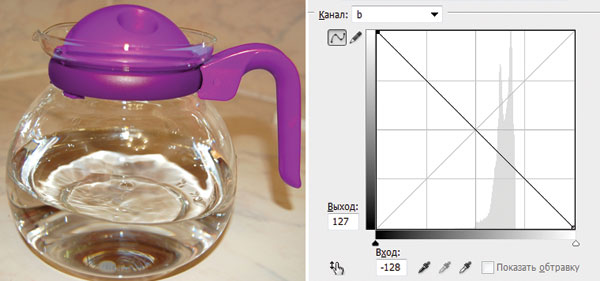
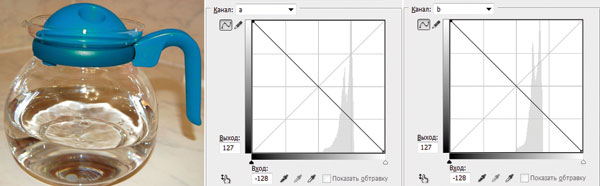
Now let's look at a few examples. In Fig. Figure 9 shows the original image of a jug with a lid and a red handle.
First you need to switch the image to Lab mode by running the command Image(Image) -> Mode(Mode) -> Lab. In this case, a tool is quite suitable for highlighting the lid and handle Quick selection(Quick Selection).
 a
a
 b
b
 c
c
Rice. 10. Result of repainting fragments: a - green by inverting the straight line in channel a; b - to lilac color by inverting the straight line in channel b; c - to blue by inverting the straight line in channels a and b
In the dialog box Curves(Curves) (it is called by the key combination Ctrl+M) from the list Channel(Channel) select the channel a and invert the straight line (Fig. 10 A).
If you invert the straight line in the channel b without changing the position of the straight line in the channel a, we get a lilac color (Fig. 10 b). Inversion of the straight line in both channels will give a blue color (Fig. 10 V).
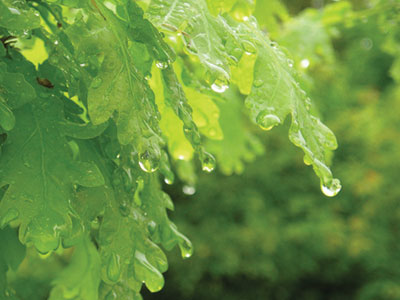
Image colors may fade during repainting. You can also increase their saturation in Lab mode, without resorting to the dialog box Hue/Saturation(Hue/Saturation). To do this, it is necessary to increase the angle of inclination of the straight line in both color channels. In Fig. Figure 11 shows the original image of green leaves. When inverting the straight line in the channel a we get a faded brown color (Fig. 12).
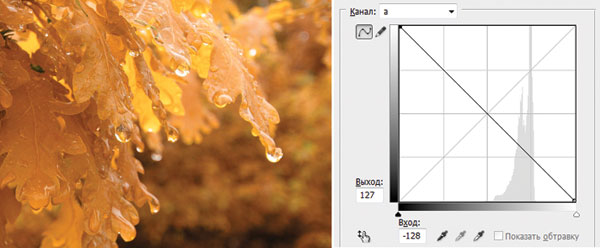
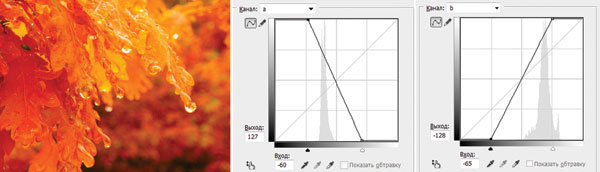
To increase the saturation of colors and transform the summer landscape into autumn, let’s change the channels a And b angle of inclination of the straight line (Fig. 13).
As you can see, the Photoshop graphics editor offers a truly huge selection of tools for recoloring image fragments. Which of the available tools to use is up to you.
If the technology is not followed when painting surfaces, various defects may occur.
Let's try to analyze in this article possible painting defects and ways to eliminate them.
Adhesive paints
Thus, when painting with adhesive paints, the following defects occur:The paint layer becomes shallow and peels off.
This is due to the fact that there was not enough glue in the composition or chalk with large particles was used.
To eliminate the defect, you need to either add glue or strain the composition through a sieve and re-paint the surface.
The paint film cracks and peels off.
This happens because the paint composition is too thick, because there is too much glue in it, or because the previous layer of paint was not removed.
It is necessary to dilute the composition, reduce the amount of glue, peel off all layers of paint, grind, prime and repaint the surface.
If shows through the previous paint layer, then either the primer is different in color from the paint composition, or there is not enough pigment in it, or the surface was previously painted with water-soluble paints.
It is necessary to prime the surface to match the color of the paint composition, or repaint it by adding pigment to the composition, or thoroughly wash, dry and repaint the surface.
The appearance of marble spots occurs when there is excess glue in the putty, primer or paint composition.
It is necessary to wash away the paint layer and repaint or prime the surface with a composition containing sufficient glue.
Grease stains on the surface
Appear if there are stains on the base from non-drying mineral and vegetable oils. In this case, the contaminated areas of the base are cut out, the surface is re-plastered and painted.
Rust stains on a painted surface
They appear if water or resinous substances have been leaking through the plaster for a long time.
It is necessary to remove the cause of the rust, clean off the rusty plaster, wash the surface with a warm 3% solution of hydrochloric acid, dry it, cover it with oil paint or rosin varnish, prime it and repaint it.
Efflorescence (white crystalline coating)
They are formed if salts are released from the plaster under the influence of moisture.
First of all, eliminate the entry of moisture, dry and clean the base with a wire brush, paint over the areas where there was efflorescence with oil or nitro-enamel white, putty, prime and re-paint.
The tone of the paint color changes when using pigments that are not resistant to alkalis, light, or hydrogen sulfide.
All paint must be washed off, primed again and the surface painted.
Dark seams at the joints individual areas of surfaces.
Appear if the surface is not primed before painting.
It is necessary to wash the surface, prime it with vitriol and repaint.
Paint does not stick to the primed surface if there is excess soap in the primer.
In this case, you need to add soap to the paint composition.
The painted surface dries unevenly if there were sharp fluctuations in air temperature during painting.
It is necessary to equalize the temperature regime and eliminate drafts.
Lime compounds
When painting with lime-based compounds, defects can also form.Lime paint film can shallow.
This happens if the surface was poorly moistened with water or painted during the hot season. It needs to be repainted.
The paint film is peeling off in the event that the surface is poorly cleaned.
You need to completely clean the entire surface and repaint it.
Oil and enamel compositions
When painting surfaces, defects are also possible.Paint may take too long to dry, if the paint composition contains pigments that delay drying: soot, kraplak, zinc white, sienna, etc., and also if the drying oil contains mineral oil or other impurities.
In this case, you need to add a drier to the composition and thoroughly shade the surface.
The painted surface remains sticky when using low-quality drying oil.
You can wash the surface with cold acidified water, and if this does not help, clean and repaint the surface.
Brush marks remain when applying too thick paint and insufficient shading.
The surface needs to be cleaned and repainted with a thinner paint.
The paint on the painted surface is blistering, if the surface is not sufficiently dried before painting or the base of the surface is constantly moistened.
You need to clean off the swollen paint, dry it and repaint the surface.
If there is a permanent source of moisture, it must be removed.
Cracks appear on the paint film, if the base is not dry enough or the primer contains too much drying oil.
The surface must be completely cleaned and repainted.
Wrinkles appear on the paint film, if too thick a layer of paint is applied. You need to clean the surface with sandpaper, prime it, putty it and repaint it.
Paint drips appear when painting if the paint is too liquid or poorly shaded.
It is necessary to clean the surface with glass sandpaper or pumice and paint it with a composition of normal thickness.
Rusty and dark spots appear on the painted surface if oil and resin stains have not been previously removed from it. Or if the painting was done on insufficiently dried plaster or putty.
In the first case, the contaminated areas are cleaned, washed with hydrochloric acid, covered with two or three layers of alcohol varnish and repainted.
In the second case, the paint is cleaned off in those places where stains have appeared, the surface is dried, primed, puttyed and repainted.
Matt spots appear on the painted surface if it is poorly primed.
You need to clean it with fine glass sandpaper and repaint it.
The joints are noticeable, if too large areas are painted with quick-drying paint.
In this case, the surface must be repainted.
Rough paint texture This happens if they use an unfiltered compound or the putty was poorly cleaned and sanded.
The surface should be cleaned with sandpaper and pumice and repainted.
The paint film peels off from the base, if the surface is not sufficiently dried, especially wood, not cleaned and under-oiled.
It is necessary to remove the peeling paint, clean the surface, wash, dry, dry, and repaint.
Shows through the colored layer of old paint in the event that the old paint dissolves into the new one.
The dried painted surface must be opened with two or three layers of alcohol varnish or nitro varnish and repainted.
Photoshop, as an image editor, allows us not only to make changes to ready-made pictures, but also to create our own compositions. This process can also include simple coloring of contours, as in children's coloring books.
Today we’ll talk about how to set up the program, what tools and with what parameters are used for coloring, and we’ll also practice a little.
To work, we need a special work environment, several useful tools and a desire to learn something new.
Working environment
The work environment (also quite often called the “Workspace”) is a certain set of tools and windows that determine the specifics of the work. For example, one set of tools is suitable for photo processing, and another for creating animation.
By default, the program contains a number of ready-made working environments, which you can switch between in the upper right corner of the interface. As you might guess, we need a set called "Drawing".
![]()
Out of the box the environment looks like this:
All panels can be moved to any convenient place,

close (delete) by right-clicking and selecting "Close",
![]()
add new ones using the menu "Window".
The panels themselves and their location are selected individually. Let's add a color adjustment window - we'll have to access it quite often.

For convenience, let's arrange the panels as follows:
The workspace for coloring is ready, let's move on to the tools.
Brush, pencil and eraser
These are the basic drawing tools in Photoshop.
Finger and mix brush
Both of these tools are designed to “smudge” drawn elements.

The tool “stretches” content created by other devices. Works equally well on transparent and colored backgrounds.

2. Mix brush.

A mix brush is a special type of brush that mixes the colors of nearby objects. The latter can be located both on one and on different layers. Suitable for quickly smoothing out clear boundaries. Doesn't work very well on pure colors.
Pen and selection tools
Using all these tools, areas that limit the filling (coloring) are created. They must be used, as this allows you to paint areas in the picture more accurately.

Fill and Gradient

Colors and samples
Main color so called because this is what tools are used to draw with Brush, Fill, and Pencil. In addition, this color is automatically assigned to the first control point when creating a gradient.
Background color can be especially important when using some filters. This color also has a gradient end point.
The default colors are black and white, respectively. Reset is carried out by pressing the key D, and changing the main to background – keys X.

Color adjustment is done in two ways:

Styles
Styles allow you to apply different effects to the elements contained on a layer. This can be a stroke, shadow, glow, overlay of colors and gradients.
Adjustment window by double clicking on the appropriate layer.

Examples of using styles:
Layers
Each area to be painted, including the outline, must be placed on a new layer. This is done for the convenience of subsequent processing.
An example of such work:
Practice
The coloring job begins with finding the outline. This black and white image was prepared for the lesson:

It was originally set on a white background, which has been removed.
As you can see, there are several areas in the picture, some of which should have the same color.

This completes the tutorial on coloring in Photoshop. If desired, you can add shadows to our composition. This will be your homework.
This article can be considered the basis for an in-depth study of Photoshop tools and settings. Carefully study the lessons that are located on the links given above, and many of the principles and laws of Photoshop will become clear to you.
THIS TECHNIQUE REQUIRES KNOWLEDGE IN DRAWING IN PHOTOSHOP
How to Draw Using Adjustment Layers in Photoshop. This is a relatively useful way of painting that I discovered while working on Now Arriving, the star of this tutorial.
You will need a graphics tablet and digital drawing skills
WHAT ARE ADJUSTMENT LAYERS?
Adjustment layers help you edit your images in Photoshop without directly changing the pixels in them. This technique is also called “non-destructive editing,” and although it is intended for editing photographs, it can also be used for quick sketches of a scene.
Adjustment layers can be found in the Adjustments panel in CS4, or through the button
in the Layers panel in Photoshop CS3.
WHAT BASICS DO YOU NEED TO KNOW?
When you select an adjustment you want to apply, it is inserted as a separate layer on top of the file you're working on. Adjustment layers are equipped with a layer mask (Layer Mask).

In the example above, I added a Photo Filter layer to my image. Note that an adjustment layer has several different components than a regular layer. By double clicking on the Settings icon you can change the settings of the adjustment you have chosen.


In the case of Photo Filter, I initially made the scene cold, but then I wanted to warm it up. To do this, I only had to double-click on the icon to change the settings from Cooler to Warmer!

This technique is superior to a regular adjustment filter from the Image menu because the layer never physically affects the pixels. If I want to see what an image looks like without any adjustments, I simply hide or delete the adjustment layers. Everything is as simple as shelling pears!


The white blank icon to the right of the correction icon is the Layer Mask. By clicking on this icon, you will be able to select the areas where the Layer Mask effects should be applied. This way, you can leave some areas of your drawing untouched, or apply a different adjustment layer to these areas.
You can only paint in shades of gray on the Layer Mask. By default, the Layer Mask is white, which means it is "on" around the entire perimeter of the image. Painting with black will "turn off" the areas you paint with the brush, thereby revealing the original drawing. Conversely, the lighter the shade of gray you paint with, the stronger the effect of the adjustment layer will be, until you fully “turn on” the white.
HOW TO USE THIS IN DRAWING?
Besides giving your image some post-processing without losing the original, adjustment layers can be very useful in directly creating detail in your digital works. Imagine painting shadows in a scene where you don't actually care whether the colors you're painting over are correct or not? Adjustment Layers give you the ability to paint just like that, saving a huge amount of time in the process.

Here you see a completed line art version of one of my latest drawings. For this tutorial I will try to show you the entire process of coloring this drawing, starting with creating a Photo Filter adjustment layer.

I want the image to be cool, so I choose a very saturated Cyan filter color with maximum Density. I unchecked the Preserve Luminosity option so that all the white was filled with color.
Now I'm going to use a Layer Mask on the Photo Filter to draw in the light source in this scene. Since the mask is on, I'll have to paint with black to allow the white background to show through.

I start painting on the Layer Mask, quickly applying the light that was already prepared in my head. I paint the areas where the light hits, while everything else remains in shadow.
I keep drawing the whole scene until I get this...

Now the entire drawing is drawn. This gives me a very clear sense of what colors to use at the beginning. Since this was painted on an adjustment layer, this first step will be very valuable. Now I can take the liberty and play with the Photo Filter settings and see if I like something different.

But I decide to leave everything as in the original blue version, because I wanted to create a feeling of cold.
Now that I have my shadows done with my base color, why don't I also work on the lighting?
To do this, I'm going to duplicate the Photo Filter layer so that I get two such filters. Then I select the duplicate's Layer Mask and press Cmd+I (Ctrl+I if you're using Windows) to invert the mask. With this inversion we will ensure that the entire drawing again becomes monochromatic, without any colors, but this is only temporary.
I'm going to edit the settings of the duplicated Photo Filter and see how the warm ambient light will look...

Yes, it looks great! But... I think the light was too intense. The feeling of light outside was lost. Decreasing the Photo Filter's saturation wouldn't work because it would just reduce the saturation of the warm light... So I'm going to enable the Preserve Luminosity feature on this Photo Filter to allow the white to come through and return light to the drawing.

Now I got what I needed! Without any additional painting steps, I made the light warm while keeping the shadows cool! Conversely, the shadows outside turned out warmer because they were drawn with less saturation than the interior. The warm filter appears more prominently in the picture, thereby establishing that the temperature outside is warmer than inside the car.
Now, Photo Filters cannot apply any actions to this picture. They can't add enough darkness to the areas I want. So I'm going to add a new adjustment layer to achieve the darkness I want in certain areas.
I add an Exposure Adjustment Layer and adjust the Exposure, Offset and Gamma sliders until I get a very high contrast, dark version of the image.

It looks scary, of course, but remember that this effect is only as strong as the Layer Mask allows. I wanted to make sure I could achieve enough darkness in any given area. So, just like I painted the shadows in the first Photo Filter, I'm going to use the Exposure Layer Mask to paint on the dark areas.
For detailing smaller areas, as in this case, it's a good idea to first invert the Layer Mask so you can paint with White on Black.

It looks more realistic this way. By using multiple shades of gray here on the Layer Mask, I could control the amount of darkness in certain areas of the painting. Here you can see how I left the areas on the inside of the door frame and the bottom of the rolling bag darker.
At this point, it's time to think about adding base colors that these adjustment layers will interact with. For now, it's best to turn off all adjustment layers so you can just focus on coloring.
On a new clean layer underneath all the adjustment layers and line art, I'm going to fill the image with simple base colors.

Please note that the picture shows ONLY the base colors. There is not even a hint of shade or light. 100% pure colors of the main set.
Now that the base colors have been applied, you can re-enable all adjustment layers.

Now, it already looks like something! Adjustment layers interact with base colors exactly as they are supposed to!
At this point, the adjustment layers did their job. All that's left to do is add some details to the background, so I'm going to paint them on a separate layer below the base colors.

The background was very easy to draw, it was behind the base colors.
But... there is no feeling of harmony, as if something is wrong. The sky should be blue, not orange! Sometimes you'll have to edit an adjustment layer that isn't performing as well as it should. In this case, the Photo Filter, which we previously duplicated to add warm light, turns out to be the culprit in this situation. Here adjustment layers are presented in all their glory! We can easily edit the layer with the Photo Filter and reduce its brightness, and even remove areas covering the sky so that it remains blue.
I'm going to make the Photo Filter less saturated, and erase the areas where the sky is visible in its Layer Mask.

After these changes, the image looks almost ready for printing! But there is one more adjustment layer that I would add to make 100% sure that the result is really perfect...
On top of all the layers I add a Color Balance adjustment layer. Color Balance will allow me to make the final touches on the temperature of the drawing and the colors in the drawing. Almost all drawings could benefit from working with Color Balance. Sometimes the result can be much better than it was. And sometimes it won’t be needed at all.

That's all! I decided to change the colors and temperatures a little more to get the look I REALLY wanted to see. [Increasing the Red level helped to better match skin tones, and Yellow slightly diluted the saturation of blues.]
Now the drawing is confidently ready to print, and what's even better is that I can easily and quickly edit any of the adjustment layers in the future if I need it.
A FEW TIPS AND TRICKS

There are a bunch of adjustment layers and each of them has certain, unique effects that, one way or another, help your drawing. The trick here is to try them all and find their strongest points, which you can later use in your work. This tutorial is just the beginning if you're wondering how all these special layers can do so much for you.
Conversely, you need to remember that Adjustment Layers can't do absolutely everything for you. There will always be things you need to draw yourself. You shouldn't rely completely on adjustment layers; that's not what they're made for. The most important thing here is that Adjustment Layers act as ASSISTANTS, moving you towards the desired result.
It is quite possible to use adjustment layers to achieve a decent level of the final drawing, then simply complete the details and objects on new layers on top of the previous ones.

When drawing, you can note one of the most important characteristics of the Layer Mask - the Eyedropper “listens” only to the shades of gray on the mask. You can, for example, draw shadows, and ONLY worry about picking up the saturation of the shadows with an eyedropper. The eyedropper will simply ignore everything else, and will only work on the layer mask you're editing.

Layer Masks can be applied to any layer, not just Adjustment Layers. Want to delete something, but don't know if you'll want to put it back later? Simply apply a Layer Mask and make the area invisible by painting with black over the mask! This way, what you deleted will never be lost - just hidden! Paint the mask with white and everything will come back when you want it.
To make a Layer Mask appear, you just need to select the desired layer and click on the button (a rectangle with an oval inside), which is located at the bottom of the Layers panel. And then you know what to do!

Layer Masks can be extracted and copied to other layer masks, so you don't have to worry that what you draw will be locked onto that adjustment layer forever. To transfer what you drew on the layer mask to the actual layer itself, simply select everything, copy and paste the layer mask. It will look like a black and white drawing on top of your drawing.
To paste shades onto a new blank layer mask from another layer mask or from something you painted before, select the Layer Mask you want to transfer the drawing to and open the Channels panel. An additional channel will appear in your list, which represents the Alpha of the layer mask [or transparency]. Select that channel and make it visible, then just paste what you wanted into that channel. If you hide the channel, you will see a layer mask containing what you just pasted onto it, and you will get the result that you wanted to achieve this way.
This concludes the lesson! I hope you find this information useful.
YOUR POTENTIAL AND YOUR WORK IS AS LIMITED AS YOU LIMIT YOURSELF. NEVER STOP EXPERIMENTING!

Click on the picture to view the image in full size and 100% quality.
“Nothing beats the tried and true method. PRACTICE IS THE IDEAL, and I do what I can to help me achieve that.” (c) Matt Laskowski.
Allows you to use layers and blending modes as a basis for composing your images.
Layers
In order to try to understand “what image layers are,” let’s look at two photographs. One of them will be used as the background (or bottom layer), and the other will be used as the first layer placed above the background:
You can think of "layers" as multiple transparent slides placed in one stack. Paint.NET displays this stack of slides as if you were looking at them from above. At the same time, there is no perspective (distant layers do not decrease). In order to better understand how this works, let's look at our photo layers from the side, and not from above:

Pixels and transparency
Each layer in Paint.NET is made up of pixels that are saved in the RGBA format. The "RGB" part of the acronym refers to the colors (red, green and blue) used to convey color intensity. The “A” (Alpha) part denotes the variable used to store information about the transparency of the pixel. Alpha can range from 0 (fully transparent) to 255 (fully opaque). Other programs may use boundaries ranging from 0 to 100%.
If the pixel is transparent, then instead of its color, the color of the pixel located “under it” will be shown, that is, the color of the pixel of the lower layer. In order to display a layered image on a standard computer monitor, Paint.NET uses an alpha channel technique.
However, transparent pixels cannot be displayed on a computer monitor. In order to somehow indicate the transparency of the layer, Paint.NET uses a background resembling a chessboard image:
Transparency
If you see a background like this, it means that part of your image is transparent. The chessboard image is not part of the image. You can think of it as a virtual or "null" background layer that is always located below all other layers displayed in the Layers window.
However, as already stated, the "chessboard" is not part of the image. If you save the image, when you view it or use it in another program, there will be no checkerboard there (unless the other program also uses the checkerboard to indicate transparency).
Layers and Opacity
While each pixel has information about its transparency, each layer also has an opacity value associated with it. These two parameters are similar, and in most cases can be considered the same thing. You can think of a layer's opacity as the "alpha" value for each pixel in the layer.
For example, if we take the top layer and gradually reduce the opacity from 225 to 0, we will get the following images, showing the layers as a stack of slides and as it appears on a computer screen:

The top layer is completely opaque

The top layer is translucent

The top layer is completely transparent
Blending Modes
The layer's blending mode specifies how the layer is blended with the layer underneath it. To change the blending mode, select the desired layer in the layers window, and then open its properties. You can open the properties of a layer using a special button in the layers window or in. In any case, the following window will open:

Not all layer blending mode names are “intuitive,” so experimentation is always recommended. Each blending mode described below is applied to the two layers discussed above with the opacity level set to 255.
In the examples below, the term “composition” will be used to refer to the result of mixing the two layers in question. The "final" composition is what you see on your computer screen after applying a particular blending mode.
Normal
Standard mode is used by default. Each pixel in the layer is blended into the composition based on its opacity value. If the top layer is completely opaque, it covers the bottom layer completely. As the transparency of the top layer decreases, the bottom layer begins to show through.
Multiplication
This mode multiplies the visible colors of the bottom layer by the colors of the top layer. As a result, the image becomes darker. When white is multiplied with another color, it does not change. A similar effect is obtained by placing two slides (one on top of the other) and directing the images onto one screen.

Addition(Additive)
The color intensities of the pixels of both layers are added together. The composition is always brighter, with the exception of completely black pixels in the images.

Darkening the base (Color Burn)
Creates the effect of incineration of the lower layer under the influence of the upper one. That is, the dark areas of the top layer are used to darken the bottom. Color multiplication and saturation increase are used. The result looks very contrasty.

Lightening the base (Color Dodge)
The opposite of the previous mode - the bottom image “burns out” under the influence of the top color. When using this mode, the light areas of the top layer enhance the brightness of the bottom layer. Dark areas have no effect. That is, the greatest changes occur towards white.

Reflect
This blending mode can be used to add shine to objects or highlights.

Glow
The same as the previous mode, but as if after changing the order of layers.

Overlay
Depending on the color intensity of the layer's pixels, the Screen Dodge mode (for dark colors) or Multiply mode (for light colors) is applied.

Difference
Subtracting the top layer from the bottom. If a pixel on the top layer is white, then a pixel on the bottom layer is inverted. If a pixel on the top layer is black, then the pixel on the bottom layer does not change. If a pixel on the top layer matches the bottom, then the result is a black pixel. That is, matching colors will be black. Mismatched fragments will be colored.
Negation
At first glance, this mode is similar to the previous one, but in fact it leads to the opposite effect. Instead of making the color darker, it lightens it.

Replacement with light (Lighten)
When using this mode, only the lightest colors on both layers remain, resulting in a lighter image than normal layering.

Replacement with dark (Darken)
In this mode, pixels in a layer are placed in the resulting image only if they are darker than the corresponding pixels in another layer.

Screen Lightening
The opposite of Multiply mode in that it multiplies the color of the bottom layer with the top layer. As a result, the picture will become brighter, as if we were projecting it using two overhead projectors.
Exception (Xor)
This mode is primarily used for image analysis rather than image processing or composition.

Due to the fact that I began to receive many requests for creating a lesson after posting one image I colored, I finally decided to tear off my butt and write one! I'm really flattered by so many requests as I didn't think my Photoshop coloring technique was that appealing, but I think it's always interesting to learn how other artists create their work... anyway, I hope you find this tutorial interesting .
My first step was to draw a clear outline. I scanned the image I had at high resolution (pixel size 2389x3508), cleaned it up a little using the function Brightness/Contrast (Brightness/ contrast), which you will find here: Image - Correction - Brightness/Contrast (Image - Adjustments - Brightness/ Contrast). Adjusting the position of the sliders of this function will make the dark areas darker and the light areas brighter... Very useful for those who sketch very sloppily, like me...

The next thing I did was create a new layer to overlay the background color. Since my sketch is still on the bottom layer, I changed the settings ( approx. Blend Mode (Blendingmode)) my new layer on Multiplication (Multiply) , so I can still see it even after filling it with whatever color I want.

I chose a dark purple for the background and mixed it in with some light purple at the bottom left so I could have some fun with the lighting. After I was done with the purple mess, I merged the layers by right-clicking on the top layer and selecting Merge (MergeDown). Now you should have one layer left to work with (I'm too simple to work with many layers).

The next step was the actual coloring! I sketched out a very simple palette and started painting the base color with a regular brush (70% Opacity (Opacity) and 70% Hardness (Flow)). It looks terrible, but I promise it will get better!

At first I only work on the face, it's just my favorite part (not counting the belly). So I pick the colors I like and start working with the shadows. In the end, I'm starting to hate this process and get angry, so I get tired of this drawing, and I go play Mario Kart, lose and turn into an emo for a couple of days.

The next thing I did was add more shadows, adding darker colors and blending them. To mix colors in Photoshop, I simply lower the level Opacity (Opacity) brushes (brush) (in this case, values of 40% were used opacity (opacity) and 50% stiffness (flow) ). I also used pipette (eyedrop) to take a sample of the shadow color from the palette that I already created earlier (Alt hotkey - hold it down and click on the place where you want to take the sample).

We continue mixing colors and shading, I added some more colors to my palette as they were too soft. I just mixed them together during the coloring process. I paint over everything I did before many times, then you will see.

The face was too dark, so I brightened it up a little, then used airbrush (airbrush) I added some red and pink tones to her lips and cheeks. The airbrush is very soft (softer than a regular painting tool), which is why I like to use it when I need to do something light, like lips or blush.

The airbrush is in instrument settings (toolpresets) for a regular brush as you see in the image below.

I also added some color to the eyes and started shaping and detailing them... I re-did them a million times until I got what you see now.
I softened her face even more with an airbrush and added a fun purple glow. I zoomed out the image to make sure I liked everything about the face... And I didn’t like it. Her eyes were too far apart, making her face appear too wide. So I adjusted her eyes and finished them off, adding highlights and more colors to them. I also adjusted her lips because her smile looked a little tense.

After I was done (I was tired of) working on her face, I started painting the rest of her body, mixing different colors like I did before. True, now I take shadow samples from the face, since I changed the colors during the drawing process.

We set lights and shadows to give and maintain a believable light source.

After I've established the base colors, I soften her skin and start adding purple shadows again. For those who may have noticed me grinning at the purple lighting, it's because I actually hate the color purple, but for some reason I like coloring with it at the moment... Oh well, moving on.

Once I'm done with her skin (I say finished for now because I'm tired of all this painting, but maybe I'll come back and change some things here because I'm not really happy with the result), I start marking The main colors of her outerwear are hot pink! Yes! It's girly!

I continued to paint her clothes the same way I did her skin - establishing base colors and then softening them. I also decided to add purple highlights here, so I made them brighter. I also brightened up the color of her lipstick so it would go better with her clothes, and the same goes for her eye shadow. I really want pink to dominate this image!

After I added color to her lipstick and eye shadow, I went with a hot pink with a hint of opacity (opacity) and painted them for them. Mixed it well with the rest of the colors that were already present, then took the tool Dodge(brightener) With range (range) Sveta (highlights) and gave a vibration to the colors which makes the lips and eyes attractive and shiny.

For the pearl necklace, I first chose the darkest color, then added highlights to it, using a brush to lay down the base highlights, then used the tool Clarifier (Dodge) at the last stage to make the pearls more shiny. I also added a very light purple highlight to the bottom of each pearl.

After I finished the necklace, I started working on the finer details: the stone on her collar was painted using the same method as the pearls, and the same was used for the silver setting on the collar. For the lace I used a small brush with opacity (opacity) 80%.

The piercing is also fun to work with, the main image doesn't show much detail, so I showed it here. It was painted the same way as the pearls - dark colors first and then highlights added, I used a very small brush as the piercing itself is tiny. I also added shadows to make the piercing shimmer, don't forget about them!!

The last thing I had to do was color my hair, I just hate coloring it in Photoshop for some reason. It takes up so much of my time. Oh, anyway, I started by applying the base colors like I always like to do, but of course, mentally I understand that the texture of the hair is different, so I try to replicate it like real hair would look like.

Then I set the base shadows and started smoothing them out (this is the part I hate about doing hair, it takes so long).

Once her hair was smooth enough I started adding highlights using a brush with opacity (opacity) 20%. Keeping the position of the hair and its individual strands in mind, I begin to lighten it. For the ears and tail I did the same since she has ears like a cat and the tail has the same texture. Because I used a smaller brush for the ears, they look fluffier.

I added some bright highlights and then some purple lighting. I've scaled the image down to make sure everything is nicely rendered, and I'm making sure that the fur is a little smooth, which is what I was going for, so I'm adding some more detail to her top and skirt and adding some attractive clips and ties to her hair to make it look make her more attractive.

The last thing I did was fix some things that still irritated me (her hair and hands). I also added some sparkles to the background to fill it out a bit.

After adding some little purple highlights I was finally done! I more or less liked the result, perhaps because I liked all the girly colors that I used in the work, in any case, I was forced to use purple this time.
Anyway, I hope this tutorial has given you an idea of how you can color in Photoshop! I can’t say exactly how long this work took me... I didn’t sit on it continuously, but I think it was somewhere around 4 hours...
Lesson topic: "Springs"Lesson objectives:
Give the initial concept of a spring.
Based on laboratory work, talk about the formation of a spring
To develop students’ cognitive abilities: attention, memory, logical thinking, creative activity and interest in the subject, independence.
Foster a caring attitude towards springs, nature, and your health.
Equipment:
Presentation on the topic of the lesson.
Song "Live, spring" Spanish. S. Belikov
Music for relaxation
Cartoon "Hare Koska and Spring"
For experiment: cups, funnels, clay, sand, soil, water, cotton wool
Drawings
Mineral water and glasses.
DURING THE CLASSES
I. Organizational moment (slide 1)
II. Checking homework
Work in groups. Game “Don’t let your row down” (slide 2)
The class is divided into 2 teams “Rosinka” and “Droplet”
– Guess the riddles:
I am water, and I swim on water.
There is a water bridge on the water.
– On a hot summer day it is very pleasant to drink sparkling water or juice with ice. What properties of ice do people use in this recipe? (Tones, removes thirst, cools)
– Why did the inhabitants of the Far North used to build houses from snow? (Because snow and ice are poor conductors of heat) Igloo
– Who can name more properties of snow and ice? (Snow is white, opaque, odorless, loose, melts when heated. Ice is colorless, transparent, odorless, hard, melts when heated.)
– What properties of steam make it invisible to us? (colorless and transparent)
– How can you prove that water easily turns into steam, and steam into water? (When the water boils, it will begin to turn into steam. You need to hold a chilled plate over it. The plate will become covered with droplets of water.)
III. Announcing the topic of the lesson and explaining the new topic
Watching the beginning of the cartoon “Koska the Hare and the Rodnichok” (until the moment the Hare meets the Rodnichok) (slide 3)
– What did you learn from the beginning of the cartoon? (how the hare Koska met Rodnichok)
– We will also meet the fontanel in class today and you will learn a lot about it. The topic of our lesson is called “Springs” (slide 4)
-What is a spring? (Source, key)
- Let's play the game “I am a hydrogeologist.” Who knows what this word means? (This is a person who studies groundwater)
(slide 5)Hydrogeology (from hydro and geology), the science of groundwater, studying its composition and properties, origin, patterns of distribution and movement, as well as interaction with rocks.
Our task find out how springs are formed, what kind of water they contain. Let's do laboratory work.
Laboratory work (slide 6)
The surface of our Earth consists of three layers: soil, sand and clay. (slide 7)
Safety precautions
In front of you are ready-made funnels filled with soil, sand, and clay. Let's pour water into them and see what happens. At the end of the work, we will draw a conclusion and learn about the formation of the spring.
The guys pour water into ready-made funnels filled with soil, sand and clay and watch how it seeps out.
conclusions
: Soil and sand allow water to seep through, but clay does not allow water to pass through.
– What kind of water is in the glass?
- Clean.
Based on this experience, we will trace the formation of the spring. (slide 8)

It's raining. It passes through soil and sand until it encounters a layer of clay. Water accumulates and flows down the inclined surface until it finds a way out. This outlet is called a spring.
A spring from which a small stream flows may be the beginning of a river. (slide 9) Let's relax a little and play "Rucheek"
IV. Fizminutka (slide 10)
To the song “Live, spring” in Spanish. S. Belikov children play in the stream.
V. Children's messages (slide 11)
– And now our young hydrogeologists will tell us what they know about the springs.
– Without water there is no life. A person cannot live without water for more than 8 days. Water is a wonderful gift of nature. Humans need clean, fresh water to live. Humans are 80% water. (Slide 12)
Spring water is called "living" water because... it passes for many kilometers through fine sand, is saturated with microelements, and the water is perfectly filtered.
The temperature of spring (spring) water is up to 6 C, which prevents the growth of pathogenic bacteria in it. (Slide 13)
If a person often drinks spring water, he is less susceptible to various diseases. Pure spring water heals many diseases and increases life expectancy. (Slide 14)
It has been established that after 3 hours, spring water largely loses its medicinal properties. Therefore, you need to drink spring water, of course, at the springs themselves. Natural spring water gives energy to those who drink it.
Some springs have chapels that are of historical and cultural value. (Slides 15, 16)
Water from the source can be fresh or mineralized. In the first case we are talking about springs and springs, in the second - about a source of mineral waters. (Slide 17)
Resort cityEssentuki
It is famous for its world-famous drinking mineral waters - Essentuki 4 and Essentuki 17, its amazing mountain-steppe climate and picturesque hiking routes.
Currently, Essentuki takes a worthy place among the world's leading resorts specializing in the treatment of diseases of the gastrointestinal tract, liver, biliary tract, and metabolic disorders.
The basis of the resort resources of the Essentuki resort are salt-alkaline waters. In total, the Essentuki resort uses the waters of 20 mineral springs for medicinal purposes.
VI. Consolidation of what has been learned
1. Work from the textbook pp. 34-35(slide 18)
Read how springs are formed.
2. Independent work in notebooks page 14(slide 19)
– Paint a layer that will retain water. Show with an arrow in which direction the water will flow through this layer. Mark the place where the source forms.
3. Group survey (slide 20)
– Tell us how springs are formed?
– How can you prove that clay does not allow water to pass through?
– What kind of water is there in springs?
– What kind of water is called mineral water?
– How is it good for health?
– Who has seen springs in nature?
– Why should we take care of springs?
4. Relaxation (to the sounds of the murmur of a stream) (slide 21)
– Now close your eyes and imagine that you are next to a wonderful spring. Listen to how wonderfully it murmurs, how beautifully the birds sing...
VII. Summing up
1. – What new did you learn in the lesson?
– Did you like the lesson?
- Well done, you worked well today. (Lesson grades
)
– In the next lesson we will continue our journey on the topic “Water in Nature.”
2. Homework: pp. 34-35
– Together with a friend, come up with and draw a poster on the theme “Protect the springs!”
3. Now let's try mineral water. (slide 22)
Similar articles
 The best amulets against the evil eye and damage Amulet against the evil eye with hands for children
 How to read the Psalter correctly
 Delicious dishes with sausages
 A glimpse of Bella. Romantic chronicle. A glimpse of genius. Messerer about Akhmadulina Boris Messerer glimpse of Bella romantic chronicle
 I dreamed that I was sailing on a boat on the river
 How to cook beef entrecote in a frying pan
 About the company Foreign language courses at Moscow State University
 Which city and why became the main one in Ancient Mesopotamia?
 Why Bukhsoft Online is better than a regular accounting program!
 Which year is a leap year and how to calculate it