
Is it possible to install on Windows 8? Installation from a flash drive
In this article we will walk you through step by step how to install Windows 8 from a disk or flash drive. The option with a flash card is relevant for owners of netbooks or those whose DVD drive is damaged.
First of all, you need to download the Windows 8 image from our website. Then you can proceed to the installation process of the operating system. Conventionally, the entire process can be divided into 4 stages: the preparatory stage, recording the image, the installation itself, and finally - installing programs and drivers.
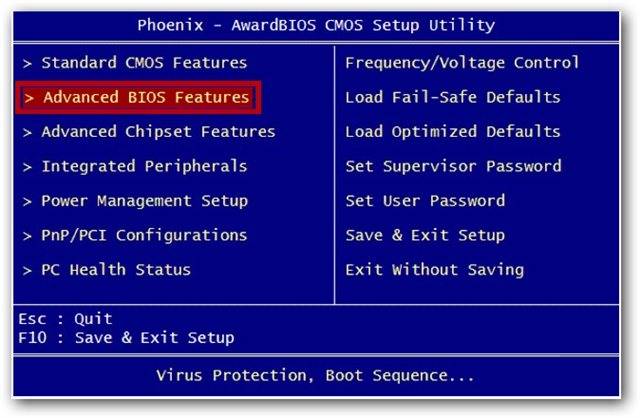
Preparing the system for installing Windows 8
Before installing Windows 8, you need to make sure that your PC meets the requirements of the Eight:

However, if before you decided to install Windows 8 on your laptop or computer you had Seven installed, you don’t have to worry, Eight will work on it without problems.
You will also need a flash card with a capacity of more than 4 GB if your goal is to install Windows 8 from a flash drive or an empty disk. After installing the operating system, all data from drive C will be lost, so do not forget to save all important information. If you want to install Windows 8 via a flash drive, it should also not contain important data, since during the process it will be formatted and all data will be erased. We also recommend that you worry in advance and download drivers for your computer.
Burning an image to a disk or flash drive
To install Windows 8 from a disk, you need to burn the image downloaded from the site to a DVD. There are many utilities for this, for example, Discs Studio. To burn an image in this free program, follow these steps step by step:
- Launch Discs Studio.
- Select the Action menu section, and in it - Burn image.
- In the window that you will see, indicate where the image is located, which should be on the disk.
- Click the Record button.
- We are waiting for the process to complete. Ready!
If you are interested in the option of how to install Windows 8 from a flash drive, you need to burn the image to a USB drive. A program like UltralSO is suitable for this. In this program, the image is written according to the following step-by-step instructions:

Installing Windows 8
Now you can go directly to how to install Windows 8 on a laptop or computer:

The process is complete, now you know how to install Windows 8 from a disk or flash card. You can get acquainted with the Metro interface and install drivers and utilities.
Installing Windows 8.1 is not a very difficult task if you know the main algorithm of actions and steps for correctly installing and configuring the system. Windows 8 was released in October 2013; in April 2014, users were able to upgrade to Windows 8.1, which was a bug fix for the 8th version of the system. At the moment, Windows 8 is not receiving updates and is not supported, in favor of version 8.1. Windows 8.1, in turn, will be supported until January 10, 2023.
To install Windows 8 or 8.1, you will need installation media from which installation will be performed in the future. To create an installation USB flash drive or DVD, you will need the Media Creation Tools utility for Windows 8.1.
Step-by-step installation of Windows 8.1 in pictures
After downloading the utility, run it and select the desired image option: Language, Edition and Architecture
- One of the many system languages
- Editions are divided into Windows 8.1 Home, Professional or Single Language (which was installed on laptops and all-in-one PCs in 90% of cases).
- x32(x86) and x64-bit system architectures

After selecting the image, select the location of the installation file: Immediately burn to a USB drive or save the ISO file for further recording to a DVD, USB, or just for storage.

The utility will then show the estimated time to download and create the installation media.

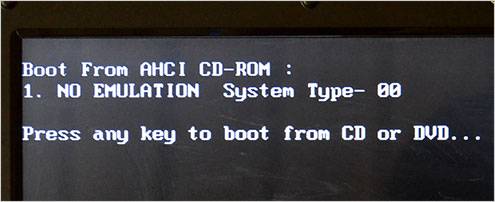
The installation media is ready, all you have to do is boot from it and start the installation. To do this, you will need to reboot your device and go to the BIOS and set the boot priority or call the Boot menu and select the installation media. An article on how to enter the BIOS and call the Boot menu will be in the following topics.
We booted from a USB flash drive or DVD and see the installation window. We are invited Install system or start System Restore. Button Install will continue the installation process and Recovery will launch a window of possible WinRE (Windows Recovery Environment) recovery points. We press Install and we move on.

Then we are greeted with a window for entering the activation key. If you have a key “sewn” into a laptop or all-in-one computer, you will not have to go through this stage if you have chosen the system image correctly. In other cases, you need to enter the key; the technical key is 100% suitable in this case.
Windows 8 and 8.1 technical keys ( these are not activation keys, they only skip the step of entering the key at the time of activation and can help in upgrading the version of Windows):
- XKY4K-2NRWR-8F6P2-448RF-CRYQH(Windows 8 Professional)
- FB4WR-32NVD-4RW79-XQFWH-CYQG3(Windows 8 Home)
- XHQ8N-C3MCJ-RQXB6-WCHYG-C9WKB(Windows 8.1 Professional)
- 334NH-RXG76-64THK-C7CKG-D3VPT(Windows 8.1 Home)
note that there is such a version as Windows 8(.1) for one language with Bing- this is a version that was supplied to very cheap laptops and a clean image for this system is practically impossible to find. In this case, if you are a user of this system, it is advisable not to reinstall the system, but to reset the laptop to its factory state.
In our case, we’ll substitute the key for Windows 8.1 Professional and click Further.

Accepts the terms of the license agreement by checking the appropriate box and clicking Further.

In the Installation Type selection window, we are offered 2 choices: Update and Custom Installation. Update only possible from a running system if we booted outside the system (from the BIOS or Boot menu, this option will not be available to us). If we plan to reinstall, then select the item Selective installation.

The next window shows us the drives on which the installation will be performed. In the example, only one Disk 0 is indicated as Unallocated Space, this means that an empty hard drive is defined, which is completely not ready for installation. To install the system, you need to partition the disk; to do this, press the button Create and select the amount of space we need to create a logical disk on which Windows 8.1 will be installed.

To create a partition and disk layout, the system can create additional partitions (for MBR format 1 additional partition, for GPT - 3 partitions). They are necessary for the correct operation of the system and services - the boot area, the WinRE (recovery) area, etc.

After partitioning the disk, select the desired partition, in the case of the example it is Partition 2 with type Basic. In your case, the partition and disk numbers may differ; the main thing is to know which partition the installation will be performed on. In our case - Primary (on which the system or partition specially created for installing Windows was previously installed).

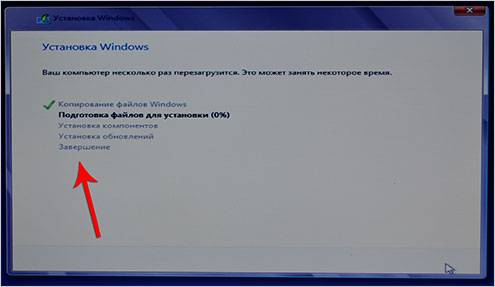
After selecting the desired partition, installation begins. During the installation process, the system will reboot several times; this process can take from 10 minutes (on SSD drives) to an hour (on older and slow devices). 
After completing all the settings and reboots, we will be greeted by the OOBE (Out-Of-Box Experience) system settings window. First you need to select the system color scheme and computer name.

Then, configure the system parameters.

In the parameters you can select settings Windows Update, as well as parameters Protection And Privacy.

If you immediately set up an Internet connection (Wi-Fi or Lan connection), you will be prompted to log in using your Microsoft account. Your right to use it or switch to a local user. A Microsoft account allows you to change your password online and also synchronizes basic system personalization settings. In the case of the example, a local profile is created, here you can set the profile name, password and password hint.

After entering all the data, Completing the settings will begin; this process takes 3-7 minutes (depending on the performance of the computer).
In this article we will summarize the issues of installing Windows 8. In addition, we will summarize other articles that are on the site and relate to setup and convenient work in Windows 8. Installing Windows 8 is possible on a regular computer, laptop, netbook or on a virtual machine. This guide will be primarily useful for beginners who want to install Windows 8 themselves, perhaps this is your first time installing Windows yourself.
System requirements for installing Windows 8
Let's start by installing Windows 8 on a computer, laptop, netbook. To find out whether Windows 8 will work well on your computer, check whether its parameters meet the minimum system requirements for Windows 8. So, here are the minimum system requirements:
- processor at least 1 GHz;
- 1 GB of RAM for the 32-bit version;
- free space on your hard drive (hard drive) of at least 16 GB;
- DirectX9 support;
- a working DVD drive or USB port (in the case of a USB port, the BIOS must support booting from USB).
And now some comments on these requirements. You may have a question: how do I know what the parameters of my computer are? The question is quite logical. There are two ways here.
First - if you have Windows XP on your computer, then to find out its parameters, right-click on the icon My computer, in the list that opens, click on the last item Properties. The window “ Properties of the system" Screenshot:

Here we are interested in the item called System. We see the following lines: Pentium(R) 4 CPU 3.00GHz 1.99 GB RAM. What do they mean? Pentium(R) 4 CPU 3.00GHz - model of the Pentium 4 processor with a frequency of 3.00 GHz; 1.99 GB RAM - means that the computer has 2 GB of RAM. Comparing this data with the minimum system requirements, it is clear that it is possible to install Windows 8.
In Windows 7, right-click on the icon Computer, in the list that opens, click Properties. A window will open View basic information about your computer. Let's look at the screenshot:

As you can see in the screenshot, the processor frequency is 2.1 GHz, and the RAM is 2 GB. This means that the computer settings are suitable for installing Windows 8.
The second way is that the manufacturer himself indicates these parameters, for example, in the instructions for your laptop or on the box. Or if you bought a laptop in an online store, then they, as a rule, write in detail the parameters of each laptop on their website.
Preparing to install Windows 8
Now it’s time to decide from which media Windows 8 will be installed. There are two options: installation from a disk or from a flash drive.
Installation from disk
If you have a ready-made installation disk with Windows 8, then you can safely start installation from it.
If you have an image of Windows 8, you can burn it to disk. All questions about installing Windows from a disk are discussed in the article: How to install Windows 8 from a disk.
Installation from a flash drive
By “installation from a flash drive” we mean not only a regular flash drive, but a memory card will also work. To install any Windows from a flash drive, including Windows 8, you need to make it bootable. Read more about this in the article: How to make a bootable USB flash drive with Windows 8. One more condition: Your computer, or rather its BIOS, must support USB ports. Read more about installing Windows 8 from a flash drive and setting up the BIOS in the guide: How to install Windows 8 from a flash drive.
When installing Windows 8, the following window will appear:

After waiting a little, a window will appear where you need to select the language and keyboard layout to be installed:

In our case, we chose Russian and click Further

Click Install.
In this window there is an item System Restore. With its help, you can restore Windows 8 after some kind of failure.

Now we are prompted to enter the product key. This is necessary for your copy of Windows 8 to be activated. If you do not have a key, you can continue with the installation, but in this case your Windows 8 will not be activated. You can activate it later after the installation is complete. In any case, click Further.

Here is a license agreement. To continue installing Windows 8, you must accept it.

Select the second installation type: Windows installation only (for advanced users). Let's move on to the next window:

Here we choose where to install Windows. It is best to have at least two local disks on your computer. In this case, we install Windows 8 on one disk, and leave the other for other data, for example, for movies, music, documents, etc.
To divide the hard drive into several local drives and/or format it, click Disk setup.
In our case, we leave it as it is and click Further.

Let's wait a few minutes. After completion, the computer will reboot and the familiar start window will appear:

Settings will then open.

In this window we can change the color from the current one to some other one. Be sure to enter the computer name and continue installing Windows 8 by clicking Further.

For now, let's stick to the standard parameters. Click Use standard settings.

Logging in - a Microsoft account will allow you to synchronize the settings of several computers and provide access to the Windows Store application store. If you do not have such an account and want to create one, then click Register a new email address. For those who do not need this, click Sign in without a Microsoft account.

Here we are again asked to create an account, but since we refused it, we click Local account. And if you suddenly need this account, you can always create it in the already installed Windows 8.

Everything in this window should be clear: enter the username, optionally a password with a hint (optional). Windows 8 installation is almost complete. Click Ready.
After waiting a little, a new look of Windows 8 will appear. Here is its screenshot:

Congratulations! Now you have a new Windows 8. You can install the necessary programs on it, as well as an antivirus. Here's a guide to it: The Complete Pack of Essential Free Software for Windows.
How to install Windows 8.1 can be viewed in video format, to download, follow the link: download.
Adding a Start button (menu) in Windows 8
One of the innovations in Windows 8 is the absence of the familiar Start button with its menu. For those who do not agree with this innovation, it is possible to return the Start button. How to add a Start button (menu) read in the article: How to make a classic Start menu in Windows 8.
Installing Windows 8 on virtual machines
What is a virtual machine? In short, this is a program that allows you to emulate the operation of a computer. As a result, you seem to have another computer, but a virtual one. You can install Windows 8 on such a virtual machine. The two most popular programs for creating a virtual machine are Virtual Box and VMware Player. We read how all this is done in the manuals: How to install Windows 8 on a virtual machine (Virtual Box) and Installing Windows 8 on VMware Player.
Let's finish here. Please write your feedback and/or questions about installing and configuring Windows 8 in the comments to the article.
The time has long passed when updating the operating system was only possible for a specialist. Now developers are striving to make working with their creations as simple as possible, so that even a “teapot” can do it. All processes are automated, so a person only needs to set custom parameters.
Preparing for installation
Oddly enough, in this path the preparation process seems to be the most labor-intensive. This is the one that will require the most time.
What do we need
The first step is to make sure that your computer meets the minimum system requirements for this OS:
- processor with a clock frequency of at least 1GHz;
- RAM 1GB (for 32-bit system) and 2 GB (for 64-bit);
- graphics adapter with video memory of at least 128 MB. At the same time, it must necessarily support Direct x technology (at least version 9);
- So, having installed the application, launch it;
- then open the item “write image to disk” (in English versions this item will be called Write image file to disc);

- then a window will pop up in which you will need to specify the path to the image. We find it and indicate it;
- then insert a blank DVD disc (it is recommended to use the R version);
- In the settings you should set the minimum recording speed. This will guarantee that the system will be stable;

- At the end, click on the record icon.
Advice: if your computer has an integrated video card (that is, a built-in one that does not have its own video memory - it separates it from the RAM), then you need to set its performance to the maximum value in the BIOS settings.
It is worth noting that if your computer has difficulty meeting these requirements, then it is better to give preference to earlier versions. As a rule, many owners of weak PCs complain about the monstrously low performance of their machines.
If you have a relatively new PC, then eight will allow you to use it 100 percent. In particular, the performance of processor cores increases.
Create an installation disk
If you want to install via BIOS from a disk, you will need to first create it. Some inexperienced users may think that it will be enough to simply transfer all files to removable media, but this is not the case.
To create a boot disk, you must do the following:

Important! Be careful when installing ImgBurn. In one of the items, uncheck the boxes so as not to install Yandex. Bar and other unnecessary software.
After some time (depending on the speed of the drive), the process will be completed. The resulting media can be used as bootable media.

How to install Windows 8 via BIOS from disk
Now the turn of the most important stage has come. "Eight" can be installed on top of an existing system. The main thing is to specify a different section so that critical errors do not occur.
However, it is recommended to fully format the disks. This allows you to avoid many possible mistakes. In addition, in this case the system will definitely get rid of viruses. Don't forget to transfer all important files to some kind of removable media.
Video: installing windows via bios
Bios settings
Before installing Windows 8, you will need to perform some minor preliminary manipulations. In particular, it is necessary to set the boot order - make the disk drive first. To do this, you need to open the BIOS (“blue screen of death”, as inexperienced users call it).
In fact, there is nothing complicated about it.
In some versions of motherboards, you can select the boot menu when turning on - to do this you need to press a certain key:
- F12– for manufacturers such as Acer, Fujitsu Siemens, Gigabyte, Lenovo, Toshiba;
- F11– As rock, ECS, MSI (Micro-Star), Sony Vaio;
- F10– Intel;
- F9– Acer, HP;
- F8– Asus, Packard Bell;
- Esc– Compaq, Asus, Samsung.
Unfortunately, it is not always possible to call up this menu. Then you have to go into the “blue screen of death”. In order to call up the BIOS, you need to press a certain key (F2-F12, Del, backspace, Enter and others). It also depends on the motherboard manufacturer.
Some manufacturers modify computers, which changes their BIOS management. Therefore, sometimes problems can arise with this.
It is best to refer to the instructions:

You can use, for example, a flash drive instead of a disk. Then you will need to put the USB port in first place.
Installing Windows 8
If everything was configured correctly at the previous stage and the distribution image is working, a message will appear asking you to start downloading. You will need to press a key (it will be written in the message). Then we wait a few seconds, and the installation process will begin.
It is worth noting that the installation process has been significantly simplified compared to the previous version.
We do the following:

Tip: if you make a mistake with your choice, you can later change everything in the settings.

No matter how funny it may sound, this completes the installation process (at least the part that is required directly from the user). After some time (on average 15-20 minutes), the installation program will complete its actions and restart the system. That's all, the desired “eight” is installed on the computer.
System Setup
If you installed 8 on an existing system, then when you restart the computer you will need to select it from the list provided. After the first launch, you will need to make initial settings.
Let's look at them step by step:
“Thank you, I have everything!”
"No, no, all the best"
“You got it with your updates!”
It was precisely these opinions that Microsoft managers encountered in their surveys, wondering why users do not want to change to a new, more beautiful and faster Windows 8.
Needless to say, even today “Seven” is installed on the computers of almost 60% of Windows OS users. And yet, there are people who are enthusiasts. People who are not used to using the “familiar” versions. People for whom the experiment is more important than the result. Subjectively, I am for everything new, even if at first it is not familiar and does not seem very convenient. Yes, let me note, that’s exactly “it seems.” Often what is convenient for us is what we are used to. And vice versa, what is uncomfortable is what you are not used to. So that’s why Windows 8 became not very popular, probably because of its innovation, for which people were simply not ready.
Where to download Windows 8
You will be surprised, but this can be done without any problems on the official Microsoft website. Of course, as always, I am for installing licensed operating systems, so this article is not about cracks, keygens, etc. If you have already purchased a key for Windows 8, or you got it somewhere :) this article will be very useful to you. (Although often the installation process of a licensed and pirated OS is practically no different).
This article will talk about installing Windows 8 from scratch or reinstalling the system. If you want to upgrade Windows 7 to Windows 8, I will write about this separately. (We will only briefly touch on updates in this article.)

If you installed Windows 8 simply because you have a license key for that particular version, upgrading will be a good solution. After all, Windows 10 has already been thoroughly improved. If for some reason you need Windows 8, we refuse to update. By the way, the update can be done, of course, later.
Our Windows 8 has been successfully installed. Congratulations! Installing any OS has its own nuances and within the framework of one article it is difficult to predict ALL possible difficulties. If such problems arise, do not be upset, and be sure to describe them in the comments below and get help.
Similar articles
 The best amulets against the evil eye and damage Amulet against the evil eye with hands for children
 How to read the Psalter correctly
 Delicious dishes with sausages
 A glimpse of Bella. Romantic chronicle. A glimpse of genius. Messerer about Akhmadulina Boris Messerer glimpse of Bella romantic chronicle
 I dreamed that I was sailing on a boat on the river
 How to cook beef entrecote in a frying pan
 About the company Foreign language courses at Moscow State University
 Which city and why became the main one in Ancient Mesopotamia?
 Why Bukhsoft Online is better than a regular accounting program!
 Which year is a leap year and how to calculate it