
House tent for cats. DIY cat tent
We've seen a lot of different photos of cat tents on the Internet and Facebook, but there are no detailed instructions anywhere. We decided to show you clearly how in five minutes you can make an excellent tent for your pet. This cat house is very easy to make. To do this we only need a few things: an old T-shirt, some wire, a couple of wire hangers, a piece of cardboard and tape.

So, let's prepare the materials:
The pussy itself
T-shirt in a small size and color of your choice.
A piece of cardboard approximately 40*40 cm
Two wire hangers
Pins
Scotch
Pliers (to shape the wire into the desired shape)
We prepare the wire.

We cut off the hooks on the hangers and straighten them. You don’t have to do this, but the author decided to still devote a little time to this for fun.
Let's deal with wire and cardboard.


We shape the wire into a semicircle; to do this, take the straightened hangers and bend them a little. In our case, the cardboard looks a little ugly, so we decided to refine it. We carefully tape the edges on all sides with tape and get this look. Looks better, doesn't it? This will also give the cardboard a little strength.
Holes for wire

In each corner we make neat holes with a diameter approximately the same as a wire. Don't make them too close to the edge, otherwise your house may not last long.
Fastening the hangers together


We fold the hangers and tie them tightly with adhesive tape exactly in the middle. They must hold on very tightly. Then we place the base of the tent on the cardboard. The ends should fit exactly into the holes we just made.
We bend the ends.


We thread the ends of the tent base through the holes and bend the wire on the back side of the cardboard. The tips should not be very small, because we also need to secure them. We offer tape for securing, as shown in the picture above.
Let's check the basis.

We put the cardboard on the floor and make sure that the wire is fastened securely and strictly in the middle, and that the house itself does not tilt to one side. You can also use pliers to adjust the wire a little if it seems to you that it is not even.
Let's create a tent!


We put the T-shirt on the base so that the collar of the T-shirt is the “entrance”, and the sleeves and hem can be turned inward and secured with pins or threads. The fabric should be tightly stretched.
Invite your cat!
Cat lovers are often interested in the question of how to make a comfortable soft house for their pet with their own hands. Of course, you can buy ready-made products, but it is much more interesting to make them yourself, taking into account the cat’s character and preferences.
Peculiarities
When looking at the assortment of specialized stores, one can only admire the products for pets. But they are not cheap, and spending money on it is not always wise. After studying, you can try to make a soft shelter for the cat yourself. Please note pay attention to the following details:
- Form– it must correspond to the character and habits of the pet. Some cats like to be visible - an open bed is suitable for them, others prefer to rest in a secluded place - a closed structure like a booth is better for them.
- Next, it is important to decide sizes house. The cat must fit freely in its shelter. If this is a cat, then you will need to take care of future kittens.
- Material for finishing it should not absorb dust and dirt, be easy to wash, meet all safety requirements - have no sharp corners or partitions, no pungent odor.
- The cat must comfortable feel like you are in your hiding place.
It is best to sew a house that will suit the overall interior of the room.
Possibility of design and configuration with other elements
All materials used to construct a soft house are classified into the following groups:

- To create a structure frame - or chipboard. They should not have a pungent odor.
- Plastic is suitable for the base of the bed.
- For soft upholstery - plush or carpet. Soft structural parts are also sewn from them - bedding, pillows, partitions, etc. Cases made of material are filled with foam rubber or synthetic padding; there are also artificial granular fillers that can retain heat.
- The structural connections can be made of metal. This will increase the operating time of the product. Also, the parts are held together with glue, which should not have any odor. A stapler should not be used; its staples may cause injury to the animal.
When making a soft house with your own hands, you need to think about decorating it. Proper decoration of the product helps to organically use it in the interior. The main rule is safety so that the cat does not chew or swallow the parts.
Soft houses are the easiest to decorate. From fabric of a contrasting shade you can sew:
- Imitation of curtains.
- Small pads.
- Animal faces.
- Paw marks, etc.
Decorative elements are fixed to the base and you get a cozy soft house for your pet. For the roof, you can make an imitation of tiles, the sun, flowers or bows.
Tools and materials for finishing
You can customize the soft house to suit your taste and give it different shapes. To create a classic model you will need the following tools:
- Foam rubber to hold the shape with side walls, at least 1.5 cm thick.
- It is recommended to lay foam rubber at least 2.5 cm thick on the bottom.
- Dense fabric for decoration, interior and exterior decoration of the house.
Installation and Security
During construction, you should not use sharp fasteners, paper clips, or a stapler so that the animal does not get hurt.
Also, in accordance with the breed of the cat - fluffy or smooth-haired, you need to select fabrics, with or without insulation.
Important!
The material must be natural and not electrified. You need durable fabric so that it does not get damaged by your pet's claws.
Options
There are a huge number of different options for soft houses; you can design your own model to suit your taste and the needs of your pet. She may have additional elements - scratching posts, toys on mounts, etc. The most popular options are:
- Beds (you can see how to design a bed from boxes).
- Booth houses with a round entrance.
- Game complexes.
Soft bed: how to sew?
Not every cat will like a closed house. Many people prefer a comfortable open soft bed to be able to observe what is happening around them.
It is very easy to sew such models.
To create a bed with sides, you will need a small flat pillow suitable for a cat, with a synthetic filler, as well as material for decoration. Creation includes the following steps:
- The pillow is cut to make 2 elongated elements for the sides and one larger one for the bottom. Each piece is tightly sewn, and an additional seam is made in the middle on the sides.
- The decorative fabric is laid out so that all the details of the structure can be covered later.
- Then a bed with sides is formed, a pillow or soft blanket is placed in the middle, which can be washed when it gets dirty.
Useful video
In the video you can find instructions on how to create a bed yourself.
We sew a round house
You can knit a soft house for a cat even from simple strips of knitted fabric.
The work is done with a thick crochet hook. Strips from unwanted T-shirts are pre-cut. The most optimal size of the house is 48 cm with a window of 10 by 20 cm, but first of all you should focus on the cat. Knitting a round bottom starts from the center; it is enough to knit 20 rows.
Sheathing of “hard” material
To finish the hard plywood from which the house is made with a soft cloth, you can use a glue gun. Preference should be given to fabrics with short piles, because long piles become clogged with dust and dirt over time, and the upholstery cannot be removed and washed.
Attention!
If you need to finish a scratching post, then jute, hemp or linen rope is most suitable for this. It is better to take a thicker one so that it is more convenient for the cat to sharpen his nails.
Hammock
Anyone can make the simplest hammock. First, a frame is made of wood, which is sheathed with decorative material, then the roof is installed and the hammock is fixed to the size of the pet. More complex models are complexes of structures with platforms, shelves, deck chairs, and columns.
You can often find hammocks for cats under a chair; it is easily attached to the legs. The product can be quickly knitted or sewn from fabric.
Useful video
You can watch the video for more details on how to create a hammock for a cat.
From a T-shirt or sweater


 The simplest design of a soft house is made from a T-shirt (if you want something warmer? Use an old sweater). This requires a box the size of the cat. One of the ends is removed, a T-shirt is pulled over the house so that its neck matches the place where there is no wall. This house with a round entrance is very comfortable and easy to design.

Useful video
To learn how to create a cat house from a T-shirt, watch the video below.
And video instructions on how to make a sweater.
Wigwam
The shape of the wigwam is a cone with 6 sides, one of which has an inlet hole. To create a house, first a pattern is drawn on cardboard and then fastened together.
A fabric is attached to the bottom of the wigwam or a flat, comfortable pillow is placed on which the cat will be comfortable to lie on. The outside of the wigwam is covered with textiles.
Useful video
You can see how to make a wigwam for a cat in the video below.
Built-in
Built-in soft houses for pets have recently become very popular. They don't take up any space at all. For example, a bedside table with a soft sleeping place for a cat inside. The inside of these houses is upholstered with plush or other pleasant materials, complemented by a bed or pillow. This option is easy to apply in quality.
From foam rubber
A sleeping place for a cat made of foam rubber turns out to be very cozy and comfortable. To create a house you will need:

- Foam rubber.
- Thick fabric.
- Pencil and paper for pattern.
- Threads.
- Needles.
- Sewing machine.
- Safety pins.
A house for a pet is quick and easy to make. The work consists of the following stages:
- Pattern. The result should be 8 blanks and 2 templates for the bottom.
- The blanks are transferred to the fabric. There must be 2 cm left on the material.
When transferring blanks to fabric, 4 out of 8 fragments are transferred to the front fabric. This will allow you to sew parts along the contours faster later. - The blanks are transferred to foam rubber. 4 parts are made for the walls and 1 for the base.
- The fabric is processed with a zigzag along the entire perimeter.
- Then each piece of foam rubber is covered with 2 pieces of fabric.
- A hole for entry is made in one of the 4 walls and the 4 walls are fastened together.
- The blanks are stitched in the process of fastening from the inside out.
It’s so easy to design a soft foam house for your pet.
Conclusion
A soft house for a cat, made with your own hands in accordance with the habits of the pet, will become a real place of relaxation for him. Also, self-design will save money, since such products are quite expensive in pet stores. Want to see all types of houses? Read this one.
For each of us, home is a cozy room, a warm hearth, delicious food, a warm atmosphere, and for many also a beloved pet cat, which, like us, needs its own secluded corner. Of course, you can buy a beautiful house at a pet store, but it’s better to do it yourself, especially since we have 13 wonderful options with detailed instructions in the photo.
Solar tent
Anyone can make such a tent for a cat. All you need is a bright T-shirt, a couple of wire hangers and cardboard.
Materials
So, prepare: a T-shirt, thick square cardboard, two wire hangers, adhesive tape, pins, pliers.

Cut off the ends (hooks) of the hangers.

We make stands from hangers. To ensure density and smoothness, tape the cardboard around the edges.

We make small holes (to hold the wire tightly) in each corner.

We cross the wires and secure the top with tape. Check that the legs of the stand are touching the corners of the cardboard. Insert them into the holes.


Bend the ends of the wire on the reverse side. 
To make it easier to move the tent, cover any protruding bends with tape.

The frame is ready. Make sure the wire posts are symmetrical. If necessary, trim them with pliers.

We cover the frame with a T-shirt, folding it as shown in the photo below. The T-shirt should be pulled tight enough.


Place a soft pillow or blanket inside and present the new thing to your cat!


Cardboard tower
A structure made of layers of corrugated cardboard for a cat looks very aesthetically pleasing and unusual. Repeat after us and you will get the same thing!
Materials
Prepare corrugated cardboard, cutter, pencil, compass, glue, brush.


Drawing circles
First of all, let's draw layouts of our cardboard disks, located one above the other. The result will be 8 groups of 4 or 5 disks of a certain size. The dimensions will depend on the size of your pet, but in our example the radii are as follows:
- 21.5 cm
- 21 cm
- 20.5 cm
- 20 cm
- 19.5 cm
- 19 cm
- 18.5 cm
- 18 cm


Cut along the drawn circles.


Basic circles for the bottom
Now we form the base of our house. We cut out a solid disk with a radius of 21.5 cm (without a hole inside), then draw exactly the same 6 disks, but with a hole (we measure 4 cm from the edge in the same way).

We place the discs on a solid base.

Assembling a pyramid.


Drawing the entrance opening
We measure the height of the opening and remove the excess top. Draw the boundaries of the door. You can draw any shape.


On each disk we mark the boundaries of the opening.

Cutting out the door
Using the marked signs, we draw straight cutting lines on the disks. It is important to determine their correct angle of inclination.


Putting the circles back together 


Glue the disks into a pyramid


Let's call the cat!
After the structure is completely dry, we arrange a soft place inside and delight our beloved pet.


Luxurious sofa for an important cat
How long can you occupy your cat’s favorite place on the sofa? Finally, sew him your own. And don't forget about the bows!


For work, prepare:warm fabric (in our example, corduroy), material for the bottom of the sofa, material for interior decoration, padding polyester, scissors, thread, needles and a sewing machine.
Let's draw a layout. Dimensions are determined by the size of the animal. The optimal width of the side panel is 20 cm.

The bottom consists of dense fabric on the bottom, padding polyester and corduroy on top.

Sew the layers together.


We cut the side. Sew along the edges, leaving one side unsewn.


We first attach the side panel to the bottom with pins.

We fill it with synthetic fluff.

Sew up the hole.

Now it’s the turn of the sofa cushions. We also fill it with synthetic fluff. If desired, add a patterned stitch along the edges.

We decorate the crib with bows or other accessories, for example, fish. We admire it!

Cat in the chimney

Materials
To make such an original house for a cat, prepare: a wooden tube of the required size (can be purchased at a hardware store), acrylic paint, sandpaper, wood glue, a ruler (or measuring tape), a piece of foam rubber or soft fabric for interior decoration.


We measure and cut the tube to the required size.


Cutting out the stand
We draw two straight lines along the tube at a short distance from each other.

We cut along the marked lines.

Thus, we will get a rounded piece that will serve as a stand for our house. Sand the rough edges with sandpaper.

Glue and paint
We paint the main structure and the outside of the stand. After the paint has completely dried, thoroughly glue the stand to the house. Turn the structure upside down and tightly clamp our stand to the base. Wait for the glue to dry (this will take about 30 minutes).

Glue a piece of foam rubber for softness.


Cozy details
Cover the bed with a blanket and place a small decorative pillow. You can also decorate it with curtains on the sides or hang a funny toy for the kitten.


Hanging cat house and shelves - original composition
Such an unusual project will become a real highlight in your home. Now the cat house imitates a hanging shelf, and real small bookshelves serve as steps for it.

We build the house from ordinary wood plywood, cutting out a doorway and a small window in the shape of a cat's face.
 But the most creative element of the composition is the cable bridge! It is made from cut strips of birch plywood and grommets connected to a cable. We buy it at a hardware store. Cable ties and mounting clips are also useful. We use a laser cutter for cutting.
The final touch is rugs on the roof of the house and on the steps-shelves. We fasten them with construction glue.

A cat in a poke!
And this project will show an interesting version of a cozy bed that can be used in different ways.

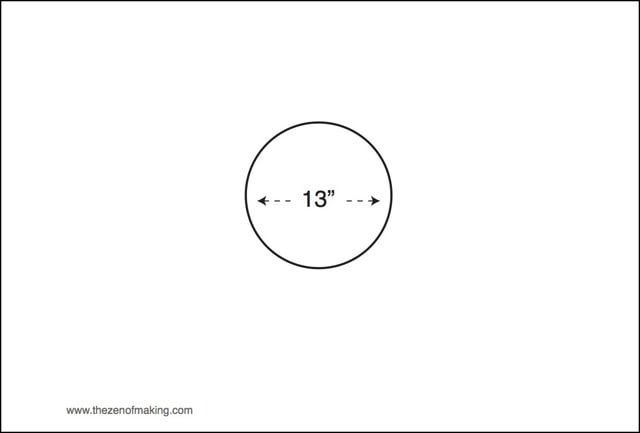
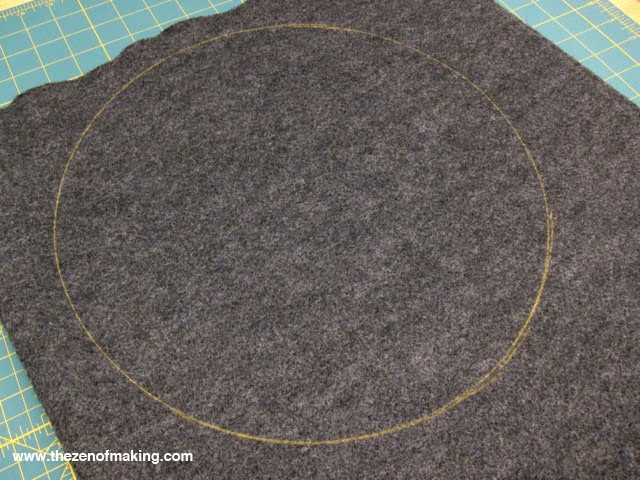
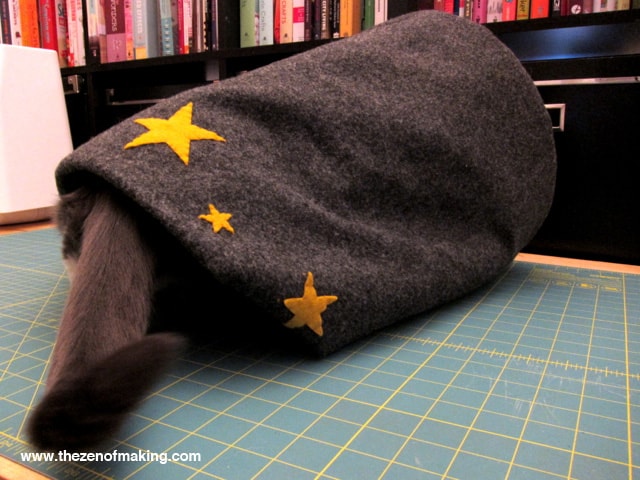
Materials: thick felt fabric, bright fabric for decorative stars, 2 colors of thread - to match the stars and the bag itself, filler, sewing machine, scissors, needle, measuring tape, fabric clips, compass or round shape, pencil, paper, chalk for fabrics.
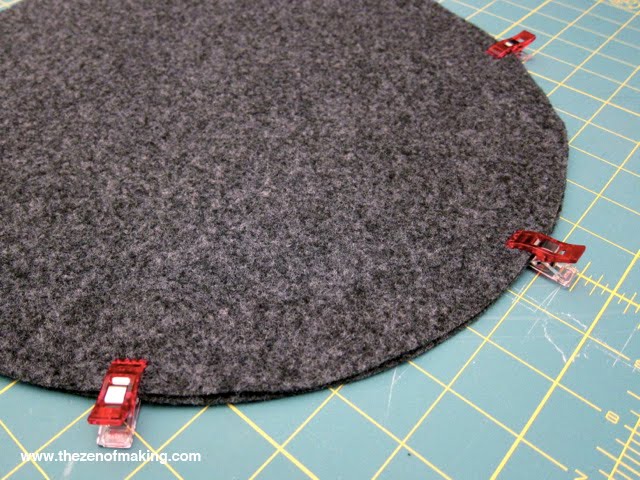
Cut out two circles for the bottom of the bag.
Sew the circles together, leaving a small hole for filling.
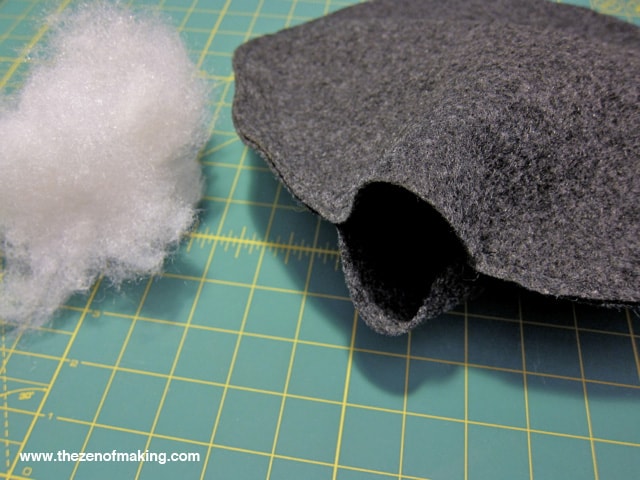
Fill the bottom evenly with filler and sew the hole.
We form the side walls. We take measurements.
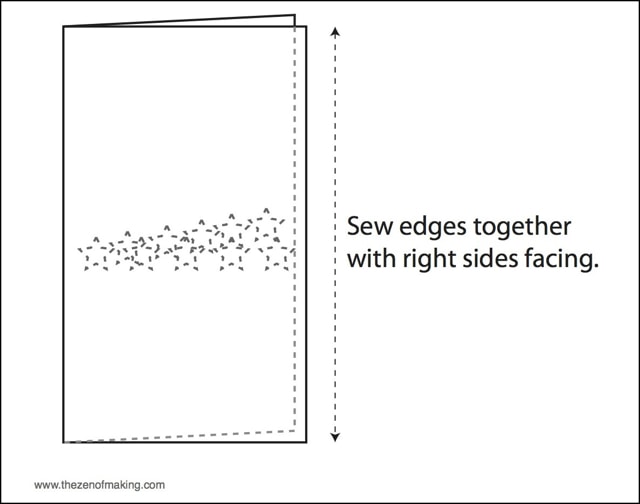
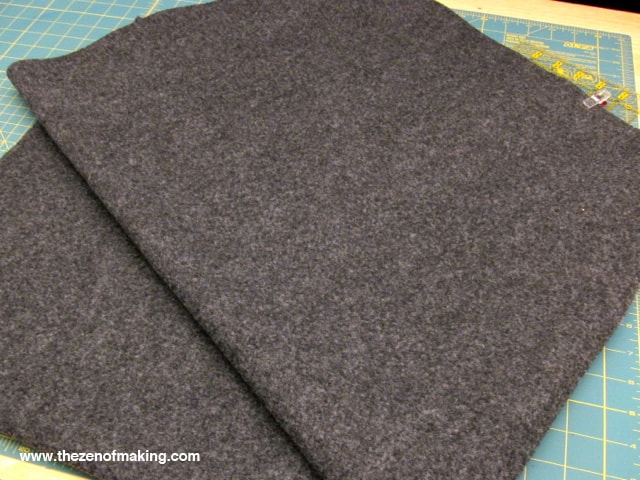
Cut out a large rectangular piece.
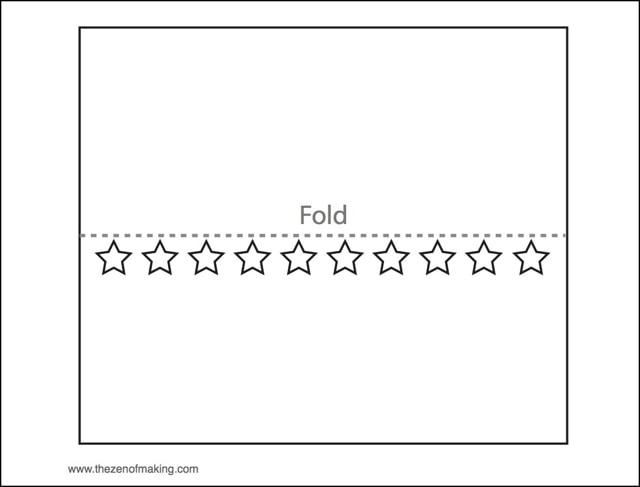
Fold the rectangle in half, and glue decorative stars on the outside just below the bend.
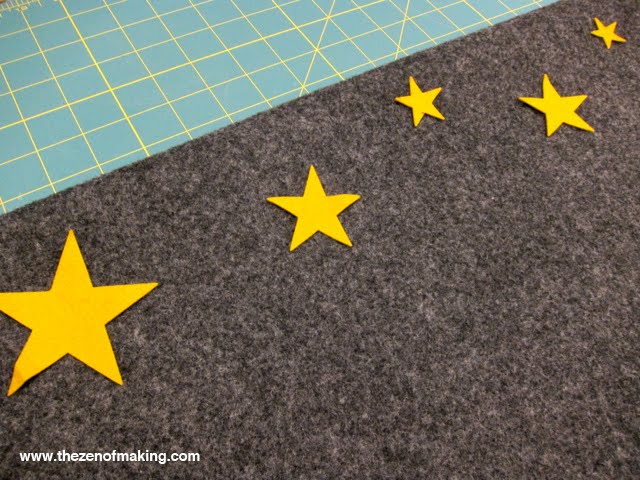
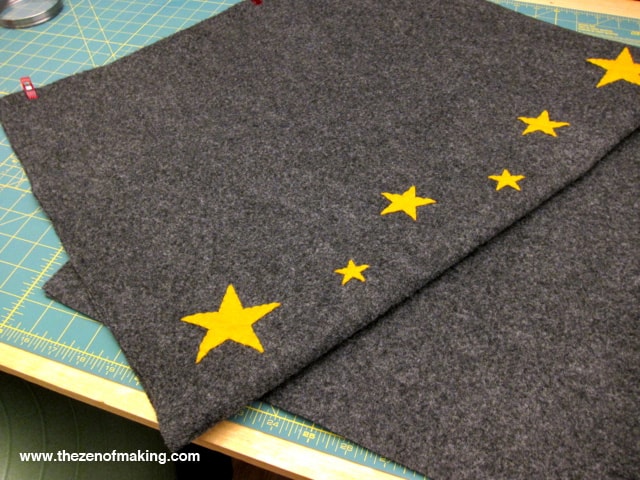
Using three-layer thread, sew the stars to only one side (try not to sew both!)
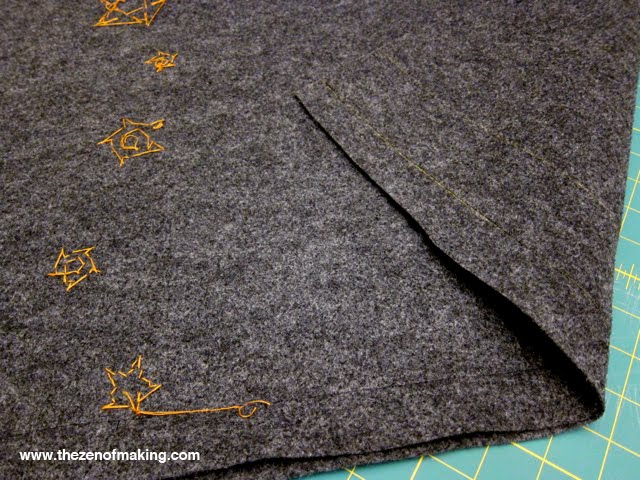
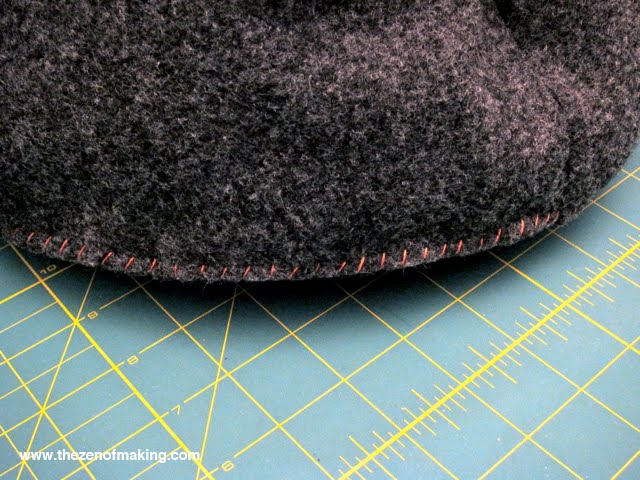
Fold the rectangle in half and sew the edges along the length. Turn the bag inside out, hiding the seam.
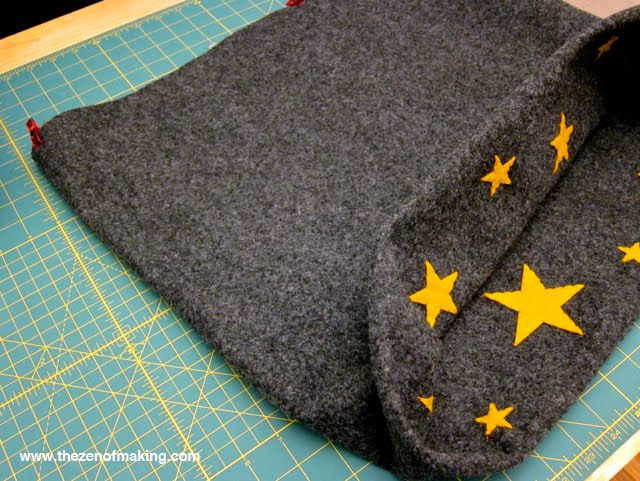
We fasten the pillow to the bottom with clamps.

Sew it to the sides.
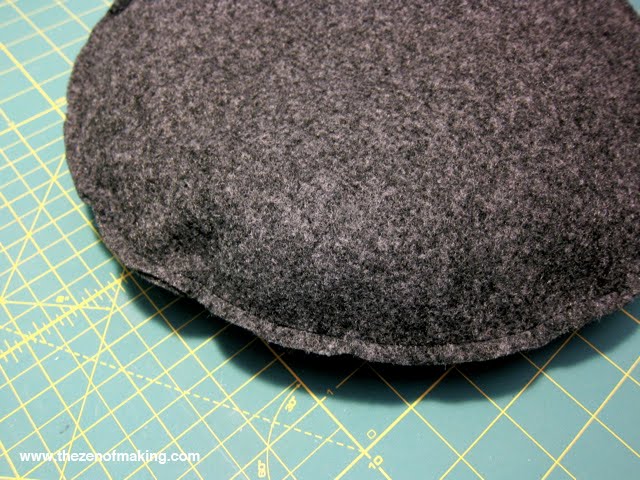
The sleeping bag for the cat is ready. But the most interesting thing is yet to come – the use cases!
Option 1 – cave
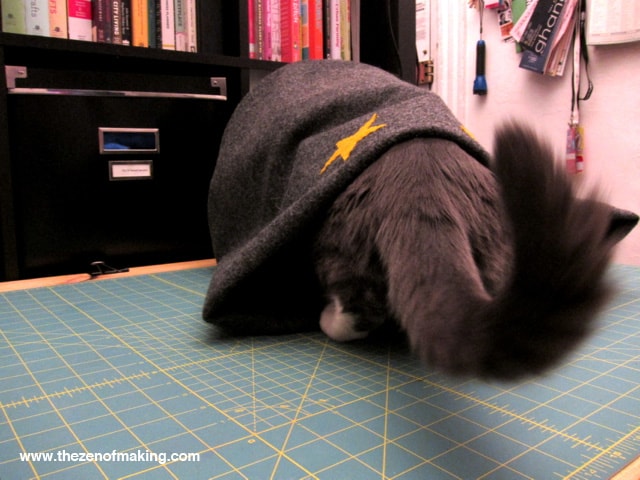
Option 2 – cozy high sleeping bag
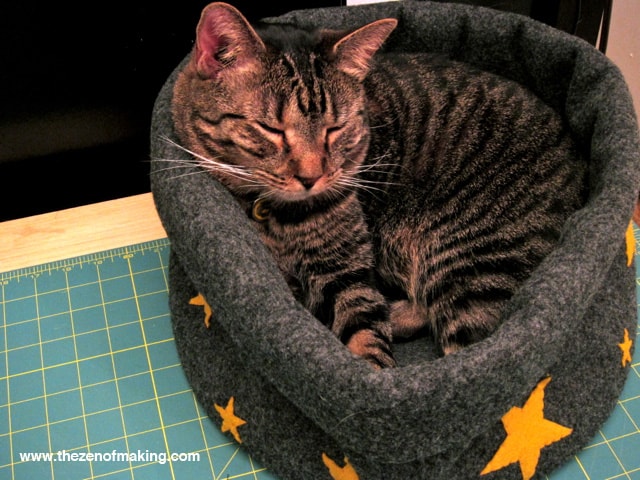
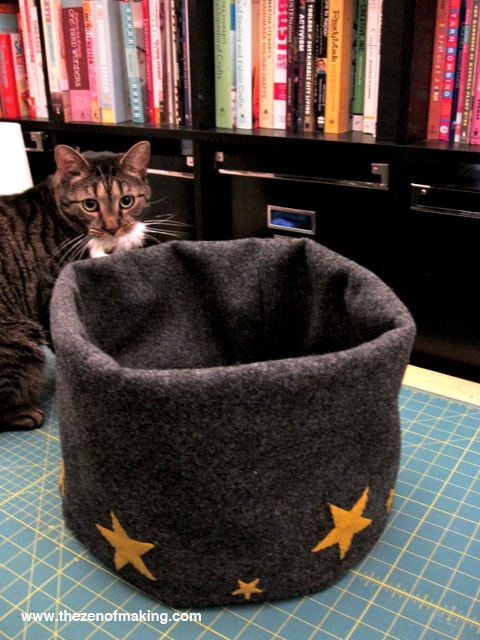
Option 3 – compact chair
Luxurious crib with columns

Let's start with this ordinary table...

... which we will turn into a luxurious cat bed.

Preparatory work
The headboard for the crib will be a finishing plinth, which we will cut to the required size.

We will make the ends of the columns from antique curly handles.

We will make the legs of the crib from wooden pine blocks.

We fasten them with screws and wood glue.

The frame is ready for finishing!


Let's add more beauty using pink marker paint.

We lay out a beautiful mattress and call the main expert!

Tent for a cat
It's no secret that cats love boxes! Why not try making a real tent out of it for your pet? The principle is the same as that of the “solar tent”.

Materials

We collect the box.

We disassemble wire hangers.

We attach the wires obtained from the hangers to the box.

For strength, glue the edges to the box with hot glue.

We fix the top by wrapping it with wire.

All that remains is to put on the T-shirt.

Transforming an old sweater
You can sew a cozy and warm cat bed from an old sweater. Prepare pins, stuffing (eg polyester), pillow, needle, thread and scissors.
Main source material

We sew up the neckline, sew a transverse line between the sleeves (this way we separate the back of the future bed).

We fill the back and sides with polyester.


Sew the cuffs. 
We put the pillow inside.

Sew up the hole and fasten the sleeves to the base with pins.

Sew and remove the pins.

You can brag about the end result!

Two-story building
A full two-story house can also be an excellent design for a cat's home. A minimum of drawing skills, good imagination and cardboard boxes will definitely come in handy in this matter. And a few more details - a knife (or scissors), a ruler, a pencil.
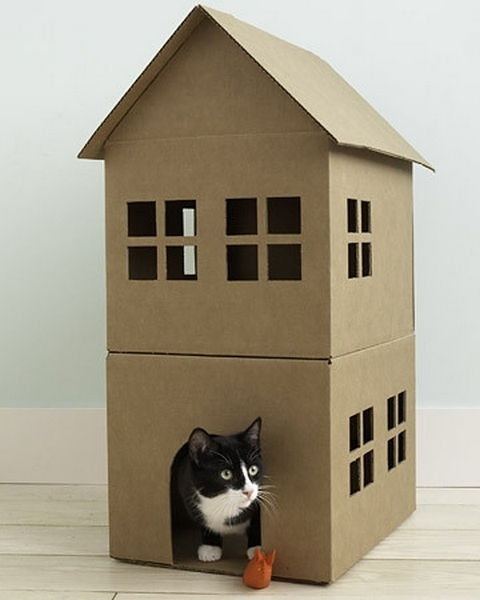
First of all, we cut out the door and windows, then we construct the roof. Glue it to the frame and you can decorate!

Another idea for a funny cardboard house for a cat
Striped tent
If you have a cat “Matroskin” at home, make him such a tent. And then for sure she and your minke will be like two boots.
Comfort cube
This cube house is made of foam rubber, covered with beautiful fabric. The work is not fun, but the result is amazing!
More creative cat house ideas:


Feel free to experiment and implement unusual ideas in such an important project as a cat house. Believe me, not only the main owner will be delighted, but also all the surrounding guests and family members!
Cats are fans of comfort. Since a cat sleeps most of its life (at least 16 hours a day), it is important that it has its own bed. Make a cat house with your own hands. Explore two budget-friendly and simple options.
Do not rush to a store that sells pet products, since such efforts and expenses are unlikely to be appreciated by your pet.
As a rule, cats disdainfully refuse purchased models because of the unusual (alien) smell or materials used to make cat houses.
It is best to equip a house for a cat using available materials and things that are in the house and the smell of which the animal is already accustomed to.
Another mandatory requirement: such structures must be covered, but not closed. Cats are the main ones in the house, so it is important for them to control everything and participate in everything. Even when resting, they closely monitor everything that happens on their territory.
Study the two simplest models that meet these requirements and try to make them yourself:
- House for a cat from an old T-shirt.

If you are wondering how to make a house for a cat and from what, then pay attention to the things that the cat chooses as a rookery. Among them there will definitely be an old T-shirt that you wouldn’t mind presenting to your furry purr.
It's easy to make such a house. For it, in addition to the T-shirt, you will need:
- thick cardboard (from packaging) size 40x40 cm;
- foam;
- old fly towel (1 pc.) or remnants of fabric (old things) measuring 50x50 cm (1 pc.);
- pins;
- wire hangers - 2 pcs.;
- regular and double-sided tape;
- pliers and awl.

Spend about 40 minutes on production. To optimize performance, follow these instructions:
- Apply double-sided tape to the cardboard around the perimeter and center.
- Cut the foam to the size of the cardboard and glue it with tape.
- Also glue an old towel or piece of fabric to the foam rubber with tape.
- To prevent the edges from fraying, fold them down and also secure them with regular tape.
- Remove the hooks from the hangers and bend them so that you get two arcs.
- Use an awl to make holes in the corners of the bed, stepping back 5 cm from the edge, and stretch the rods through them so that they intersect at the top.
- Fold the ends on the reverse side so that the frame does not fall out. Secure the rods with tape in the center.
- Place a T-shirt over the structure. Wrap the edges and sleeves under the cardboard bottom and secure with pins.
Try to ensure that the neck of the T-shirt forms the entrance to the structure. The cat will feel comfortable in such a house.
- House for a cat out of a box.

Boxes are to cats what Disneyland is to children. If there is anything in the house that even remotely resembles this packaging material, you can be sure that the cat, no matter what its size, will definitely settle down to sleep in it.
Satisfy your pet's passion and make him a house out of a box. There are many such models.
Here, as they say, everyone is at their best. The owners have the opportunity to show their imagination and do something extraordinary or stick to a basic model.
The main material at hand is ready-made boxes. Such a house is the best solution to the problem.

If there is a cardboard box in the apartment in which the cat can cozy up, then turn it upside down and use a utility knife to make a hole at the bottom.
If you are planning to make a two-story house, then another hole should be made in the roof of the lower part. This is the cat's way to the second floor.
Secure both parts around the perimeter with tape. Make several windows to provide the house with sufficient ventilation.
Since such structures are not stable, use a sheet of plywood as a “foundation”.
Equip the house with foam beds or warm old sweaters, pants, etc.

A house for a cat can be made from corrugated cardboard. This material makes it possible to show your creativity to the maximum and build a booth in the form of a snail, ball, or cone.
Cats are selfish, so it is important for them to lie down comfortably and comfortably in a secluded corner to sleep. Namely, they spend most of the day doing this activity. A cat house is an excellent solution to the issue of a cat bed.
If your pet needs a house, don’t rush to spend money, look around. Perhaps old things, scrap materials that every home has, will serve the purpose.
How you can make a tent for your pet in five minutes. This cat house is very easy to make. To do this we only need a few things: an old T-shirt, a wire or a couple of wire hangers, a piece of cardboard and tape.
Materials:
The pussy itself
T-shirt in a small size and color of your choice.
A piece of cardboard approximately 40*40 cm
Two wire hangers
Pins
Scotch
Pliers (to shape the wire into the desired shape)
We prepare the wire.
We cut off the hooks on the hangers and straighten them. You don’t have to do this, but the author decided to still devote a little time to this for fun.
Let's deal with wire and cardboard.


We shape the wire into a semicircle; to do this, take the straightened hangers and bend them a little. In our case, the cardboard looks a little ugly, so we decided to refine it. We carefully tape the edges on all sides with tape and get this look. Looks better, doesn't it? This will also give the cardboard a little strength.
Holes for wire

In each corner we make neat holes with a diameter approximately the same as a wire. Don't make them too close to the edge, otherwise your house may not last long.
Fastening the hangers together


We fold the hangers and tie them tightly with adhesive tape exactly in the middle. They must hold on very tightly. Then we place the base of the tent on the cardboard. The ends should fit exactly into the holes we just made.
We bend the ends.


We thread the ends of the tent base through the holes and bend the wire on the back side of the cardboard. The tips should not be very small, because we also need to secure them. We offer tape for securing, as shown in the picture above.
Let's check the basis.

We put the cardboard on the floor and make sure that the wire is fastened securely and strictly in the middle, and that the house itself does not tilt to one side. You can also use pliers to correct the wire a little if it seems to you that it is not even.

If the T-shirt is small, the opposite side can be secured like this:


HOW TO MAKE A HOUSE FROM A BOX AND A T-SHIRT
Similar articles
 The best amulets against the evil eye and damage Amulet against the evil eye with hands for children
 How to read the Psalter correctly
 Delicious dishes with sausages
 A glimpse of Bella. Romantic chronicle. A glimpse of genius. Messerer about Akhmadulina Boris Messerer glimpse of Bella romantic chronicle
 I dreamed that I was sailing on a boat on the river
 How to cook beef entrecote in a frying pan
 About the company Foreign language courses at Moscow State University
 Which city and why became the main one in Ancient Mesopotamia?
 Why Bukhsoft Online is better than a regular accounting program!
 Which year is a leap year and how to calculate it